Epson WorkForce GT-1500 User Manual - Page 40
Scanning in Professional Mode Using the Document Table, Image Type setting
 |
View all Epson WorkForce GT-1500 manuals
Add to My Manuals
Save this manual to your list of manuals |
Page 40 highlights
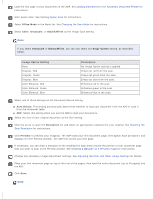
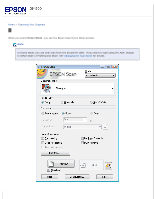
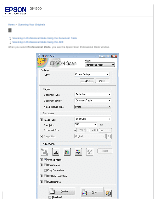
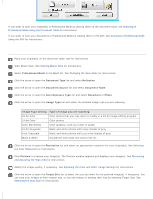
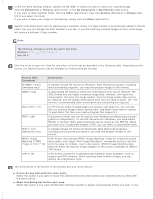
If you want to scan your original(s) in Professional Mode by placing them on the document table, see Scanning in Professional Mode Using the Document Table for instructions. If you want to scan your documents in Professional Mode by loading them in the ADF, see Scanning in Professional Mode Using the ADF for instructions. Scanning in Professional Mode Using the Document Table Place your original(s) on the document table. See for instructions. Start Epson Scan. See Starting Epson Scan for instructions. Select Professional Mode in the Mode list. See Changing the Scan Mode for instructions. Click the arrow to open the Document Type list and select Reflective. Click the arrow to open the Document Source list and select Document Table. Click the arrow to open the Auto Exposure Type list and select Document or Photo. Click the arrow to open the Image Type list and select the detailed image type you are scanning. Image Type setting Type of image you are scanning 48-bit Color Color photos that you may want to modify in a 48-bit image-editing program 24-bit Color Color photos Color Smoothing Color graphics, such as a chart or graph 16-bit Grayscale Black-and-white photos with many shades of gray 8-bit Grayscale Black-and-white photos with just a few shades of gray Black & White Documents with black text and/or line art Click the arrow to open the Resolution list and select an appropriate resolution for your original(s). See Selecting the Scan Resolution for instructions. Click Preview to preview your image(s). The Preview window appears and displays your image(s). See Previewing and Adjusting the Scan Area for instructions. Modify the image quality, if necessary. See Adjusting the Color and Other Image Settings for instructions. Click the arrow to open the Target Size list to select the size you want for the scanned image(s), if necessary. You can scan your images at their original size, or you can reduce or enlarge their size by selecting Target Size. See Selecting the Scan Size for instructions.
-
 1
1 -
2
-
3
-
4
-
5
-
6
-
7
-
8
-
9
-
10
-
11
-
12
-
13
-
14
-
15
-
16
-
17
-
18
-
19
-
20
-
21
-
22
-
23
-
24
-
25
-
26
-
27
-
28
-
29
-
30
-
31
-
32
-
33
-
34
-
 35
35 -
 36
36 -
 37
37 -
 38
38 -
 39
39 -
 40
40 -
 41
41 -
 42
42 -
 43
43 -
 44
44 -
 45
45 -
46
-
47
-
48
-
49
-
50
-
51
-
52
-
53
-
54
-
55
-
56
-
57
-
58
-
59
-
60
-
61
-
62
-
63
-
64
-
65
-
66
-
67
-
68
-
69
-
70
-
71
-
72
-
73
-
74
-
75
-
76
-
77
-
78
-
79
-
80
-
81
-
82
-
83
-
84
-
85
-
86
-
87
-
88
-
89
-
90
-
91
-
92
-
93
-
94
-
95
-
96
-
97
-
98
-
99
-
100
-
101
-
102
-
103
-
104
-
105
-
106
-
107
-
108
-
109
-
110
-
111
-
112
-
113
-
114
-
115
-
116
-
117
-
118
-
119
-
120
-
121
-
122
-
123
-
124
-
125
-
126
-
127
-
128
-
129
-
130
-
131
-
132
-
133
-
134
-
135
-
136
-
137
-
138
-
139
-
140
-
141
-
142
-
143
-
144
-
145
-
146
-
147
-
148
-
149
 |
 |
