Epson WorkForce GT-1500 User Manual - Page 77
Scanning to a PDF File in Home Mode, Close, Document Type, Image Type, Destination, Preview
 |
View all Epson WorkForce GT-1500 manuals
Add to My Manuals
Save this manual to your list of manuals |
Page 77 highlights
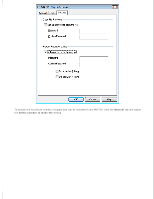
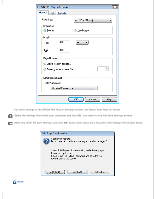
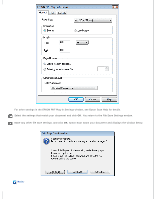
When you have finished editing your pages, click OK. The pages are saved in one PDF file in Pictures, My Pictures, or the location you selected in the File Save Settings window, and you return to the Office Mode window. Click Close to exit Epson Scan. Top Scanning to a PDF File in Home Mode Place your document on the document table. See Placing Documents or Photos for instructions. Note: In Home Mode you can only scan from the document table. If you want to scan using the ADF, change to Office Mode or Professional Mode. See Changing the Scan Mode for details. Start Epson Scan. See Starting Epson Scan for instructions. In the Home Mode window, select the Document Type, Image Type, and Destination settings. For details, see Scanning in Home Mode. Click Preview to preview your image(s), then select your scan area. For details, see Previewing and Adjusting the Scan Area. Make any other necessary image adjustments. See Adjusting the Color and Other Image Settings for details. Size your image as necessary. See Selecting the Scan Size for details. Click Scan. The File Save Settings window appears. Select PDF as the Type setting. The current Paper Size, Orientation, Margin, Page Number, Compression Level, and Text Setting settings are displayed below it.
-
 1
1 -
2
-
3
-
4
-
5
-
6
-
7
-
8
-
9
-
10
-
11
-
12
-
13
-
14
-
15
-
16
-
17
-
18
-
19
-
20
-
21
-
22
-
23
-
24
-
25
-
26
-
27
-
28
-
29
-
30
-
31
-
32
-
33
-
34
-
35
-
36
-
37
-
38
-
39
-
40
-
41
-
42
-
43
-
44
-
45
-
46
-
47
-
48
-
49
-
50
-
51
-
52
-
53
-
54
-
55
-
56
-
57
-
58
-
59
-
60
-
61
-
62
-
63
-
64
-
65
-
66
-
67
-
68
-
69
-
70
-
71
-
 72
72 -
 73
73 -
 74
74 -
 75
75 -
 76
76 -
 77
77 -
 78
78 -
 79
79 -
 80
80 -
 81
81 -
 82
82 -
83
-
84
-
85
-
86
-
87
-
88
-
89
-
90
-
91
-
92
-
93
-
94
-
95
-
96
-
97
-
98
-
99
-
100
-
101
-
102
-
103
-
104
-
105
-
106
-
107
-
108
-
109
-
110
-
111
-
112
-
113
-
114
-
115
-
116
-
117
-
118
-
119
-
120
-
121
-
122
-
123
-
124
-
125
-
126
-
127
-
128
-
129
-
130
-
131
-
132
-
133
-
134
-
135
-
136
-
137
-
138
-
139
-
140
-
141
-
142
-
143
-
144
-
145
-
146
-
147
-
148
-
149
 |
 |