Epson WorkForce Pro GT-S50 User Manual - Page 36
The Add Confirmation window includes the, PICT*.pct Macintosh
 |
View all Epson WorkForce Pro GT-S50 manuals
Add to My Manuals
Save this manual to your list of manuals |
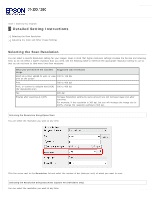
Page 36 highlights
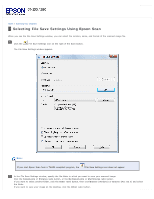
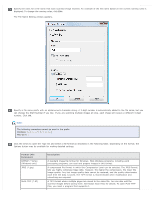
PDF (*.pdf) PICT(*.pct) (Macintosh only) TIFF (*.tif) A document format that can be read on both Windows and Macintosh systems (platform independent). To use PDF documents in Windows, you need Adobe Reader or Acrobat. Multi-page documents can be saved as one PDF file. When you save color or grayscale images in PDF, you can select a Compression Level. A standard image file format for Macintosh. Most Macintosh programs, including word processing programs, can read and prepare images in this format. A file format created for exchanging data between many programs, such as graphic and DTP software. When scanning black & white images, you can specify the Compression type. The check boxes at the bottom of the window give you these options: Overwrite any files with the same name Select this option if you want to reuse the selected file name and location and overwrite previous files with the same names. Show this dialog box before next scan Select this option if you want the File Save Settings window to appear automatically before you scan. If you deselect it, you must click the File Save Settings icon to open the window before clicking the Scan button. Open image folder after scanning Select this option if you want Windows Explorer or the Macintosh Finder to automatically open the folder where your scanned image file is saved when Epson Scan finishes scanning. Show Add Page dialog after scanning Select this option if you want the Add Page Confirmation window to appear automatically after each scan to PDF or multi-Tiff. The Add Page Confirmation window includes the Add page, Edit page, and Save File buttons. Click OK.
-
 1
1 -
2
-
3
-
4
-
5
-
6
-
7
-
8
-
9
-
10
-
11
-
12
-
13
-
14
-
15
-
16
-
17
-
18
-
19
-
20
-
21
-
22
-
23
-
24
-
25
-
26
-
27
-
28
-
29
-
30
-
 31
31 -
 32
32 -
 33
33 -
 34
34 -
 35
35 -
 36
36 -
 37
37 -
 38
38 -
 39
39 -
 40
40 -
 41
41 -
42
-
43
-
44
-
45
-
46
-
47
-
48
-
49
-
50
-
51
-
52
-
53
-
54
-
55
-
56
-
57
-
58
-
59
-
60
-
61
-
62
-
63
-
64
-
65
-
66
-
67
-
68
-
69
-
70
-
71
-
72
-
73
-
74
-
75
-
76
-
77
-
78
-
79
-
80
-
81
-
82
-
83
-
84
-
85
-
86
-
87
-
88
-
89
-
90
-
91
-
92
-
93
-
94
-
95
-
96
-
97
-
98
-
99
-
100
-
101
-
102
-
103
-
104
-
105
-
106
 |
 |