Epson XP-400 User Manual - Page 44
Copying and Restoring Photos, Auto Fit - small in one
 |
View all Epson XP-400 manuals
Add to My Manuals
Save this manual to your list of manuals |
Page 44 highlights
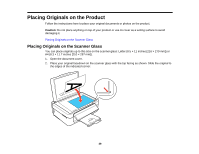
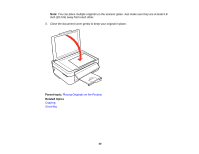
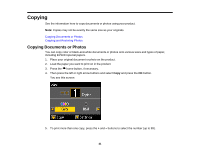
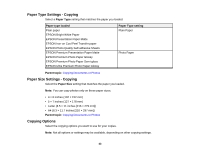
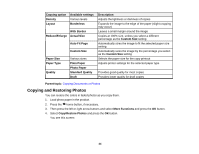
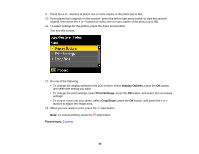
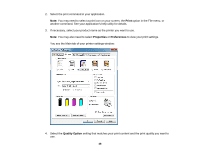
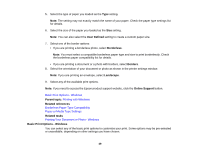
Copying option Density Layout Available settings Various levels Borderless With Border Reduce/Enlarge Actual Size Auto Fit Page Custom Size Paper Size Paper Type Quality Various sizes Plain Paper Photo Paper Standard Quality Draft Description Adjusts the lightness or darkness of copies Expands the image to the edge of the paper (slight cropping may occur) Leaves a small margin around the image Copies at 100% size, unless you select a different percentage as the Custom Size setting Automatically sizes the image to fit the selected paper size setting Automatically sizes the image by the percentage you select as the Custom Size setting Selects the paper size for the copy printout Adjusts printer settings for the selected paper type Provides good quality for most copies Provides lower quality for draft copies Parent topic: Copying Documents or Photos Copying and Restoring Photos You can restore the colors in faded photos as you copy them. 1. Load photo paper in the product. 2. Press the home button, if necessary. 3. Then press the left or right arrow buttons and select More Functions and press the OK button. 4. Select Copy/Restore Photos and press the OK button. You see this screen: 44
-
 1
1 -
2
-
3
-
4
-
5
-
6
-
7
-
8
-
9
-
10
-
11
-
12
-
13
-
14
-
15
-
16
-
17
-
18
-
19
-
20
-
21
-
22
-
23
-
24
-
25
-
26
-
27
-
28
-
29
-
30
-
31
-
32
-
33
-
34
-
35
-
36
-
37
-
38
-
 39
39 -
 40
40 -
 41
41 -
 42
42 -
 43
43 -
 44
44 -
 45
45 -
 46
46 -
 47
47 -
 48
48 -
 49
49 -
50
-
51
-
52
-
53
-
54
-
55
-
56
-
57
-
58
-
59
-
60
-
61
-
62
-
63
-
64
-
65
-
66
-
67
-
68
-
69
-
70
-
71
-
72
-
73
-
74
-
75
-
76
-
77
-
78
-
79
-
80
-
81
-
82
-
83
-
84
-
85
-
86
-
87
-
88
-
89
-
90
-
91
-
92
-
93
-
94
-
95
-
96
-
97
-
98
-
99
-
100
-
101
-
102
-
103
-
104
-
105
-
106
-
107
-
108
-
109
-
110
-
111
-
112
-
113
-
114
-
115
-
116
-
117
-
118
-
119
-
120
-
121
-
122
-
123
-
124
-
125
-
126
-
127
-
128
-
129
-
130
-
131
-
132
-
133
-
134
-
135
-
136
-
137
-
138
-
139
-
140
-
141
-
142
-
143
-
144
-
145
-
146
-
147
-
148
-
149
-
150
-
151
-
152
-
153
-
154
-
155
-
156
-
157
-
158
-
159
-
160
-
161
-
162
-
163
-
164
-
165
-
166
-
167
-
168
-
169
-
170
-
171
-
172
-
173
-
174
-
175
-
176
-
177
-
178
-
179
-
180
-
181
-
182
-
183
-
184
-
185
-
186
-
187
-
188
-
189
-
190
-
191
-
192
-
193
-
194
-
195
-
196
-
197
-
198
-
199
-
200
-
201
-
202
-
203
-
204
-
205
-
206
-
207
-
208
-
209
-
210
-
211
-
212
-
213
-
214
-
215
-
216
-
217
-
218
-
219
-
220
 |
 |
