Epson XP-400 User Manual - Page 94
Selecting a Scan Area - Office Mode
 |
View all Epson XP-400 manuals
Add to My Manuals
Save this manual to your list of manuals |
Page 94 highlights
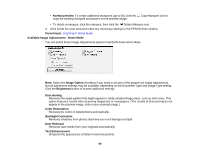
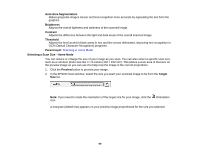
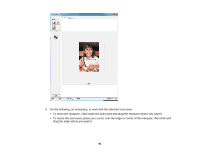
EPSON Scan previews your original and displays the result in a separate Preview window. 7. If desired, select the area in your preview image that you want to scan (scanned image area). 8. Select any of the image adjustment settings you want to use. Before making adjustments, click the image or scanned image area in the Preview window. 9. Click Scan. You see the File Save Settings window. 10. Change any of the necessary file save settings and click OK. EPSON Scan scans your original, and saves the file in the selected folder or opens it in your scanning program. If the file was saved directly to your computer, you see the file in the Windows Explorer or Mac OS X Finder, where you can view and print the image, if desired. Selecting a Scan Area - Office Mode Available Image Adjustments - Office Mode Parent topic: Selecting EPSON Scan Settings Related concepts Scan Resolution Guidelines Related tasks Selecting Scan File Settings Selecting a Scan Area - Office Mode You can select a specific area in your preview image to include in your scanned image. You can select the entire image area or a portion of it. You can even select multiple scan areas to create multiple scanned images of different areas. You can also use the scan area to select specific Image Adjustments settings for a scanned image. Just be sure to click inside the scan area before selecting the settings. 94
-
 1
1 -
2
-
3
-
4
-
5
-
6
-
7
-
8
-
9
-
10
-
11
-
12
-
13
-
14
-
15
-
16
-
17
-
18
-
19
-
20
-
21
-
22
-
23
-
24
-
25
-
26
-
27
-
28
-
29
-
30
-
31
-
32
-
33
-
34
-
35
-
36
-
37
-
38
-
39
-
40
-
41
-
42
-
43
-
44
-
45
-
46
-
47
-
48
-
49
-
50
-
51
-
52
-
53
-
54
-
55
-
56
-
57
-
58
-
59
-
60
-
61
-
62
-
63
-
64
-
65
-
66
-
67
-
68
-
69
-
70
-
71
-
72
-
73
-
74
-
75
-
76
-
77
-
78
-
79
-
80
-
81
-
82
-
83
-
84
-
85
-
86
-
87
-
88
-
 89
89 -
 90
90 -
 91
91 -
 92
92 -
 93
93 -
 94
94 -
 95
95 -
 96
96 -
 97
97 -
 98
98 -
 99
99 -
100
-
101
-
102
-
103
-
104
-
105
-
106
-
107
-
108
-
109
-
110
-
111
-
112
-
113
-
114
-
115
-
116
-
117
-
118
-
119
-
120
-
121
-
122
-
123
-
124
-
125
-
126
-
127
-
128
-
129
-
130
-
131
-
132
-
133
-
134
-
135
-
136
-
137
-
138
-
139
-
140
-
141
-
142
-
143
-
144
-
145
-
146
-
147
-
148
-
149
-
150
-
151
-
152
-
153
-
154
-
155
-
156
-
157
-
158
-
159
-
160
-
161
-
162
-
163
-
164
-
165
-
166
-
167
-
168
-
169
-
170
-
171
-
172
-
173
-
174
-
175
-
176
-
177
-
178
-
179
-
180
-
181
-
182
-
183
-
184
-
185
-
186
-
187
-
188
-
189
-
190
-
191
-
192
-
193
-
194
-
195
-
196
-
197
-
198
-
199
-
200
-
201
-
202
-
203
-
204
-
205
-
206
-
207
-
208
-
209
-
210
-
211
-
212
-
213
-
214
-
215
-
216
-
217
-
218
-
219
-
220
 |
 |
