Eureka LightSpeed 4700D Owners Manual - Page 16
FIG. 13, FIG. 14, FIG. 15 - filter
 |
View all Eureka LightSpeed 4700D manuals
Add to My Manuals
Save this manual to your list of manuals |
Page 16 highlights
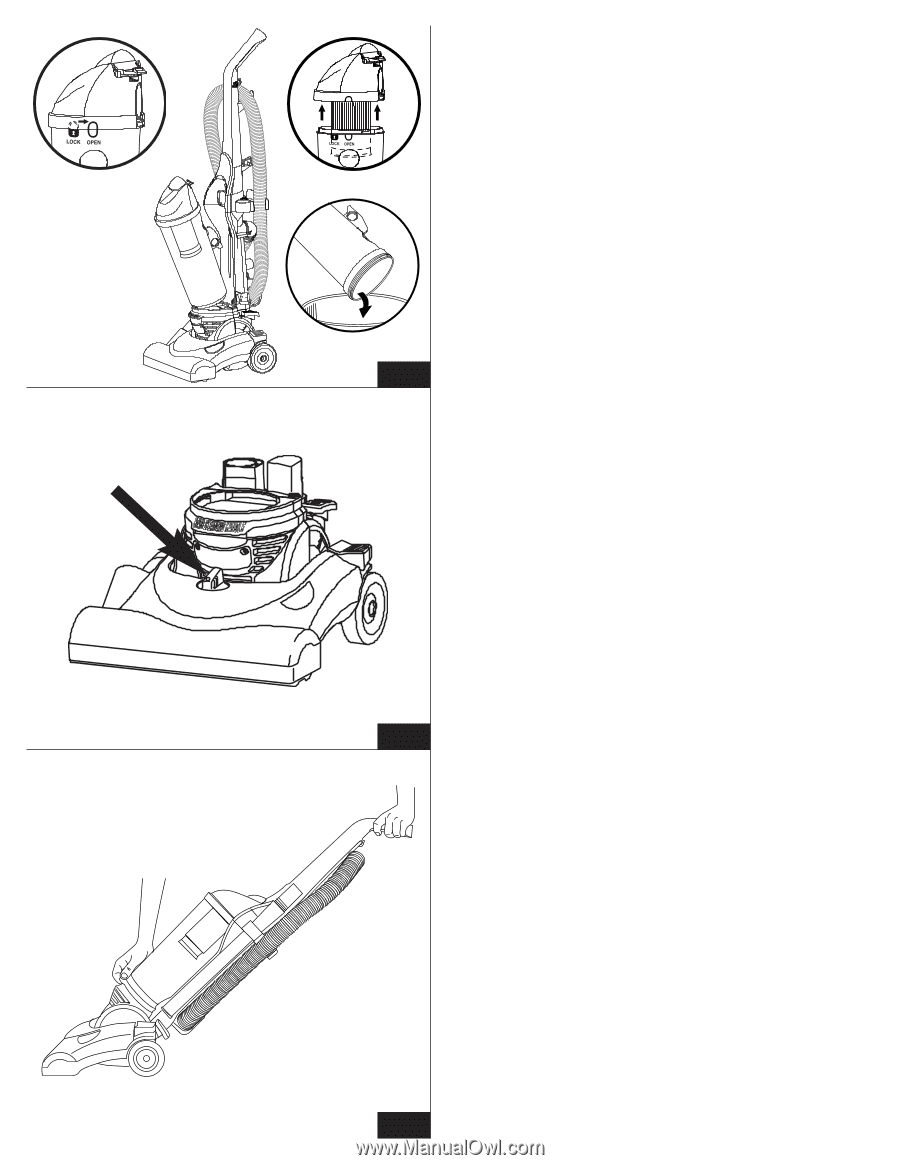
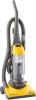
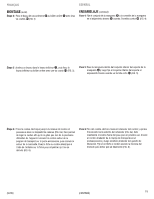
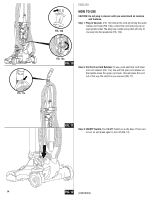
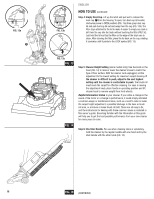
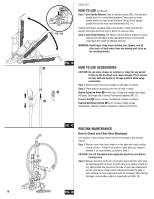
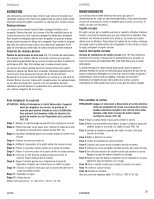
FIG. 13a ●F FIG. 13b ENGLISH HOW TO USE (continued) Step 4: Empty Dust Cup. Lift up the latch and pull out to release the dust cup ●F from the housing. To open, turn dust cup lid counter clockwise (move to OPEN position) (FIG. 13a) then grasp dust cup lid and pull dust cup lid out and away from the cup (FIG. 13b). The filter stays attached to the lid to make it easier to empty any dust or dirt from the cup into the trash without touching the filter (FIG.13c). Just hold the lid and tap the filter on the edge of the trash can to clean. After cleaning the filter, place the lid back on the cup, rotating it clockwise until it points to the LOCK symbol (FIG. 13). FIG. 13c FIG. 13 FIG. 14 Step 5: Cleaner Height Setting (some models only). Use the knob on the hood (FIG. 14) to raise or lower the cleaner's base to match the type of floor surface. With the cleaner cord unplugged, set the adjustment to the lowest setting for maximum carpet cleaning. If the cleaner is difficult to push, adjust to the next highest setting until the cleaner is comfortable to push. The brush roll must reach the carpet for effective cleaning. For ease in moving the adjustment knob, place handle in operating position and tilt cleaner back to remove weight from front wheels. Helpful Information: Listen to your cleaner. If you notice a change in the sound of the motor or a change in performance, it could simply indicated a common usage or maintenance issue, such as a need to raise or lower the carpet height adjustment, a possible blockage in the hose or brush roll area, or a broken or loose brush roll belt. These are all easy to fix, and the instructions for dealing with these common issues is included in this owner's guide. Becoming familiar with the information in this guide will help you to get the best possible performance from your new cleaner for many years to come. Step 6: Use Stair Handle. For use when cleaning stairs or upholstery, hold the cleaner by the regular handle with one hand and by the stair handle with the other hand (FIG. 15). 16 FIG. 15 (CONTINUED)
-
 1
1 -
2
-
3
-
4
-
5
-
6
-
7
-
8
-
9
-
10
-
 11
11 -
 12
12 -
 13
13 -
 14
14 -
 15
15 -
 16
16 -
 17
17 -
 18
18 -
 19
19 -
 20
20 -
 21
21 -
22
-
23
-
24
-
25
-
26
-
27
-
28
-
29
-
30
-
31
-
32
-
33
-
34
-
35
-
36
 |
 |