Eureka LightSpeed 4700D Owners Manual - Page 8
How To Assemble - parts
 |
View all Eureka LightSpeed 4700D manuals
Add to My Manuals
Save this manual to your list of manuals |
Page 8 highlights
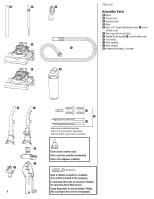
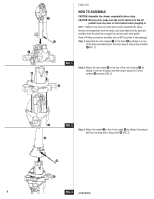
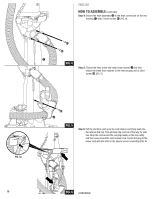
●E ●K1 ●I ●K2 ENGLISH HOW TO ASSEMBLE CAUTION: Assemble the cleaner completely before using. CAUTION: Moving parts, make sure the on/off switch is in the off position and stay clear of the brushroll when plugging in. NOTE: Features may vary by model yet all parts assemble the same. Remove all components from the carton and check that all of the parts are available from the parts list on page 6 (or see the quick start guide). Have a Phillips screwdriver available (one is NOT provided in the package) Step 1: Assemble the rear housing ●I to the base ●E by sliding it on top of the base and attaching to the base using a long screw provided ●K2 (FIG. 1). FIG. 1 Step 2: Attach the tool caddy ●H to the top of the rear housing ●I by ●K1 sliding it onto the housing, and then attach using the 2 short screws ●K1 provided (FIG. 2). ●H ●I ●G FIG. 2 Step 3: Attach the handle ●G to top of tool caddy ●H by sliding it downward and then securing with a long screw ●K2 (FIG. 3). ●K2 ●H 8 FFIIGG..136 (CONTINUED)
-
 1
1 -
2
-
 3
3 -
 4
4 -
 5
5 -
 6
6 -
 7
7 -
 8
8 -
 9
9 -
 10
10 -
 11
11 -
 12
12 -
 13
13 -
14
-
15
-
16
-
17
-
18
-
19
-
20
-
21
-
22
-
23
-
24
-
25
-
26
-
27
-
28
-
29
-
30
-
31
-
32
-
33
-
34
-
35
-
36
 |
 |
