Fluke 576 FE 576 Users Manual - Page 10
Using the Camera, How to use the camera, The unit is ready to use now. It is preset
 |
View all Fluke 576 manuals
Add to My Manuals
Save this manual to your list of manuals |
Page 10 highlights
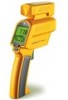
576 Using the Camera In addition to the thermometer functionality the Model 576 comes with a digital built-in camera to documentate the measured places. The pictures include the measured values and additional information. the additional information is customizable via the IRGraph software. How to use the camera 1. To switch on the unit, pull the trigger. 2. Press the "Enter" button to activate the camera while the display is active. 3. First the word "LOG" flashes and then the camera icon appears. The unit is ready to use now. It is preset to take 26 high-resolution (640x480 pixel) pictures. 4. Pull the trigger and hold it. The laser circle shows where you are measuring. 5. Aim at the target. Be sure that the laser sighting is inside the target. 6. Gently release the trigger to record the photo and the temperature. Successful recording of picture and temperature is indicated by two short beeps and a green blinking LED above the display. The next location will be shown on the display. Caution: If you hear a longer beep and the LED above the display is shining red, look at the display. If you see "Use Flash!" and a flash symbol, repeat your last measurement. A green LED above the camera symbol 10
-
 1
1 -
2
-
3
-
4
-
 5
5 -
 6
6 -
 7
7 -
 8
8 -
 9
9 -
 10
10 -
 11
11 -
 12
12 -
 13
13 -
 14
14 -
 15
15 -
16
-
17
-
18
-
19
-
20
-
21
-
22
-
23
-
24
-
25
-
26
-
27
-
28
-
29
-
30
-
31
-
32
-
33
 |
 |
