Fluke 985 Fluke 985 - Airborne Particle Counter - Manual - Page 17
How to Take a Sample, Navigation Menu, Table 6. Main Menu Icons, Menu Item - particle counter software
 |
View all Fluke 985 manuals
Add to My Manuals
Save this manual to your list of manuals |
Page 17 highlights
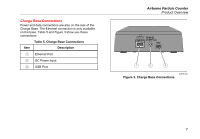
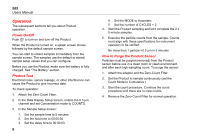
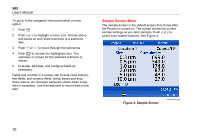
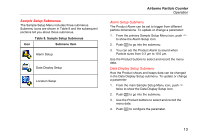
How to Take a Sample Before you take a sample, make sure that you remove the protective cap. To take a sample, select the Sample screen and push . The Product samples with values in the Sample Setup menu. To stop a sample, let the sample procedure complete or push again. See the "Sample Setup Menu" section to set the sample values. Navigation Menu The navigation menu lets you move through the five different sections of the Product software. To go to the Navigation menu, push . The live navigation icon in the middle of the screen is larger and brighter than the other icons. There are five main menus. See Table 6.The Sample Setup and Communication Setup menus also have submenus. See the "Sample Setup Submenus" section. Airborne Particle Counter Operation Icon Table 6. Main Menu Icons Menu Item Sample Screen Buffered Data Screen Sample Setup Communication Setup Trend Data 9
-
 1
1 -
2
-
3
-
4
-
5
-
6
-
7
-
8
-
9
-
10
-
11
-
 12
12 -
 13
13 -
 14
14 -
 15
15 -
 16
16 -
 17
17 -
 18
18 -
 19
19 -
 20
20 -
 21
21 -
 22
22 -
23
-
24
-
25
-
26
-
27
-
28
-
29
-
30
-
31
-
32
 |
 |