Fluke ii910 Product Manual - Page 13
Capture Analysis Mode
 |
View all Fluke ii910 manuals
Add to My Manuals
Save this manual to your list of manuals |
Page 13 highlights
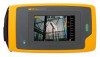
MyFlukeStore.com 1.888.610.7664 Shop for Fluke products online at: www. Capture Analysis Mode When you select the LeakQ™ capture mode, the Imager is able to capture the leak data for later use to evaluate the type of leak (quick-disconnect, threaded coupling, hose, open end) and estimate the size of the leak. The ii910 also includes the PDQ Mode™ that can capture and store partial discharge data to estimate the type of partial discharge (corona, surface/tracking, arcing, and void). The data includes information for later use to create pulse phase diagrams. To select the capture analysis mode: 1. Open the tool menu. 2. Tap the Capture Mode icon to open the Capture Mode menu. 3. Tap for the LeakQ mode. The icon on the tool menu and the display change to show the selected mode. ii910 only: 4. Tap for the PDQ-MODE. Online tools and calculators are available to create reports with data captures that use the LeakQ and PDQ modes. Acoustic Imager Menus LeakQ™ LeakQ mode automatically determines the distance to the target (a leak that shows inside the circle on the display). When a leak is detected and the Imager can determine the distance, the LeakQ value on the display gives an indication of the size of the leak. The value is based on the measured dB SPL value and the distance. If a leak shows inside the circle on the display: • Values for DISTANCE and LeakQ Scale show on the display. or • NO TARGET FOUND shows on the display when no leak is detected inside the circle. If the Imager cannot automatically determine the distance, this pop-up message shows on the display: UNABLE TO ESTIMATE DISTANCE If the Imager is unable to determine the distance, or you want to override the estimated distance, you can input the distance manually. To input the distance manually: 1. Tap on the message to open a numeric screen and enter the distance. The Imager uses the entered distance to calculate the LeakQ values. Note Stabilize the Imager for a few moments as it calculates the values. 2. Press the Capture button to make a more precise calculation. 3. If the measured distance requires additional adjustment, tap the Distance box to update. 9
-
 1
1 -
2
-
3
-
4
-
5
-
6
-
7
-
 8
8 -
 9
9 -
 10
10 -
 11
11 -
 12
12 -
 13
13 -
 14
14 -
 15
15 -
 16
16 -
 17
17 -
 18
18 -
19
-
20
-
21
-
22
 |
 |
