Foxconn A7DA-S 3.0 English Manual. - Page 88
RAID Enable in BIOS, 3 Select a RAID Array for Use
 |
View all Foxconn A7DA-S 3.0 manuals
Add to My Manuals
Save this manual to your list of manuals |
Page 88 highlights
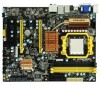
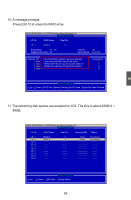
5 5-2 RAID Enable in BIOS 1. Enter the BIOS setup by pressing key when boot up. 2. Select the "Integrated Peripherals" from the "Main menu", then select the "IDE Configuration" menu and press to go to the configuration items. 3. Enable RAID function and individual SATA port for hard drive or DVD connection. 4. Press to save the setting then PC will reboot itself. CMOS Setup Utility - Copyright (C) 1985-2006, American Megatrends, Inc. IDE Configuration IDE Configuration Help Item OnBoard PCI IDE Controller OnChip SATA Channel OnChip SATA Type SATA IDE Combined Mode [Enabled] Options [Enabled] I Native IDE [RAID] RAID [Enabled] AHCI Legacy IDE Move Enter:Select +/-/:Value F10:Save ESC:Exit F1:General Help F9:Optimized Defaults 5-3 Select a RAID Array for Use When BIOS is restarted, it will display a message asking you to press [Ctrl-F] key to enter the main menu of Option ROM Utility. Press [Ctrl-F], the Main Menu appears. Option ROM Utility (c) 2008 Advanced Micro Devices, Inc. [ Main Menu ] View Drive Assignment 1 ] Define LD 2 ] Delete LD 3 ] Controller Configuration 4 ] [ Keys Available ] Press 1..4 to Select Option [ESC] Exit 81
-
 1
1 -
2
-
3
-
4
-
5
-
6
-
7
-
8
-
9
-
10
-
11
-
12
-
13
-
14
-
15
-
16
-
17
-
18
-
19
-
20
-
21
-
22
-
23
-
24
-
25
-
26
-
27
-
28
-
29
-
30
-
31
-
32
-
33
-
34
-
35
-
36
-
37
-
38
-
39
-
40
-
41
-
42
-
43
-
44
-
45
-
46
-
47
-
48
-
49
-
50
-
51
-
52
-
53
-
54
-
55
-
56
-
57
-
58
-
59
-
60
-
61
-
62
-
63
-
64
-
65
-
66
-
67
-
68
-
69
-
70
-
71
-
72
-
73
-
74
-
75
-
76
-
77
-
78
-
79
-
80
-
81
-
82
-
 83
83 -
 84
84 -
 85
85 -
 86
86 -
 87
87 -
 88
88 -
 89
89 -
 90
90 -
 91
91 -
 92
92 -
 93
93 -
94
-
95
-
96
-
97
-
98
-
99
-
100
-
101
-
102
-
103
-
104
-
105
-
106
-
107
-
108
-
109
-
110
-
111
-
112
 |
 |