Frigidaire FGGF3685TS Installation Instructions - Page 7
Electrical Requirements, Cabinet Construction
 |
View all Frigidaire FGGF3685TS manuals
Add to My Manuals
Save this manual to your list of manuals |
Page 7 highlights
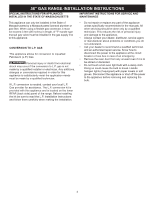
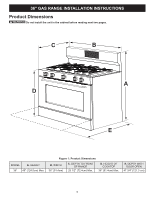
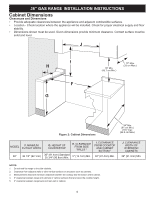
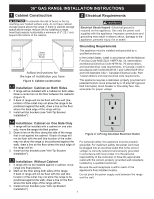
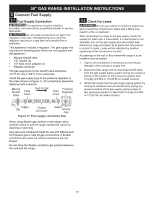
36" GAS RANGE INSTALLATION INSTRUCTIONS 1 Cabinet Construction 2 Electrical Requirements To eliminate the risk of burns or fire by reaching over heated surface units, do not have cabinet storage space above the range. If there is cabinet storage space above range, reduce risk by installing a range hood that projects horizontally a minimum of 5" (12.7 cm) beyond the bottom of the cabinet. Electrical Shock Hazard -Electrical ground is required on this appliance. Use only the power cord supplied with the appliance. Improper connections and grounding may result in electric shock, damage to the appliance, personal injury, fire or death. Center Line of Range Follow instructions for the type of installation you have Figure 3: Cabinet construction 1.1 Installation: Cabinet on Both Sides 1. If range will be installed with a cabinet on both sides, Draw a center line on the floor between the cabinets (Figure 3). 2. If back of range will not be flush with the wall (the location of the outlet may not allow the range to be positioned against the wall), draw a line on the floor where the back edge of the range will be. 3. Install anti-tip brackets (see "Anti-Tip Bracket Installation"). Grounding Requirements This appliance must be installed and grounded by a qualified technician. In the United States, install in accordance with the National Fuel Gas Code ANSI Z223.1/NPFA No. 54, latest edition and National Electrical Code NFPA No. 70 latest edition, and local electrical code requirements. In Canada, install in accordance with CAN/CGA B149.1 and CAN/CGA B149.2 and CSA Standard C22.1, Canadian Electrical code, Part 1-latest editions and local electrical code requirements. This appliance requires a dedicated, properly grounded and polarized branch circuit protected by a 15 amp GFI (ground fault interrupter) circuit breaker or time delay fuse. See serial plate for proper voltage. 1.2 Installation: Cabinet on One Side Only 1. If range will be installed with a cabinet on one side only, move the range into final position. 2. Draw a line on the floor along the side of the range that is not against the cabinet. If back of range will Figure 4: 3-Prong Gounded Electrical Outlet not be flush with the wall (the location of the outlet may not allow the range to be positioned against the For personal safety, this appliance must be properly wall), draw a line on the floor where the back edge of grounded. For maximum safety, the power cord must the range will be. be plugged into an electrical outlet that is the correct 3. Install anti-tip brackets (see "Anti-Tip Bracket voltage, is correctly polarized and properly grounded Installation"). in accordance with local codes. It is the personal responsibility of the consumer to have the appropriate 1.3 Installation: Without Cabinet 1. If range will not be installed against a cabinet, move range into final position. 2. Mark on the floor along both sides of the range. outlet with the correct, properly grounded wall receptacle installed by a qualified electrician. Be sure the wall receptacle is within reach of the appliance's final installed location. If back of range will not be flush with the wall (the Do not pinch the power supply cord between the range location of the outlet may not allow the range to be and the wall. positioned against the wall), draw a line on the floor where the back edge of the range will be. 3. Install anti-tip brackets (see "Anti-Tip Bracket Installation"). 7
-
 1
1 -
 2
2 -
 3
3 -
 4
4 -
 5
5 -
 6
6 -
 7
7 -
 8
8 -
 9
9 -
 10
10 -
 11
11 -
 12
12 -
13
-
14
-
15
-
16
-
17
-
18
-
19
-
20
-
21
-
22
-
23
-
24
-
25
-
26
-
27
-
28
-
29
-
30
-
31
-
32
-
33
-
34
-
35
-
36
-
37
-
38
-
39
-
40
-
41
-
42
-
43
-
44
-
45
-
46
-
47
-
48
 |
 |
