Fujitsu 4120C Operating Guide
Fujitsu 4120C - fi - Document Scanner Manual
 |
UPC - 097564304286
View all Fujitsu 4120C manuals
Add to My Manuals
Save this manual to your list of manuals |
Fujitsu 4120C manual content summary:
- Fujitsu 4120C | Operating Guide - Page 1
P3PC-E007-01EN fi-4120C Image Scanner Operator's Guide - Fujitsu 4120C | Operating Guide - Page 2
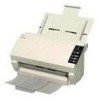
INTRODUCTION Thank you for buying the fi-4120C Duplex Color Scanner. The fi-4120C scanner is capable of scanning color images on both sides, and has the following features. I Easy Scanning and Display The ADF (Automatic Document Feeder) allows you to scan A4-size duplex color documents at a high - Fujitsu 4120C | Operating Guide - Page 3
describes how to scan various types of documents. 5 DAILY CARE This chapter describes how to clean the scanner. 6 REPLACING CONSUMABLES This chapter describes how to replace scanner consumables. 7 TROUBLESHOOTING This chapter describes how to remedy document jams, other trouble, items to check - Fujitsu 4120C | Operating Guide - Page 4
describes the required document size and paper quality for ensuring correct operation of the ADF. 9 SCANNER SPECIFICATION This chapter lists the scanner specifications. We hope that this manual is useful in taking full advantage of the fi-4120C Duplex Color Scanner's advantages. April, 2002 iii - Fujitsu 4120C | Operating Guide - Page 5
to Part 15 of the FCC Rules. These limits are designed to provide reasonable protection against harmful interference in a residential installation. This equipment generates, uses, and can radiate radio frequency energy and, if not installed and used in accordance with the instruction manual, may - Fujitsu 4120C | Operating Guide - Page 6
device is prohibited. The length of the parallel interface cable must be 3 meters (10 feet) or less. The length of the serial interface cable must be 15 feet) or less. • The length of the AC cable must be 3 meters (10 feet) or less. This Class B digital apparatus complies with Canadian ICES-003. - Fujitsu 4120C | Operating Guide - Page 7
Bescheimigung des Herstellers / Importeurs Hiermit wird bescheinigt, daß der/dieldas • fi-4120C in Übereinsstimmung mit den Bestimmungen der • AmtsblVfg 243/1991 funkentstört ist. Der Deutschen Bundesport wurde das Inverkehrbringen dieses Gerätes angezeigt und die Berechtigung - Fujitsu 4120C | Operating Guide - Page 8
to life and health when an extremely high degree of safety is required, for example, in the control of nuclear reactions at nuclear power facilities, automatic flight control of aircraft, air traffic control, operation control in mass-transport systems, medical equipment for sustaining life, and - Fujitsu 4120C | Operating Guide - Page 9
: • Put the substance in the lamp into mouth as it contains mercury. • Vaporize, crumb, condense the scanner. • Aspirate the chemical liquid containd in scanner parts. Dispose of the scanner should be conducted as required by local ordinances or regulations. Illegal Copying Copying of bank notes - Fujitsu 4120C | Operating Guide - Page 10
Edition operating system. Windows® 2000: Refers to Microsoft® Windows® 2000 Professional operating system. Windows® XP: Refers to Microsoft® Windows® XP Professional operating system, and Microsoft® Windows® XP Home Edition operating system Windows NT®: Refers to Microsoft® Windows NT® operating - Fujitsu 4120C | Operating Guide - Page 11
you start to use this product. In particular, be sure to read and fully understand the Safety Precautions described in this manual before you use this product. Also, store this manual in a safe place so that it can be easily referred to during use of this product. Warning Indications Used In This - Fujitsu 4120C | Operating Guide - Page 12
Symbols Used In This Manual This manual uses the following symbols in explanations in addition to .The drawing inside or under the circle shows the specific action that is not allowed. Outline characters on a colored background shows instructions users should follow. It may include the drawing which - Fujitsu 4120C | Operating Guide - Page 13
manual, operate by following the actual displayed screen referring to the User's Manual of the scanner application you are using. Furthermore, the screenshots in this manual are for the FUJITSU TWAIN32 scanner driver and the Image Capturing Software Utilities "ScandAll 21" for Microsoft® Windows - Fujitsu 4120C | Operating Guide - Page 14
in this manual. Do not damage the AC cable. A damaged AC cable might cause fire or electric shock. Do not place heavy objects on AC cables, or pull, bend, twist, heat, damage or modify AC cables. Also, do not use damaged AC cables or power plugs, and AC cables or power plugs when - Fujitsu 4120C | Operating Guide - Page 15
Do not connect to multiple-power strips. Use this scanner only at the indicated power voltage. Improper power voltage so might cause fire or electric shock. Also, do not connect to multiple-power strips. Wipe any dust from the power plug. Wipe off any dust from metal parts on the power plug or metal - Fujitsu 4120C | Operating Guide - Page 16
sense heat coming from devices or detect other malfunctions such as smoke, strange smells or strange noises, immediately press down the power button to turn off the scanner and then disconnect its power plug. Make sure that the smoke has disappeared, and then contact the agent where you bought the - Fujitsu 4120C | Operating Guide - Page 17
metal objects, liquids, etc.) get inside the scanner, immediately press down the power button to turn off the scanner and disconnect the power plug from the power outlet. Then contact the agent where you bought the scanner or Maintenance Service Center. Pay particular attention to this warning in - Fujitsu 4120C | Operating Guide - Page 18
Do not touch the inside of the scanner unless necessary. Do not disassemble or modify the scanner. The inside of the scanner contains high-voltage components. Touching these components might cause fire or electric shock. xvii - Fujitsu 4120C | Operating Guide - Page 19
cautions described in this manual. Do not touch the AC cable with wet hands. Do not insert or disconnect the power plug with wet hands. Doing so might cause electric shock. Do not install the scanner on unstable surfaces. Install the scanner on a desk so that none of its parts protrude outside of - Fujitsu 4120C | Operating Guide - Page 20
's top surface for performing other work. Improper installation might cause injuries. Before moving the scanner, disconnect the power plug from the power outlet. Do not move the scanner with the power and interface cables connected as this might damage the cables, causing fire, electric shock or - Fujitsu 4120C | Operating Guide - Page 21
. Do not use aerosol sprays, for example, to clean the scanner. Air sprayed from aerosol sprays causes dirt and dust to enter the scanner, resulting scanner failure and malfunction. Avoid any contact when scanner is in use. Avoid any contact when scanner is operating as this may cause injuries. xx - Fujitsu 4120C | Operating Guide - Page 22
power outlet. Leaving the scanner turned ON might result in damage to the scanner. Do not install the scanner in the direct sunlight. Do not install the scanner in the direct sunlight or near heating apparatus. Doing so might cause heat to build up inside the scanner, causing fire or scanner trouble - Fujitsu 4120C | Operating Guide - Page 23
Group Offices Please send your comments on this manual or on Fujitsu products to the following addresses: FUJITSU COMPUTER PRODUCTS OF AMERICA, INC. 2904 Orchard Parkway, San Jose, CA 95134-2009, U.S.A. Phone: (1-800)591-5924; (1-408)432-6333 Technical Assistance Center: (1-800)626- - Fujitsu 4120C | Operating Guide - Page 24
www.fujitsu-europe.com/ FUJITSU AUSTRALIA LTD. Fujitsu House 2311-2277 Website: http://fw.fujitsu.com/ FUJITSU ICL ESPAÑA, S.A. Camino Cerro http://www.fujitsu-europe.com/ E-mail: [email protected] FUJITSU ASIA PTE fujitsu.com/ E-mail: [email protected] FUJITSU HONG KONG LTD. 10 - Fujitsu 4120C | Operating Guide - Page 25
Group 658-1 Tsuruma Machida-shi, Tokyo 194-8510, Japan Phone: (81-42)796-5211 Fax: (81-42)788-7651 Website: http://www.pfu.fujitsu.com/ E-mail: [email protected] Corporate headquarters Nu 98-2 Unoke, Unoke-machi, kahoku-gun, Ishikawa 929-1192, Japan Phone: (81-76)283-1212 Fax: (81-76)283 - Fujitsu 4120C | Operating Guide - Page 26
26 3 BASIC SCANNER OPERATIONS.......27 3.1 Turning the Scanner ON 28 3.2 Loading Documents on the ADF for Scanning ........ 30 3.3 Scanning Documents 36 4 SCANNING VARIOUS TYPES OF DOCUMENTS 41 4.1 Scanning Different-width Documents 42 4.2 Saving Scanned Images in PDF Format 43 4.3 Excluding - Fujitsu 4120C | Operating Guide - Page 27
Cycle 66 6.2 Replacing the Pad ASY 74 6.3 Replacing the Pick Roller 80 7 TROUBLESHOOTING 91 7.1 Removing Jammed Documents 92 7.2 Remedying Typical Troubles 95 7.3 Items to check before contacting the agent where you bought the scanner 114 7.4 Checking Labels on the Scanner 118 8 ADF AND - Fujitsu 4120C | Operating Guide - Page 28
PREPARING THE SCANNER 1 PREPARING THE SCANNER 1 This chapter describes how to prepare the scanner for use. 1.1 Checking the Contents of the Scanner Package ....... 2 1.2 Names and Functions of Parts 4 1.3 Operator panel 9 1 - Fujitsu 4120C | Operating Guide - Page 29
1.1 Checking the Contents of the Scanner Package When you unpack the scanner package, make sure that all the following parts are included in the package. If any parts are missing or defective, contact your sales representative. Handle the scanner and accessories with care. 2 1.1 Checking the - Fujitsu 4120C | Operating Guide - Page 30
PREPARING THE SCANNER • Scanner Scanner and Accessories • ADF paper chute • AC adapter • AC cable 1 • USB interface cable • Scanner driver CD-ROM • Adobe® Acrobat® 5.0 CD-ROM • Manual CD-ROM • Operator's Guide • Quick Installation (this manual) Guide fi-XXXX XXXXXXXXX 1.1 Checking the - Fujitsu 4120C | Operating Guide - Page 31
1.2 Names and Functions of Parts This section describes the names of parts and their functions. I Front (2) ADF paper chute (3) Side guide (1) Automatic document feeder (ADF) (4) ADF button (5) Operator panel (6) Stacker 4 1.2 Names and Functions of Parts - Fujitsu 4120C | Operating Guide - Page 32
Press this button to open the ADF cover, for example, to remove jammed documents in the ADF. 5 Operator panel Used for operating the scanner. The scanner status is shown on the Function No. display. 6 Stacker Documents are stacked here after they are scanned. 1.2 Names and Functions of Parts 5 - Fujitsu 4120C | Operating Guide - Page 33
I Rear (7) SCSI ID switch (10) DC inlet (8) SCSI Interface connector (9) USB Interface connector 6 1.2 Names and Functions of Parts - Fujitsu 4120C | Operating Guide - Page 34
SCSI ID. (Set to "5" before the scanner is shipped from the factory.) Connect the SCSI interface cable from the host PC or Computer 1 here. Connect the USB interface cable from the host PC or Computer here. Connect the AC adapter here. PREPARING THE SCANNER 1.2 Names and Functions of Parts 7 - Fujitsu 4120C | Operating Guide - Page 35
I Removable Parts The following shows the parts that can be removed from the scanner. Sheet guide ADF paper chute PAD ASY Pick roller Removal is possible. 8 1.2 Names and Functions of Parts - Fujitsu 4120C | Operating Guide - Page 36
1.3 Operator panel The operator panel is located on the right side of the scanner. This panel comprises a Function No. display, four buttons and a LED. 1 Function No. display Function Send to Scan Power button LED PREPARING THE SCANNER 1.3 Operator panel 9 - Fujitsu 4120C | Operating Guide - Page 37
application software according to the details set in the launcher (*). Turns the scanner ON and OFF. Lights when the scanner is turned ON. *) For information on detailed settings for the launcher, refer to the Scanner Utility for Microsoft® Windows® User's Guide on the scanner driver CD-ROM. 10 - Fujitsu 4120C | Operating Guide - Page 38
this status is called "Ready Status". I U Indicates that a temporary error occurred while the document was being scanned. "U" and "1 and 2" are display alternately. To return the scanner to the ready status ("1"), press "Scan" or "Send to" button while the error is indicated. 1.3 Operator panel 11 - Fujitsu 4120C | Operating Guide - Page 39
alternately. To return the scanner to the ready status ("1"), press "Scan" or "Send to" button while the alarm is indicated. If this alarm occurs, turn the power off and on again. If the alarm continues after turning on the power again, contact your service engineer. 12 1.3 Operator panel - Fujitsu 4120C | Operating Guide - Page 40
PREPARING THE SCANNER The following table shows the details of each temporary error. Indication Meaning " for removing the jammed documents. Confirm the documents meet paper condition for ADF scanning. See "I Precautions" in "8.2 Document Quality" for document conditions. 1.3 Operator panel 13 - Fujitsu 4120C | Operating Guide - Page 41
alarms. Indication E2 E3 E4 E6 E7 E8 E9 Ec Ed Meaning An trouble occurred on the optical system (front). An trouble occurred on the optical system (back). The motor fuse has blown. An trouble occurred on the operator panel. An trouble occurred in the EEPROM. The SCSI interface fuse has blown. An - Fujitsu 4120C | Operating Guide - Page 42
Professional operating system. Windows® XP Refers to Microsoft® Windows® XP Professional operating system. Refers to Microsoft® Windows® XP Home Edition operating system. Windows NT® Refers to Microsoft® Windows NT® operating system Version4.0. 2.1 Installing the Scanner 16 2.2 Connecting the - Fujitsu 4120C | Operating Guide - Page 43
site. For details on the scanner's dimensions and required installation space, see "9.2 Installation Specifications." 2. Attach the ADF paper chute. For details on how to attach the ADF paper chute, see "I Attaching the ADF paper chute" in this section. 3. Connect the AC adapter. For details on how - Fujitsu 4120C | Operating Guide - Page 44
following shows the procedure for attaching the ADF paper chute. 1. Hold the ADF paper chute and insert its tabs into the counterpart holes on the scanner as shown in the figure below. The Side guide of the ADF paper chute has to face up. ADF paper chute 2 tab Side - Fujitsu 4120C | Operating Guide - Page 45
following shows the procedure for connecting the AC adapter. Use only whth AC adapter provided by the CAUTION manufacturer. 1. Connect the AC cable to the AC adapter. 2. Connect the connector of AC adapter to the DC inlet of the scanner. 3. Insert the AC cable into the outlet. 18 2.1 Installing - Fujitsu 4120C | Operating Guide - Page 46
When running Windows® 98, Windows® ME, Windows® 2000, or Windows® XP, connect either the USB interface cable or the SCSI interface cable. 2 ATTENTION Connect only one of the USB or SCSI interface cables. Windows® 95 and Windows NT® 4.0 does not support USB interface. INSTALLATION OF A SCANNER - Fujitsu 4120C | Operating Guide - Page 47
. 1. Connect the USB interface cable to the USB interface connector. 2. Connect the other end of the USB interface cable to the PC. 3. Press down the scanner power button on the Function No. display to turn on the - Fujitsu 4120C | Operating Guide - Page 48
4. Press the power button on the face plate of the PC to turn on the PC. ATTENTION • Be sure to use the USB cable which comes as an accessory with this scanner. We does not confirm the correct operation of a commercial USB cable. • When connecting to a USB hub, use the first stage USB - Fujitsu 4120C | Operating Guide - Page 49
noted on the following home page. http://imagescanner.fujitsu.com/ ATTENTION • When connecting the SCSI interface cable, be sure to first connect the SCSI interface cable then turn on the power of the scanner and the personal computer. • Connect the scanner so that it is the terminal device on the - Fujitsu 4120C | Operating Guide - Page 50
the interface connector until both sides click. 2 2. Connect the connector on the other end of the cable to the personal computer. ATTENTION When using the scanner on the SCSI interface, connect the scanner so that it is the terminal device on the SCSI daisy chain. INSTALLATION OF - Fujitsu 4120C | Operating Guide - Page 51
other SCSI device. For details on how to change the SCSI ID, see "I Setting the SCSI ID" in this section. 3. Press down the scanner power button on the Function No. display to turn on the scanner. 4. Press the power button on the face plate of the PC to turn on the PC. ATTENTION This - Fujitsu 4120C | Operating Guide - Page 52
factory default setting for SCSI ID is "ID 5". The following shows the procedure for setting (changing) the SCSI ID. 1. If the scanner is ON, press the power button to turn the scanner OFF. Disconnect the AC cable from the outlet. 2 2. Set the device address using the SCSI ID switch on the back of - Fujitsu 4120C | Operating Guide - Page 53
Image Capturing Software Utilities "ScandAll 21" for Microsoft® Windows® (ScandAll 21) , refer to the fi-4220C Quick Installation Guide. For further details on installing the FUJITSU TWAIN32 scanner driver, refer to the Scanner Utility for Microsoft® Windows® User's Guide on the scanner driver CD - Fujitsu 4120C | Operating Guide - Page 54
differ slightly if the OS that you are using is other than Windows® XP. Also, when FUJITSU TWAIN32 is updated the screens and operations noted in this chapter will differ slightly. 3.1 Turning the Scanner ON 28 3.2 Loading Documents on the ADF for Scanning ........ 30 3.3 Scanning Documents 36 27 - Fujitsu 4120C | Operating Guide - Page 55
ON. The following shows the procedure for turning the scanner ON. 1. Press the power button on the operator panel. The scanner is turned ON, and the green LED on the operator panel lights. Also, while the scanner is being initialized, the indication of the Function No. display changes as follows - Fujitsu 4120C | Operating Guide - Page 56
mode, perform one of the following: • Load the document on the ADF paper chute. • Press any button on the operator panel. However, holding down the power button for will turn the scanner OFF. • Execute a command from the scanner driver. 3 BASIC SCANNER OPERATIONS 3.1 Turning the Scanner ON 29 - Fujitsu 4120C | Operating Guide - Page 57
the front and side edges of the document to be loaded. Documents can be scanned more correctly if both edges are aligned. 2) Check the number of sheets in the document. The standard number of sheets that can be loaded on the scanner is as follows: • Number of sheets of A4-size paper or smaller that - Fujitsu 4120C | Operating Guide - Page 58
BASIC SCANNER OPERATIONS 2. Fan the document When loading a multiple-sheet document, fan the document as follows. 1) Take out a stack of document sheets follows. 4) Repeat steps 1) to 3) a few times. 5) Rotate the document 90 degrees, and fan again. 3.2 Loading Documents on the ADF for Scanning 31 - Fujitsu 4120C | Operating Guide - Page 59
on the ADF paper chute. Set the document so that the front side of the document (side to be scanned as first page) contacts to the ADF paper chute. Furthermore, when you have multiple pages, set the document facing the ADF paper chute.(face down) 32 3.2 Loading Documents on the ADF for Scanning - Fujitsu 4120C | Operating Guide - Page 60
they match the width of the document. Move the side guides to eliminate gaps between the side guides and the document. If there are gaps between the side guides and the document, the document is sometimes scanned in skewed. Side guide BASIC SCANNER OPERATIONS 3.2 Loading Documents on the ADF for - Fujitsu 4120C | Operating Guide - Page 61
prevents document sheets from dropping after they are scanned. Use the stacker as follows: 1. Lift up the stacker towards you by inserting your fingertips into the handle on the scanner. handle 2. Lift the paper stop and swing forward by inserting your fingertips into the indentations on the - Fujitsu 4120C | Operating Guide - Page 62
BASIC SCANNER OPERATIONS 5. Start up the scanner application, and scan the document. For details on how to scan documents using the ScandAll 21 application, see "3.3 Scanning Documents." 3 3.2 Loading Documents on the ADF for Scanning 35 - Fujitsu 4120C | Operating Guide - Page 63
21" from here on). 1. Load the document on the scanner's ADF paper chute. For details on how to load documents, see "3.2 Loading Documents on the ADF for Scanning." 2. Start up ScandAll 21. Select [Program] - [Scanner Utility for Microsoft Windows] [ScandAll 21] in that order from the [Start] menu - Fujitsu 4120C | Operating Guide - Page 64
BASIC SCANNER OPERATIONS The [Select Source] dialog box appears. Select "FUJITSU fi-4120Cdj" (Windows® 95 and WindowsNT® 4.0, select "FUJITSU TWAIN 32") and click the [Select] button. 3 4. Click the "display in scan preview screen" on the tool bar. The [TWAIN Driver] dialog box (screen for setting - Fujitsu 4120C | Operating Guide - Page 65
38 3.3 Scanning Documents - Fujitsu 4120C | Operating Guide - Page 66
BASIC SCANNER OPERATIONS The document is scanned, and an image of the scanned document appears on the ScandAll 21 screen. 3 For details on scanning various other documents, see "Chapter4, SCANNING VARIOUS TYPES OF DOCUMENTS." For details on ScanAll 21 functions and operations, refer to ScandAll 21 - Fujitsu 4120C | Operating Guide - Page 67
40 3.3 Scanning Documents - Fujitsu 4120C | Operating Guide - Page 68
are using is other than Windows® XP. Also, when FUJITSU TWAIN32 is updated the screens and 4 operations noted in this chapter will differ slightly. SCANNING VARIOUS TYPES OF DOCUMENTS 4.1 Scanning Different-width Documents 42 4.2 Saving Scanned Images in PDF Format 43 4.3 Excluding a Color in - Fujitsu 4120C | Operating Guide - Page 69
same width. The following shows the procedure for reading the manuscript with which width is different. 1. Sorted to the stack of the same width. 2. Side guide unites with the width of documents. 3. Scan the same-width documents separately. For details on how to load documents, see - Fujitsu 4120C | Operating Guide - Page 70
you are using. Adobe Acrobat5.0 can be installed from the Adobe Acrobat5.0 CDROM provided. The following shows the procedure for saving scanned images in PDF format. 1. Load the document on the ADF paper chute. 2. Start up Adobe Acrobat5.0. Select [Program] - [Adobe Acrobat5.0] in that order from - Fujitsu 4120C | Operating Guide - Page 71
3. Select [Import] - [Scan...] in that order from the [File] menu. The [Acrobat Scan Plug-in] dialog box appears. 44 4.2 Saving Scanned Images in PDF Format - Fujitsu 4120C | Operating Guide - Page 72
fi-4120Cdj"(Windows® 95 and WindowsNT® 4.0, select "FUJITSU TWAIN 32") at "Device" and click the [Scan] button. The [TWAIN Driver] dialog box appears. ATTENTION Also select "Simplex" when scanning double-sided documents. 4 SCANNING VARIOUS TYPES OF DOCUMENTS 4.2 Saving Scanned Images in PDF - Fujitsu 4120C | Operating Guide - Page 73
5. Set the scan resolution, paper size and other scan conditions, and click the [Scan] button. Scanning starts, and a message for selecting whether or not to continue scanning appears. 46 4.2 Saving Scanned Images in PDF Format - Fujitsu 4120C | Operating Guide - Page 74
6. To end scanning, click the [Done] button. The scanned image appears. Save the scanned image on Adobe Acrobat5.0. For details on Adobe Acrobat5.0 operations, refer to the Adobe 4 Acrobat5.0 manual and Help. SCANNING VARIOUS TYPES OF DOCUMENTS 4.2 Saving Scanned Images in PDF Format 47 - Fujitsu 4120C | Operating Guide - Page 75
only black areas in the document (i.e. the color green is "dropped out"). To set the scanner to scan documents with a selected color dropped out, change the settings in the [TWAIN Driver] dialog box. The following shows the procedure for changing the settings in this dialog box. 48 4.3 Excluding - Fujitsu 4120C | Operating Guide - Page 76
1. Click the [Advance...] button in the [TWAIN Driver] dialog box. 4 The [Advance] dialog box appears. 2. Select the color to drop out from "Dropout Color" under "More". 4.3 Excluding a Color in the Image(dropout color) 49 SCANNING VARIOUS TYPES OF DOCUMENTS - Fujitsu 4120C | Operating Guide - Page 77
3. For example, to scan only black text areas when scanning black text surrounded by a green frame, select [Green]. 4. Click the [OK] button. The [TWAIN Driver] dialog box will be redisplayed. Continue scanning from this dialog box. 50 4.3 Excluding a Color in the Image(dropout color) - Fujitsu 4120C | Operating Guide - Page 78
-feed, stop scanner operation, and display an error message. To set the scanner to detect double-feed, change the settings in the [TWAIN Driver] dialog box. The following shows the procedure for changing the settings in this dialog box. 4 4.4 Detecting Double-feeds 51 SCANNING VARIOUS TYPES OF - Fujitsu 4120C | Operating Guide - Page 79
1. Click the [Option...] button in the [TWAIN Driver] dialog box. The [Option] dialog box appears. 2. Click the [Option] tab. 52 4.4 Detecting Double-feeds - Fujitsu 4120C | Operating Guide - Page 80
Select the detection conditions from "Double Feed" under "ADF Option". SCANNING VARIOUS TYPES OF DOCUMENTS The following detection conditions are provided: 4 None Check thickness : Double-feed detection is not performed : The scanner uses a sensor to monitor the thickness of documents that are - Fujitsu 4120C | Operating Guide - Page 81
scanner monitors both document thickness and length to detect doublefeed. Furthermore, see "8.5 Double-feed Detection Conditions" for detailed information about the document for double-feed detection. 4. Click the [OK] button. The display returns to the [TWAIN Driver] dialog box. Continue scanning - Fujitsu 4120C | Operating Guide - Page 82
5 DAILY CARE This chapter describes how to clean the scanner. WARNING When cleaning the scanner, turn off the power, and unplug the AC cable from the outlet. 5 DAILY CARE 5.1 Cleaning Materials and Locations and Cleaning Cycle 56 5.2 Cleaning the ADF 58 55 - Fujitsu 4120C | Operating Guide - Page 83
isopropyl alcohol) Remarks 1 bottle Moisten cloth with this fluid and wipe the scanner clean. Soft, dry cloth For details on Cleaner F1, consult the agent where you bought your scanner. I Locations That Needs To Be Cleaned Same location in the ADF must be cleaned regularly with a soft, dry cloth - Fujitsu 4120C | Operating Guide - Page 84
cleaning cycle for each location that needs to be cleaned. Location Pad ASY Pick roller Feed roller Plastic roller Sheet guide Glass Standard Cleaning Cycle Clean every 1000 scanned sheets. ATTENTION The scanner must be cleaned more frequently when the following documents are used: •Documents - Fujitsu 4120C | Operating Guide - Page 85
cleaning ADF, disconnect the AC adapter from the power outlet, and wait at least 15 minutes for the glass to cool down. I Cleaning the ADF The following parts needs to be cleaned in the ADF unit: •Pad ASY •Pick roller •Feed roller •Plastic roller •Sheet guide • Glass 58 5.2 Cleaning the ADF - Fujitsu 4120C | Operating Guide - Page 86
The following shows the procedure for cleaning the ADF. 1. Open the ADF by pushing on the ADF button and turning the ADF cover to the front. The front portion ADF button Be careful, the ADF cover may close and CAUTION pinch your finger. 5 DAILY CARE 5.2 Cleaning the ADF 59 - Fujitsu 4120C | Operating Guide - Page 87
2. Clean the following locations with a soft, dry cloth moistened with Cleaner F1. Feed rollers (Four pieces) Pad ASY Sheet guide (A white portion, Two parts) Pick roller (One pieces) Glass(Two parts) Plastic rollers (Four pieces) 60 5.2 Cleaning the ADF - Fujitsu 4120C | Operating Guide - Page 88
•Pad ASY Clean the Pad ASY (rubber surface) downwards (direction of arrow). When doing this, take care not to catch the pick springs to avoid bending. Pick spring The portion to clean •Pick roller Lightly clean the Pick rollers taking care not to scratch the roller surfaces and the Mylar sheet. Take - Fujitsu 4120C | Operating Guide - Page 89
cleans the surface of the rollers. Take particular care when cleaning these rollers as black foreign matter on these rollers affects document pick performance. As a guideline, seven simultaneous presses of the "Send to" and "Scan" buttons cause the Feed rollers to rotate one full turn. CAUTION - Fujitsu 4120C | Operating Guide - Page 90
•Sheet guide(Especially a white portion) Clean lightly. • Glass Clean lightly. HINT When white portion of the sheet guide or glass surface become dirty, black vertical streaks sometimes appear in the scanned image. 5 DAILY CARE 5.2 Cleaning the ADF 63 - Fujitsu 4120C | Operating Guide - Page 91
the ADF is returned to its original position, make sure that the ADF is completely closed. An incompletely closed ADF might cause document jams or scanning problems. 64 5.2 Cleaning the ADF - Fujitsu 4120C | Operating Guide - Page 92
® XP. Also, when FUJITSU TWAIN32 is updated the screens and operations noted in this chapter will differ slightly. WARNING Turn off the power and unplug the AC adapter from the outlet when changing the scanners consumable products. 6.1 Consumable and Replacement Cycle 66 6.2 Replacing the Pad ASY - Fujitsu 4120C | Operating Guide - Page 93
table shows the specifications of consumables and their standard replacement cycle. Description Pad ASY Pick roller Specifications Standard Replacement Cycle how frequently the user uses and cleans the scanner. ATTENTION Use only the specified consumables. Do not use other consumables. - Fujitsu 4120C | Operating Guide - Page 94
shows the procedure for doing this. 1. When turning on the power, check that the scanner and the personal computer are 6 connected. See "2.2 Connecting the Scanner to a PC" for information about connecting the scanner to a personal computer. 2. Double click the "Printer and Other Hardware - Fujitsu 4120C | Operating Guide - Page 95
3. In the [Printer and Other Hardware] screen, double click the "Scanners and Cameras" icon. The [Scanners and Cameras] screen is displayed. 68 6.1 Consumable and Replacement Cycle - Fujitsu 4120C | Operating Guide - Page 96
REPLACING CONSUMABLES 4. Double click the "fi-4120Cdj". (Windows® 95 and WindowsNT® 4.0, select "FUJITSU TWAIN 32" icon Select at "Device" and click the [Properties] button.) 6 6.1 Consumable and Replacement Cycle 69 - Fujitsu 4120C | Operating Guide - Page 97
The [fi-4120Cdj Properties] dialog box appears. 70 6.1 Consumable and Replacement Cycle - Fujitsu 4120C | Operating Guide - Page 98
You can confirm the following information in this panel: • Total number of scans • Pad counter (approximate number of documents scanned after replacing the Pad ASY) • Pick roller counter (approximate number of documents scanned after replacing the Pick roller) 6.1 Consumable and Replacement Cycle 71 - Fujitsu 4120C | Operating Guide - Page 99
message sometimes appears when the scanner is being used: Replace consumables scanning, and replace the consumables immediately, click the [Cancel] button. 3) Replace the consumables. For details on how to replace consumables, see "6.2 Replacing the Pad ASY" and "6.3 Replacing the Pick Roller - Fujitsu 4120C | Operating Guide - Page 100
scanning, click the [Cancel] button. 3) Replace the consumable when the following message is displayed, or as soon as possible before the message is displayed, as soon as you can. For details on how to replace consumables, see "6.2 Replacing the Pad ASY" and "6.3 Replacing the Pick Roller - Fujitsu 4120C | Operating Guide - Page 101
following shows the procedure for replacing the Pad ASY. 1. Remove any documents on the ADF paper chute. 2. Open the ADF by pushing on the ADF button and turning the ADF cover to the front. - Fujitsu 4120C | Operating Guide - Page 102
Press in the knobs on both ends of the Pad ASY, and pull the Pad ASY upwards and towards you. When doing this, take care not to catch the pick springs. 6 REPLACING CONSUMABLES Pick spring 4. Attach the new Pad ASY. Hold both ends of the new Pad ASY and attach it to its installation location. When - Fujitsu 4120C | Operating Guide - Page 103
pad counter. The following shows the procedure for resetting the pad counter. • For Windows® 98 / Windows® Me / Windows® 2000 / Windows® XP 1) When turning on the power, check that the scanner "Scanners and Cameras" icon. The [Scanners and Cameras] screen is displayed. 76 6.2 Replacing the Pad ASY - Fujitsu 4120C | Operating Guide - Page 104
REPLACING CONSUMABLES 4) Double click the "fi-4120Cdj". 5) Click the "Device Set" tab. The following panel appears. 6 After clicking the [Clear] button beside the "Pad Counter" in "Page Counter", click the [OK] button. This returns the pad counter to "0". 6.2 Replacing the Pad ASY 77 - Fujitsu 4120C | Operating Guide - Page 105
turning on the power, check that the scanner and the personal computer are connected. 2) Right click the "FUJITSU Scanner Control Center" icon displayed in the task tray, then select "Option" 3) Double click "Scanner Information". The following screen is displayed. 78 6.2 Replacing the Pad ASY - Fujitsu 4120C | Operating Guide - Page 106
REPLACING CONSUMABLES 4) Click the "Pad Counter Reset" button. The following message is displayed. 6 Click "Yes". The Pad counter (The pad counts) returns to "0". 6.2 Replacing the Pad ASY 79 - Fujitsu 4120C | Operating Guide - Page 107
6.3 Replacing the Pick Roller The following shows the procedure for replacing the Pick roller. 1. Remove any documents on the ADF paper chute. 2. Remove the ADF paper chute. ADF paper chute 80 6.3 Replacing the Pick Roller - Fujitsu 4120C | Operating Guide - Page 108
REPLACING CONSUMABLES 3. Open the ADF by pushing on the ADF button and turning the ADF cover to the front. The front portion 6 ADF button Be careful, the ADF cover may close and CAUTION pinch your finger. 6.3 Replacing the Pick Roller 81 - Fujitsu 4120C | Operating Guide - Page 109
4. Remove the Pick roller from a scanner. 1) Grip the knobs on the sheet guide between you fingers, and lift up to remove. 2) Rotate the Pick roller bushing in the direction of the arrow. Pick roller bushing 82 6.3 Replacing the Pick Roller - Fujitsu 4120C | Operating Guide - Page 110
up in the direction of the arrow. 6 REPLACING CONSUMABLES CAUTION The Pick roller Bushing is hard. Do not turn this bearing with your fingernails. 4) Remove the Pick roller from the shaft while lifting up the tab on the Pick roller. tab Shaft Lift up. Pull shaft to remove. 6.3 Replacing the - Fujitsu 4120C | Operating Guide - Page 111
5. Attach the new Pick roller. Insert the new Pick roller aligning the protrusion on the axis with the groove in the Pick roller. Protrusion Groove ATTENTION Make sure that the Pick roller is completely attached. An incompletely attached Pick roller might cause document jams or other feed errors - Fujitsu 4120C | Operating Guide - Page 112
removing the Pick roller from the scanner. After attaching the Pick roller to the scanner, perform the following procedure to fix it in place. 6 1) Turn the Pick roller bushing in the direction indicated by the arrow. Pick roller bushing REPLACING CONSUMABLES 2) Move the sheet guide claws in - Fujitsu 4120C | Operating Guide - Page 113
7. Press down on the center of the ADF to return it to its original position and lock the ADF button. Press center of ADF. 8. Attach the ADF paper chute. ADF paper chute 86 6.3 Replacing the Pick Roller - Fujitsu 4120C | Operating Guide - Page 114
the pick counter. • For Windows® 98 / Windows® Me / Windows® 2000 / Windows® XP 1) When turning on the power, check that the scanner and screen, double click the "Scanners and Cameras" icon. The [Scanners and Cameras] screen is displayed. REPLACING CONSUMABLES 6.3 Replacing the Pick Roller 87 - Fujitsu 4120C | Operating Guide - Page 115
4) Double click the "fi-4120Cdj". 5) Click the "Device Set" tab. The following panel appears. After clicking the [Clear] button beside the "Pick Counter" in "Page Counter", click the [OK] button. This returns the pick counter to "0". 88 6.3 Replacing the Pick Roller - Fujitsu 4120C | Operating Guide - Page 116
the scanner and the personal computer are connected. 2) Right click the "FUJITSU Scanner Control Center" icon displayed in the task tray, then select "Option" 6 3) Double click "Scanner Information". The following screen is displayed. REPLACING CONSUMABLES 6.3 Replacing the Pick Roller 89 - Fujitsu 4120C | Operating Guide - Page 117
4) Click the "Pick Counter Reset" button. The following message is displayed. Click "Yes". The Pick counter (The Pick roller counts) returns to "0". 90 6.3 Replacing the Pick Roller - Fujitsu 4120C | Operating Guide - Page 118
other than the contents indicated, and the details of an error, refer to the Scanner Utility for Microsoft® Windows® User's Guide on the scanner driver CD-ROM. 7.1 Removing Jammed Documents 92 7.2 Remedying Typical Troubles 95 7.3 Items to check before contacting the agent where you bought the - Fujitsu 4120C | Operating Guide - Page 119
a document jam occurs during scanning, follow the procedure below to remove the jammed document. CAUTION • Take care to prevent injuries when removing jammed documents. • Take care to prevent neckties, necklaces, etc. from getting entangled inside the scanner when removing jammed documents. • The - Fujitsu 4120C | Operating Guide - Page 120
the ADF button and turning the ADF cover to the front. The front portion 7 TROUBLESHOOTING ADF button Be careful, the ADF cover may close and CAUTION pinch your finger. as these. Also, before you start scanning, be sure to remove any staples, clips, etc. from the document. • Take care not - Fujitsu 4120C | Operating Guide - Page 121
4. Press down on the center of the ADF to return it to its original position and lock the ADF button. Press center of ADF. ATTENTION Make sure that the ADF is completely closed. An incompletely closed ADF might cause document jams or scanning problems. 94 7.1 Removing Jammed Documents - Fujitsu 4120C | Operating Guide - Page 122
the following flowcharts. If the remedies in these flowcharts do not solve the problem, check the items in "7.3 Items to check before contacting the agent where you bought the scanner" and then contact the agent where you bought the scanner. 7 TROUBLESHOOTING 7.2 Remedying Typical Troubles 95 - Fujitsu 4120C | Operating Guide - Page 123
Symptom1 Scanner does not turn ON. Are power cord and AC adapter correctly connected? NO Correctly connect power cord. YES Have you pushed the power button? YES Contact the manufacturer's authorized service center. NO Press power button. 96 7.2 Remedying Typical Troubles - Fujitsu 4120C | Operating Guide - Page 124
Power Save mode. Press any button on control panel to start up scanner. NO Does the display remain blank even after you have turned on NO Scanner operation is normal. 7 the power again? YES Contact the manufacturer's authorized service center. TROUBLESHOOTING 7.2 Remedying Typical Troubles - Fujitsu 4120C | Operating Guide - Page 125
Symptom3 Scanning is not started. Document loaded correctly on ADF paper chute? YES ADF closed completely? NO Load document correctly on ADF paper chute. NO Close ADF completely. YES Interface cable connected correctly? NO Connect interface cable correctly. YES (when using scanner on SCSI NO - Fujitsu 4120C | Operating Guide - Page 126
Continued from previous page Does the alarm state remain displayed even after the scanner has been turned off and back on again? YES NO Scanner operation is normal. Contact the manufacturer's authorized service center. 7 TROUBLESHOOTING 7.2 Remedying Typical Troubles 99 - Fujitsu 4120C | Operating Guide - Page 127
Halftoning or dithering on host computer. YES Glass and sheet guides(A white portion) clean? NO Clean dirty locations.(*) YES Contact the manufacturer's authorized service center. *) For details on how to clean dirty locations, see "Chapter5, DAILY CARE." 100 7.2 Remedying Typical Troubles - Fujitsu 4120C | Operating Guide - Page 128
or lines is unsatisfactory. Glass and sheet guides(A white portion) clean? NO Clean dirty locations.(*) YES 7 Contact the manufacturer's authorized service center. *) For details on how to clean dirty locations, see "Chapter5, DAILY CARE." TROUBLESHOOTING 7.2 Remedying Typical Troubles 101 - Fujitsu 4120C | Operating Guide - Page 129
by ADF? YES Do not press down ADF or place heavy objects on ADF during scanning. NO Is something causing the scanner to vibrate while scanning with the ADF? YES Do not allow anything to cause the scanner to vibrate while scanning. NO Next page is followed. 102 7.2 Remedying Typical Troubles - Fujitsu 4120C | Operating Guide - Page 130
NO surface or scanner missing rubber foot? Install scanner on flat, level surface or attach rubber foot. YES Contact the manufacturer's 7 authorized service center. *) For details on how to clean dirty locations, see "Chapter5, DAILY CARE." TROUBLESHOOTING 7.2 Remedying Typical Troubles 103 - Fujitsu 4120C | Operating Guide - Page 131
Symptom7 Vertical streaks appear in scanned image. Black streaks? YES Clean glass.(*) NO Contact the manufacturer's authorized service center. *) For details on how to clean Sheet guide(A white portion) and glass, see "5.2 Cleaning the ADF." 104 7.2 Remedying Typical Troubles - Fujitsu 4120C | Operating Guide - Page 132
Function No. display indicates alarm after scanner is turned ON. Turn scanner OFF and then ON NO Scanner operation is again. normal. Function No. display indicates alarm? YES 7 Contact the manufacturer's authorized service center. TROUBLESHOOTING 7.2 Remedying Typical Troubles 105 - Fujitsu 4120C | Operating Guide - Page 133
satisfying requirements. (*1) Fill double-feed detection. (*2) YES Document fanned before loading on document support? YES Document recently printed on a copier or laser printer? NO Fan document before loading sheets in the document. YES Continued on next page 106 7.2 Remedying Typical Troubles - Fujitsu 4120C | Operating Guide - Page 134
Continued from previous page Pad ASY dirty? YES Clean Pad ASY.(*3) NO Pad ASY worn down? NO YES Replace Pad ASY.(*4) 7 Pad ASY attached correctly? NO Attach Pad ASY correctly.(*4) YES Contact the manufacturer's authorized service center. TROUBLESHOOTING *1) For details on requirements, see - Fujitsu 4120C | Operating Guide - Page 135
before loading, or reduce number of sheets in document to be loaded. Attach Pad ASY correctly.(*2) YES Pick roller dirty? YES Clean Pick roller.(*3) NO Pick roller worn down? NO Contact the manufacturer's authorized service center. YES Replace pick roller.(*4) 108 7.2 Remedying Typical Troubles - Fujitsu 4120C | Operating Guide - Page 136
TROUBLESHOOTING *1) For details on requirements, see "8.2 Document Quality." *2) For details on how to attach the Pad ASY, see "6.2 Replacing the Pad ASY." *3) For details on how to clean the Pick roller, see "5.2 Cleaning the ADF." *4) For details on how to replace the Pick roller, see "6.3 - Fujitsu 4120C | Operating Guide - Page 137
Contact the manufacturer's authorized service center. *1) For details on requirements, see "8.2 Document Quality." *2) For details on how to clean the ADF, see "5.2 Cleaning the ADF." *3) For details on how to attach the Pad ASY, see "6.2 Replacing the Pad ASY." 110 7.2 Remedying Typical Troubles - Fujitsu 4120C | Operating Guide - Page 138
Clean all of the rollers (*1) YES Contact the manufacturer's authorized service center. 7 TROUBLESHOOTING NO Set the scan scale. What OS are you using? Windows R 98/ Windows R Me/ Windows R 2000/ Windows R XP Display the properties of the scanner that you are using on "Scanners and Cameras" in - Fujitsu 4120C | Operating Guide - Page 139
R 95/ Windows NT R 4.0 YES Is the Scanner Control Center icon displayed in the task tray? NO Select [FUJITSU Scanner Control Center] from the Start menu and run it. Right click the Scanner Control Center icon and select [Options] then adjust the scan scale. 112 7.2 Remedying Typical Troubles - Fujitsu 4120C | Operating Guide - Page 140
manufacturer's authorized service center. 7 TROUBLESHOOTING Windows R 98/ Windows R Me/ Windows R 2000/ Windows R XP Windows R 95/ Windows NT R 4.0 Display the properties of the scanner that you are using on "Scanners and Cameras" in the control panel, then adjust the [Sub-scan Setting]. YES - Fujitsu 4120C | Operating Guide - Page 141
7.3 Items to check before contacting the agent where you bought the scanner Check the following items before you contact the agent where you bought the scanner. 114 7.3 Items to check before contacting the agent where you bought the scanner - Fujitsu 4120C | Operating Guide - Page 142
I General Details Item Model findings (Example) fi-4120C For details on model, see "7.4 Checking Labels on the Scanner." Serial No. (Example) 000001 7 For details on serial No., see "7.4 Check- ing Labels on the Scanner." TROUBLESHOOTING Production date (Example) 2002-4 (April, 2002) For - Fujitsu 4120C | Operating Guide - Page 143
I Installation or PC connection issues I problem at the time of personal computer connection Item OS Displayed error message Interface findings (Example) SCSI interface Interface controllers (Example) made by Adaptec SCSI Card 2940Au I Feed system trouble Item Document type Main purpose of use - Fujitsu 4120C | Operating Guide - Page 144
system trouble Item findings Type and version of scanner driver Type of interface controller (Example) made by Adaptec SCSI Card 2940Au OS (Windows®) Software application 7 (Example) ScandAll 21 (Example) Acrobat TROUBLESHOOTING I Other Item Can both the original document and scanner image - Fujitsu 4120C | Operating Guide - Page 145
7.4 Checking Labels on the Scanner This section describes how to check the labels on the scanner. I Positions of Labels on the Scanner The following shows where the two labels are located on the scanner. label A label B Label A (example): Indicates scanner information. 118 7.4 Checking Labels on - Fujitsu 4120C | Operating Guide - Page 146
TROUBLESHOOTING Label B (example): Indicates scanner conformity with various standards. 7 7.4 Checking Labels on the Scanner 119 - Fujitsu 4120C | Operating Guide - Page 147
120 7.4 Checking Labels on the Scanner - Fujitsu 4120C | Operating Guide - Page 148
This chapter describes the required document size and paper quality for ensuring correct operation when scanning documents on 8 the ADF. ADF AND PAPER SPECIFICATION 8.1 Document Size 122 8.2 Document Quality 123 8.3 Maximum Document Loading Capacity 127 8.4 Hole-punching Prohibited Areas - Fujitsu 4120C | Operating Guide - Page 149
8.1 Document Size The following shows the size of documents that can be scanned on the ADF. A Feeding Direction B Maximum Minimum A B A B 216 (8.5 in) 356 (14 in) 53 (2.1 in) 74 (2.9 in) (Unit : mm) 122 8.1 Document Size - Fujitsu 4120C | Operating Guide - Page 150
the above, check 8 whether or not the document can be scanned by test-scanning a few sheets before executing the actual document. I Document on this scanner: • 52g/m2 to 127g/m2 Only a paper weight of 127g/m2 is allowed for A8-size documents. ADF AND PAPER SPECIFICATION 8.2 Document Quality - Fujitsu 4120C | Operating Guide - Page 151
I Precautions The following documents sometimes cannot be scanned successfully on the ADF. To prevent unexpected trouble, a feed test using a spare document may be needed. • Paper-clipped or stapled documents • Ink documents that are still wet • Documents (e.g. envelopes) of uneven thickness • - Fujitsu 4120C | Operating Guide - Page 152
errors occur fre- quently, clean the Pad ASY 8 and Pick rollers. For details on cleaning the Pad ASY and Pick rollers, see "5.2 Cleaning the ADF." Replacing parts: The service life of the Pad ASY and Pick rollers is sometimes shortened when scanning mediumgrade paper documents. • When the - Fujitsu 4120C | Operating Guide - Page 153
HINT When using the ADF, the leading edge of all document sheets must be evenly aligned. Make sure that curling at the leading edge is within the following tolerances: More than 30mm Feed direction Less than 3mm Top of the paper Read surface More than 30mm Feed direction Less than 5mm Top of - Fujitsu 4120C | Operating Guide - Page 154
20 Legal 60 50 50 41 A4 / Letter or smaller 8 35 29 29 24 0 52 64 80 104 127 Paper weight (g/m2 ) ADF AND PAPER SPECIFICATION Unit g/m2 lb Paper weight conversion table Conversion 52 64 75 90 104 127 13.9 17 20 24 27.9 34 8.3 Maximum Document Loading Capacity 127 - Fujitsu 4120C | Operating Guide - Page 155
8.4 Hole-punching Prohibited Areas When using the ADF, document trouble might occur if there are punched holes in the shaded area in the following figure. Read reference 35 position Top of paper Front side Feeding - Fujitsu 4120C | Operating Guide - Page 156
of the vertical center line of the document. • The deviation in the amount of the light transmitted through background areas must not be less than 10%. ADF AND PAPER SPECIFICATION 8.5 Double-feed Detection Conditions 129 - Fujitsu 4120C | Operating Guide - Page 157
of the vertical center line of the document. • The deviation in the amount of the light transmitted through background areas must not be less than 10%. 130 8.5 Double-feed Detection Conditions - Fujitsu 4120C | Operating Guide - Page 158
ADF AND PAPER SPECIFICATION I Detection by Document Thickness and Length Sheets of the same deviation in the amount of the light transmitted through background areas must not be less than 10%. 8 The type of document and document conditions HINT sometimes cause the double-feed detection rate - Fujitsu 4120C | Operating Guide - Page 159
No printing allowed 35mm 26mm 10mm Feeding direction No punched holes allowed Center of paper 132 8.5 Double-feed Detection Conditions - Fujitsu 4120C | Operating Guide - Page 160
9 SCANNER SPECIFICATION This chapter lists the scanner specifications. 9 9.1 Basic Specifications 134 9.2 Installation Specifications 136 9.3 External Dimensions 138 133 SCANNER SPECIFICATION - Fujitsu 4120C | Operating Guide - Page 161
9.1 Basic Specifications 1 Scanner Type ADF(Automatic - Document Feeder) 2 Image sensor CCD x 2 Front / Back 3 Light source Incandescent cold Front / Back cathode fluorescent lamp x 2 4 Scanning Mini- A8 area mum ADF 127g/m2 paper Maxi- A4 / Legal - mum 5 Paper Weight 52g/m2 to - Fujitsu 4120C | Operating Guide - Page 162
600 dpi Scalable in 1 dpi increments 10 Grayscale level (internal) 8 bits per color Internal 10 bits 11 Halftone Patterns Dither / - "Chapter8, ADF AND PAPER SPECIFICATION." *2) The scanning speed is the maximum speed of the scanner hardware. Software processing time such as data transfer - Fujitsu 4120C | Operating Guide - Page 163
to scanner installation. Item Specification Dimensions (mm) (Without ADF paper chute and Stacker) Depth 168 (6.6in) Width 301 (11.8 in) Height 158 (6.2 in) Installation Space (mm) 700 (27.6in) x 400 (15.8in) x 380 (15.0in) (D x W x H) Weight (kg) 3.5kg (7.7 lb.) Input power Voltage - Fujitsu 4120C | Operating Guide - Page 164
Item Specification Ambient condition Device status Temperature Operating 5 to 35 °C (41 to 95°F) Not operating -20 to 60 °C (-4 to 140°F) Humidity 20 to 80 % 8 to 95 % Heat capacity 24.1 kcal / H or less Shipping Weight (kg) 5.5 kg (12.2 lb) 9 SCANNER SPECIFICATION 9.2 Installation - Fujitsu 4120C | Operating Guide - Page 165
9.3 External Dimensions The following shows the external dimensions of the fi-4120C. 301(11.9") 158 (6.2") 235 (9.3") 168(6.6") 355(14") 138 9.3 External Dimensions (Unit : mm) - Fujitsu 4120C | Operating Guide - Page 166
Code for Information Interchange. ASCII is a set of 256 codes (numbered 0 to 255) used to communicate information between a computer and another device such as a scanner. Backside reading = Back-side scanning Refers to reading the backside of the document, specifically in Duplex reading mode. GL-1 - Fujitsu 4120C | Operating Guide - Page 167
in the binary numbering system. Eight bits equal one byte. Density In this manual, refers to a measurement of the depth of the display. Dither Technique for two pixel levels, black and white. Double feed detection A scanner function which detects the accidental feeding of multiple sheets by the ADF - Fujitsu 4120C | Operating Guide - Page 168
in pencil or ballpointed pen depends on the reflective light characteristics of the specific ink or lead used. Dropped pixels may produce outlines, gaps, or thin . Front-side reading = Front-side scanning Refers to reading the front side of the document, specifically in Duplex reading mode. GL-3 - Fujitsu 4120C | Operating Guide - Page 169
image is read with specified parameters. Interface The connection that allows communication from one part of a system to another. For example, electrical signals are transferred between the computer and scanner over an interface cable. Inversion (Reverse-image reading) In reverse-image reading, data - Fujitsu 4120C | Operating Guide - Page 170
value determines whether black or white pixels are scanned. Line drawing mode is therefore appropriate for scanning text and line art images. Manual Feed mode = Manual Mode Requires the operator to feed each document manually into the ADF paper chute. Manual start mode ( automatic start mode) The - Fujitsu 4120C | Operating Guide - Page 171
panel A panel containing the scanner indicators and buttons. The operator panel is used to control scanner operations such as loading document of image corresponds to the blackpixel density, making it suitable in scanning images such as photographs having gradations. Photo mode = photograph mode - Fujitsu 4120C | Operating Guide - Page 172
in. This is useful in OCR applications, for example. Temporary Error An error correctable by the operator. Time-out limit This is the time the scanner waits for next document insertion after the last document feeding. The scanner returns Paper Empty when no document is set after time-out limit. GL-7 - Fujitsu 4120C | Operating Guide - Page 173
GL-8 - Fujitsu 4120C | Operating Guide - Page 174
10 Power button 10 Scan button 10 Send to button 10 C Capacity of ADF 134 Cleaning Cleaning the ADF........... 58 Cleaning materials 56 Connecting the SCSI interface cable 22 Connecting the USB interface cable 20 Connections Connecting the AC adapter 18 Connecting the PC to the scanner - Fujitsu 4120C | Operating Guide - Page 175
Resolution 134 Output resolution 135 P Pad ASY 8 Paper Weight 134 Power consumption 136 Power save mode 29 R Replacement Replacing the Pad ASY 74 Replacing the Pick roller 80 S Scanner installation ......... 15, 16 Scanner Type 134 Scanning area 134 Scanning Speed 134 SCSI ID switch - Fujitsu 4120C | Operating Guide - Page 176
Scanning area 134 Scanning speed 134 Stacker 5 T Turning the power ON 28 U USB interface cable 3, 20 USB interface connector ..........7 W Weight 136 IN-3 - Fujitsu 4120C | Operating Guide - Page 177
IN-4 - Fujitsu 4120C | Operating Guide - Page 178
fi-4120C Image Scanner Operator's Guide P3PC-E007-01EN Date of issuance : April, 2002 Issuance responsibility : PFU LIMITED Printed in Singapore • Copying of the contents of this manual in whole or in part and copying of the scanner application is forbidden under the copyright law. • The contents of - Fujitsu 4120C | Operating Guide - Page 179
- Fujitsu 4120C | Operating Guide - Page 180
-
 1
1 -
 2
2 -
 3
3 -
 4
4 -
 5
5 -
 6
6 -
 7
7 -
8
-
9
-
10
-
11
-
12
-
13
-
14
-
15
-
16
-
17
-
18
-
19
-
20
-
21
-
22
-
23
-
24
-
25
-
26
-
27
-
28
-
29
-
30
-
31
-
32
-
33
-
34
-
35
-
36
-
37
-
38
-
39
-
40
-
41
-
42
-
43
-
44
-
45
-
46
-
47
-
48
-
49
-
50
-
51
-
52
-
53
-
54
-
55
-
56
-
57
-
58
-
59
-
60
-
61
-
62
-
63
-
64
-
65
-
66
-
67
-
68
-
69
-
70
-
71
-
72
-
73
-
74
-
75
-
76
-
77
-
78
-
79
-
80
-
81
-
82
-
83
-
84
-
85
-
86
-
87
-
88
-
89
-
90
-
91
-
92
-
93
-
94
-
95
-
96
-
97
-
98
-
99
-
100
-
101
-
102
-
103
-
104
-
105
-
106
-
107
-
108
-
109
-
110
-
111
-
112
-
113
-
114
-
115
-
116
-
117
-
118
-
119
-
120
-
121
-
122
-
123
-
124
-
125
-
126
-
127
-
128
-
129
-
130
-
131
-
132
-
133
-
134
-
135
-
136
-
137
-
138
-
139
-
140
-
141
-
142
-
143
-
144
-
145
-
146
-
147
-
148
-
149
-
150
-
151
-
152
-
153
-
154
-
155
-
156
-
157
-
158
-
159
-
160
-
161
-
162
-
163
-
164
-
165
-
166
-
167
-
168
-
169
-
170
-
171
-
172
-
173
-
174
-
175
-
176
-
177
-
178
-
179
-
180
 |
 |

Operator's Guide
fi-4120C Image Scanner
P3PC-E007-01EN