Fujitsu 5120C Getting Started Guide - Page 23
Appendix1 - replacement
 |
View all Fujitsu 5120C manuals
Add to My Manuals
Save this manual to your list of manuals |
Page 23 highlights
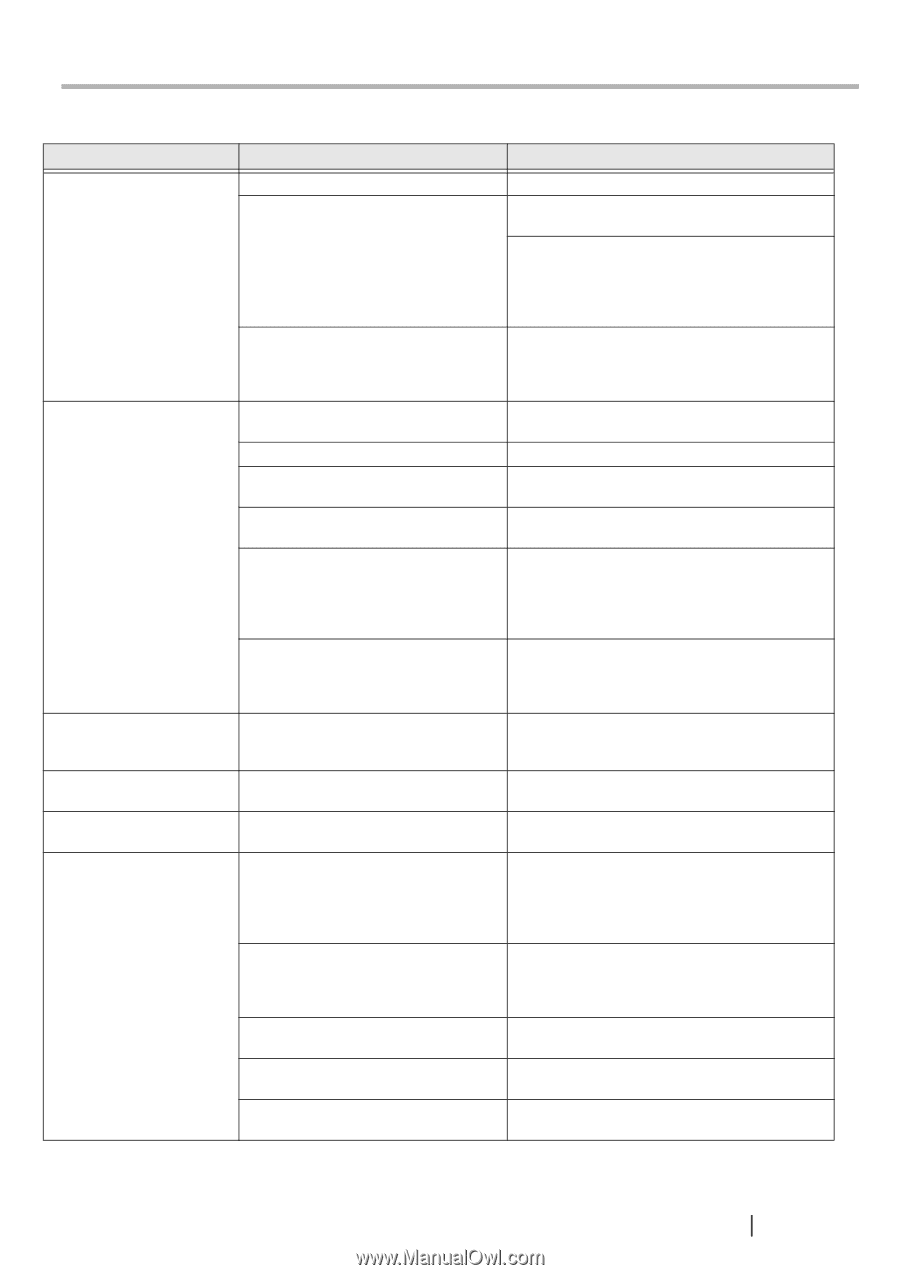
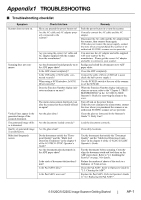
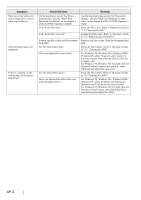
Appendix1 TROUBLESHOOTING ■ Troubleshooting checklist Symptom Scanner does not turn on. Scanning does not commence. Vertical lines appear in the generated image of the scanned document. The generated image shifts or is distorted. Quality of generated image is unsatisfactory. Multi feed frequently occurs. Check this item Have you pressed the power button on? Are the AC cable and AC adapter properly connected to the scanner? Are you using the correct AC cable and AC adapter supplied with the scanner from the manufacture? Are the documents loaded properly on to the ADF paper chute? Is the ADF closed completely? Is the USB cable or SCSI cable connected securely? When using a SCSI interface, Is SCSI ID set correctly? Does the Function Number display indicates an alarm or an error? The alarm status remain displayed even after the scanner has been turned off and on again? Are the glass dirty? Remedy Push the power button in to turn the scanner. Correctly connect the AC cable and the AC adapter. Disconnect the AC cable and the AC adapter from the scanner, then connect them again. If this does not restore the power supply, contact the store where you purchased the scanner or an authorized FUJITSU scanner service provider. You must use the AC adapter and cable supplied with your scanner by the manufacture. Please get the correct AC adapter and cable to connect to your scanner. Realign and reload the documents on to ADF paper chute. Close the ADF completely. Connect the cable. (When a USB hub is used, check the hub's power supply.) Use the SCSI ID switch at the rear of the scanner to set the SCSI ID. When the Function Number display indicates an alarm or an error, refer to the "Chapter 5. TROUBLESHOOTING" in the fi-5120C/fi-5220C Operator's Guide for removing the alarm or the error. Turn off and on the power button. If this does not eliminate the alarm status, contact the store where you purchased the scanner or an authorized FUJITSU scanner service provider. Clean the glass as instructed in the Operator's Guide "3. Daily Care". Are the documents loaded correctly? Load the documents correctly. Are the glass clean? Clean dirty locations. Do the documents satisfy the "Document Quality" and the "Multi feed Detection Conditions" in the chapter 6 of the fi-5120C/fi-5220C Operator's Guide? Are the documents placed properly in the ADF paper chute? Is the stack of document thicker than 5 mm? Is the Pad ASSY dirty? Is the Pad ASSY worn out? Use the documents that satisfy the "Document Quality" and the "Multi feed Detection Conditions" in the chapter 6 of the fi-5120C/fi-5220C Operator's Guide. Fan the documents before scanning. Correctly align the document stack and load them on the ADF paper chute. Refer to "2.1 Installing the Scanner" on page 3 for details. Reduce the number of sheets of the stack to a thickness of 5 mm or less. Clean the Pad ASSY. Refer to Operator's Guide in "3.3. Cleaning the ADF". Replace the Pad ASSY. Refer to Operator's Guide in "4.2. Replacing the Pad ASSY". fi-5120C/fi-5220C Image Scanner Getting Started AP-1
-
 1
1 -
2
-
3
-
4
-
5
-
6
-
7
-
8
-
9
-
10
-
11
-
12
-
13
-
14
-
15
-
16
-
17
-
 18
18 -
 19
19 -
 20
20 -
 21
21 -
 22
22 -
 23
23 -
 24
24 -
 25
25 -
 26
26 -
 27
27 -
 28
28
 |
 |