Garmin DriveAssist 50LMT Owner s Manual - Page 10
Destination Arrival with Garmin Real Vision, Assistance, Adding a Location to Your Route, Shaping - map update
 |
View all Garmin DriveAssist 50LMT manuals
Add to My Manuals
Save this manual to your list of manuals |
Page 10 highlights
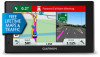
Next action in the route. Indicates the next turn, exit, or other action À and the lane in which you should travel, if available. Distance to the next action. Á Name of the street or exit associated with the next action. Â Route highlighted on the map. Ã Next action in the route. Arrows on the map indicate the location of Ä upcoming actions. Vehicle speed. Å Name of the road on which you are traveling. Æ Estimated arrival time. Ç TIP: You can touch this field to change the information it shows (Changing the Map Data Field, page 12). Active Lane Guidance As you approach a turn while navigating a route, a detailed simulation of the road appears beside the map, if available. A colored line indicates the proper lane for the turn. À Viewing Turns and Directions While navigating a route, you can view upcoming turns, lane changes, or other directions for your route. 1 From the map, select an option: • To view upcoming turns and directions as you navigate, select > Turns. The map tool displays the next four turns or directions beside the map. The list updates automatically as you navigate the route. • To view the complete list of turns and directions for the entire route, select the text bar at the top of the map. 2 Select a turn or direction (optional). Detailed information appears. An image of the junction may appear for junctions on major roadways, if available. Viewing the Entire Route on the Map 1 While navigating a route, select anywhere on the map. 2 Select . Destination Arrival with Garmin Real Vision™ Assistance The Garmin Real Vision feature automatically displays a camera view when approaching some destinations, including addresses and geographic coordinates. The location of your destination appears on an image of your surroundings captured by the dash camera. 6 Some conditions may prevent this feature from appearing. • This feature is not available in all areas or for all types of destinations. • This feature may not appear for destinations far from the route or road, close to a turn or maneuver, or located on a very curvy or hilly road. • This feature may not appear when the road or destination is obscured by weather, vegetation, or other obstructions. • This feature may not appear in very bright or dark environments. Adding a Location to Your Route Before you can add a location to your route, you must be navigating a route (Starting a Route, page 5). You can add locations to the middle or end of your route. For example, you can add a fuel station as the next destination in your route. TIP: To create complex routes with multiple destinations or scheduled stops, you can use the trip planner to plan, schedule, and save a trip (Planning a Trip, page 7). 1 From the map, select > Where To?. 2 Search for a location (Finding and Saving Locations, page 8). 3 Select a location. 4 Select Go!. 5 Select an option: • To add the location as the next destination in your route, select Add As Next Stop. • To add the location to the end of your route, select Add As Last Stop. • To add the location and edit the order of destinations in your route, select Add to Active Route. The device re-calculates the route to include the added location and guides you to the destinations in order. Shaping Your Route Before you can shape your route, you must start a route (Starting a Route, page 5). You can manually shape your route to change its course. This allows you to direct the route to use a certain road or go through a certain area without adding a destination to the route. 1 Touch anywhere on the map. 2 Select . The device enters route shaping mode. 3 Select a location on the map. TIP: You can select to zoom in on the map and select a more precise location. The device recalculates the route to travel through the selected location. 4 If necessary, select an option: • To add more shaping points to the route, select additional locations on the map. • To remove a shaping point, select . 5 When you are finished shaping the route, select Go!. Taking a Detour You can take a detour for a specified distance along your route or detour around specific roads. This is useful if you encounter construction zones, closed roads, or poor road conditions. 1 From the map, select > Change Route. TIP: If the Change Route tool is not in the map tools menu, you can add it (Enabling Map Tools, page 11). Navigating to Your Destination
-
 1
1 -
2
-
3
-
4
-
 5
5 -
 6
6 -
 7
7 -
 8
8 -
 9
9 -
 10
10 -
 11
11 -
 12
12 -
 13
13 -
 14
14 -
 15
15 -
16
-
17
-
18
-
19
-
20
-
21
-
22
-
23
-
24
-
25
-
26
-
27
-
28
-
29
-
30
 |
 |
