Garmin GPSMAP 4208 Owner's Manual - Page 35
Information, Merge From Card, Save To, Add New File, Rocker, Numeric, Save To Card, User Data
 |
UPC - 753759066048
View all Garmin GPSMAP 4208 manuals
Add to My Manuals
Save this manual to your list of manuals |
Page 35 highlights
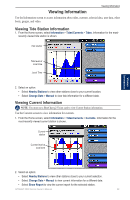
Viewing Information Viewing Information 5. From the Send to Device window, select the drive for the SD card reader and the types of data you want to copy to your chartplotter. 6. Click Send. 7. Insert the SD card into your chartplotter. 8. From the Home screen on your chartplotter, select Information > User Data > Data Transfer > Card. 9. Complete one of the following: • Select Merge From Card to transfer data from the SD card to the chartplotter and combine it with existing user data. • Select Replace From Card transfer data from the SD card to the chartplotter and overwrite existing user data on the chartplotter. 10. Select the file name from the list. 11. Select Merge from Card or Replace from Card. To t�r�a�n�s�f�e�r��w��a�y�p�o��in��ts��, �r�o�u�t�e�s�,��tr�a�c��k�s��to��a��n��S�D��c�a��rd��: 1. Insert an SD card into the SD card slot on the front of the chartplotter. 2. From the Home screen, select Information > User Data > Data Transfer > Card > Save To Card. 3. Complete one of the following actions to indicate the name of the new file: • Select a file name from the list. • Select Add New File to create a new file. Enter the file name using the Rocker or Numeric Keypad (GPSMAP 4210 or 4212 only) and select Done. 4. Select Save To Card to save waypoints, routes, and tracks to the SD card. The file name is saved with an .ADM extension. To t�r�a�n�s�f�e�r��w�a�y��p�o�i�n�t�s�,�r�o�u��te��s�,�a�n�d��t�r�a�c�k��s�f�r�o�m���a�n��S�D��c�a��rd��: 1. Insert an SD card into the SD card slot on the front of the chartplotter. 2. From the Home screen, select Information > User Data > Data Transfer > Card. 3. Select an option to indicate how existing data on the chartplotter is handled: • Select Merge From Card to transfer data from the SD card to the chartplotter and combine it with existing user data. • Select Replace From Card to transfer data from the SD card to the chartplotter and overwrite existing user data on the chartplotter. 4. Select the file name from the list. 5. Select Merge from Card or Replace from Card. To copy the built-in maps to an SD card: 1. Insert an SD card into the SD card slot on the front of the chartplotter. 2. From the Home screen, select Information > User Data > Data Transfer > Card. 3. Select Copy Built-In Map to copy the maps loaded onto your chartplotter to the SD card. GPSMAP 4000 Series Owner's Manual 31
-
 1
1 -
2
-
3
-
4
-
5
-
6
-
7
-
8
-
9
-
10
-
11
-
12
-
13
-
14
-
15
-
16
-
17
-
18
-
19
-
20
-
21
-
22
-
23
-
24
-
25
-
26
-
27
-
28
-
29
-
 30
30 -
 31
31 -
 32
32 -
 33
33 -
 34
34 -
 35
35 -
 36
36 -
 37
37 -
 38
38 -
 39
39 -
 40
40 -
41
-
42
-
43
-
44
-
45
-
46
-
47
-
48
-
49
-
50
-
51
-
52
-
53
-
54
-
55
-
56
-
57
-
58
-
59
-
60
-
61
-
62
-
63
-
64
-
65
-
66
-
67
-
68
-
69
-
70
-
71
-
72
-
73
-
74
-
75
-
76
-
77
-
78
-
79
-
80
-
81
-
82
-
83
-
84
 |
 |
