Garmin Sport PRO Owner s Manual - Page 5
Attaching the Dog Collar Device to the Collar
 |
View all Garmin Sport PRO manuals
Add to My Manuals
Save this manual to your list of manuals |
Page 5 highlights
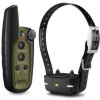
Getting Started WARNING See the Important Safety and Product Information guide in the product box for product warnings and other important information. Attaching the Dog Collar Device to the Collar Strap 1 With the buckle facing outward, insert the end of the collar À strap through the slot on the collar device. Á Setting Up the Sport PRO System Before you can use the Sport PRO system, you must set up the devices. 1 Attach the dog collar device to the collar strap (Attaching the Dog Collar Device to the Collar Strap, page 1). 2 Charge the handheld device (Charging the Handheld Device, page 1). 3 Charge the dog collar device (Charging the Dog Collar Device, page 1). 4 Turn on the devices (Turning On the Dog Collar Device, page 2). 5 If necessary, pair the dog collar device with the handheld device (Pairing a Dog Collar Device with the Handheld Device, page 2). Device Overviews Sport PRO Handheld Device 2 Pull most of the collar strap through the two slots on the  dog device. 3 Insert the end of the collar strap through the slot on the à opposite side of the device. 4 Pull the strap until it is tight across the front of the device. Charging the Handheld Device NOTICE To prevent corrosion, thoroughly dry the USB port, the weather cap, and the surrounding area before charging or connecting to a computer. You should fully charge the battery before you use the device for the first time or whenever the battery is low. It is normal for the battery to discharge in approximately 7 to 10 weeks when the device is not in use. Charging a fully depleted battery takes about 2 hours. NOTE: The device will not charge when it is outside the temperature range of 0° to 40°C (32° to 104°F). 1 Lift the weather cap . À Dog collar device toggle switch À Intensity level and operating mode dial Á Continuous stimulation key  BarkLimiter™ on key (AUX mode) Momentary stimulation key à BarkLimiter off key (AUX mode) Vibration key Ä Light on key (AUX mode) Tone key Å Light off key (AUX mode) Sport PRO Dog Device Power key À Status LED Á Lights  Contact points à Charging clip contacts Ä Getting Started 2 Plug the small end of the power cable into the mini-USB port on the device. Á 3 Plug the other end of the power cable into a power source. The status LED is solid red when the device is charging. 4 After the status LED turns solid green, unplug the power cable from the device. Charging the Dog Collar Device NOTICE To prevent corrosion, thoroughly dry the USB port, the weather cap, and the surrounding area before charging or connecting to a computer. You should fully charge the battery before you use the device for the first time or whenever the battery is low. It is normal for the battery to discharge in approximately 7 to 10 weeks when the device is not in use. Charging a fully depleted battery takes about 2 hours. NOTE: The device will not charge when it is outside the temperature range of 0° to 40°C (32° to 104°F). 1 Snap the charging clip onto the device . À Á 1
-
 1
1 -
 2
2 -
 3
3 -
 4
4 -
 5
5 -
 6
6 -
 7
7 -
 8
8 -
 9
9 -
 10
10 -
 11
11 -
12
 |
 |
