Garmin Sport PRO Owner s Manual - Page 6
Turning On the Dog Collar Device, Dog Collar Device, Fitting the Collar on Your Dog - bark limiter
 |
View all Garmin Sport PRO manuals
Add to My Manuals
Save this manual to your list of manuals |
Page 6 highlights
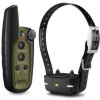
2 Plug the power cable into a power source. The status LED is solid red when the collar is charging. 3 After the status LED turns solid green, remove the charging clip from the collar. Turning On the Dog Collar Device • To turn on the dog collar device in training mode, hold the power key until the status LED turns green and the collar beeps. • To turn on the dog collar device in independent BarkLimiter mode, hold the power key until the status LED turns blue (Enabling the Independent BarkLimiter Feature from the Dog Collar Device, page 4). • To turn on the dog collar device in pairing mode, hold the power key until the status LED turns yellow (Pairing a Dog Collar Device with the Handheld Device, page 2). Turning Off the Device 1 On the dog collar device, hold the power key until the status LED turns red. 2 Release the power key. The dog collar device beeps to confirm powering off. NOTE: If the device is powered off in BarkLimiter mode, the LED flashes the number of corrected barks before powering off (Bark Odometer™, page 4). Dog Collar Device You can use up to 3 dog collar devices with a single handheld device. Each dog collar device must be paired with the handheld device before it can be used. During the pairing process, each dog collar device is associated with a different color on the handheld device. Pairing a Dog Collar Device with the Handheld Device NOTE: If your handheld device and dog collar device were included in the same package, the devices are paired from the factory. 1 On the handheld device, move the toggle switch to choose the color associated with the dog collar device. 2 On the handheld device, set the intensity level to a numbered position. 3 On the dog collar device, hold the power key for about 5 seconds until the status LED turns yellow. 4 While the dog collar device status LED is yellow, select a training key on the handheld device. The dog collar device beeps when the devices have paired successfully. TIP: If the devices did not pair successfully, you should verify the batteries in both devices are fully charged and the intensity level is set to a numbered position. Selecting a Dog Collar Device Before you can select and control a dog collar device, you must pair the dog collar device with the handheld device (Pairing a Dog Collar Device with the Handheld Device, page 2). Move the dog collar device toggle switch to select the color associated with a dog collar device. The training keys control the dog collar device associated with the selected color. Fitting the Collar on Your Dog CAUTION To prevent irritation from the contact points, remove the collar for at least eight hours out of every 24-hour period. This device is not intended for human use. Do not attempt to use on any person. Do not spray the device or collar with harsh chemicals including but not limited to flea or tick spray. Always ensure that any flea or tick spray that is applied to the dog is completely dry before placing the collar on the dog. Small amounts of harsh chemicals can damage the plastic components and collar laminate. In order to effectively train the dog, the collar and device must fit the dog properly. If the collar is too loose or positioned incorrectly, stimulation may be inconsistent. This can delay or prevent successful training. 1 Position the device at the front of the dog's neck, with the status LED facing toward the dog's chin and the contact points against the throat. TIP: For bark correction, the device contact points should be positioned near the dog's vocal cords. This location varies based on the breed of dog. If the device does not seem to detect the dog's barks, you should move the device closer to or farther from the dog's body to find the ideal location. 2 Tighten the strap so that it is very snug around the dog's neck, and fasten the buckle. NOTE: The collar should fit tightly and should not be able to rotate or slide on the dog's neck. The dog must be able to swallow food and water normally. You should observe your dog's behavior to verify that the collar is not too tight. 3 Wiggle the device to work the contact points through the dog's coat. NOTE: The contact points must have contact with the dog's skin to be effective. 4 If the strap is too long, cut off the excess, leaving at least 8 cm (3 in.) to spare. TIP: You can mark the hole used to fasten the buckle for future reference. Selecting and Installing the Contact Points For best results, select the correct contact points based on your dog's coat. 2 Getting Started
-
 1
1 -
 2
2 -
 3
3 -
 4
4 -
 5
5 -
 6
6 -
 7
7 -
 8
8 -
 9
9 -
 10
10 -
 11
11 -
 12
12
 |
 |
