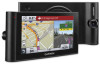
Garmin dezlCam LMTHD Owner s Manual - Page 5
Installing the Dash Camera Memory Card, Mounting and Powering the dēzlCam Device, in Your Vehicle, - update
 |
View all Garmin dezlCam LMTHD manuals
Add to My Manuals
Save this manual to your list of manuals |
Page 5 highlights
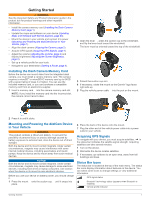
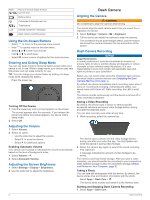
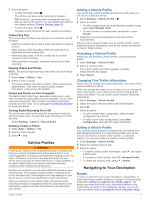
Getting Started WARNING See the Important Safety and Product Information guide in the product box for product warnings and other important information. • Install the camera memory card (Installing the Dash Camera Memory Card, page 1). • Update the maps and software on your device (Updating Maps and Software with Garmin Express, page 20). • Mount the device in your vehicle and connect it to power (Mounting and Powering the dēzlCam Device in Your Vehicle, page 1). • Align the dash camera (Aligning the Camera, page 2). • Acquire GPS signals (Acquiring GPS Signals, page 1). • Adjust the volume (Adjusting the Volume, page 2) and display brightness (Adjusting the Screen Brightness, page 2). • Set up a vehicle profile for your truck. • Navigate to your destination (Starting a Route, page 4). 2 Open the lever , press the suction cup to the windshield, Â and flip the lever back toward the windshield. The lever must be oriented toward the top of the windshield. Installing the Dash Camera Memory Card Before the device can record video from the integrated dash camera, you must install a camera memory card. The camera requires a microSD™ or microSDHC memory card up to 64GB with a speed rating of class 4 or higher. You can use the included memory card, or you can purchase a compatible memory card from an electronics supplier. 1 Insert a memory card into the camera memory card slot . À Á NOTE: If you install the memory card into the incorrect slot, the camera cannot record video. 3 Extend the suction cup arm . Ã 4 If necessary, rotate the mount so the Garmin® logo faces right-side up. 5 Plug the vehicle power cable into the port on the mount. Ä 2 Press it in until it clicks. Mounting and Powering the dēzlCam Device in Your Vehicle WARNING This product contains a lithium-ion battery. To prevent the possibility of personal injury or product damage caused by battery exposure to extreme heat, store the device out of direct sunlight. Both the device and its mount contain magnets. Under certain circumstances, magnets may cause interference with some internal medical devices, including pacemakers and insulin pumps. Keep the device and its mount away from such medical devices. NOTICE Both the device and its mount contain magnets. Under certain circumstances, magnets may cause damage to some electronic devices, including hard drives in laptop computers. Use caution when the device or its mount is near electronic devices. Before you use your device on battery power, you should charge it. 1 Press the mount onto the suction cup until it snaps into À Á place. 6 Place the back of the device onto the mount. 7 Plug the other end of the vehicle power cable into a power outlet in your vehicle. Acquiring GPS Signals To navigate with your device, you must acquire satellites. in the status bar indicates the satellite signal strength. Acquiring satellites can take several minutes. 1 Turn on the device. 2 Wait while the device locates satellites. 3 If necessary, go outdoors to an open area, away from tall buildings and trees. Status Bar Icons The status bar is located at the top of the main menu. The status bar icons display information about features on the device. You can select some icons to change settings or view additional information. GPS signal status Bluetooth® technology status (appears when Bluetooth is enabled) Vehicle profile indicator Getting Started 1
-
 1
1 -
 2
2 -
 3
3 -
 4
4 -
 5
5 -
 6
6 -
 7
7 -
 8
8 -
 9
9 -
 10
10 -
 11
11 -
12
-
13
-
14
-
15
-
16
-
17
-
18
-
19
-
20
-
21
-
22
-
23
-
24
-
25
-
26
-
27
-
28
-
29
-
30
 |
 |
