Garmin dezlCam LMTHD Owner s Manual - Page 8
Starting a Route, Your Route on the Map, Adding a Location to Your Route, Shaping Your Route
 |
View all Garmin dezlCam LMTHD manuals
Add to My Manuals
Save this manual to your list of manuals |
Page 8 highlights
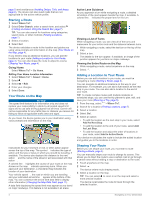
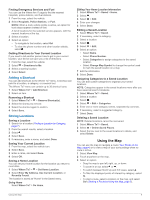
page 5) and avoidances (Avoiding Delays, Tolls, and Areas, page 6). The device can also avoid roads that are not appropriate for the active vehicle profile. Starting a Route 1 Select Where To?. 2 Select Enter Search, enter a search term, and select (Finding a Location Using the Search Bar, page 7). TIP: You can also search for locations using categories, search tools, or other methods (Finding Locations, page 7). 3 Select a location. 4 Select Go!. The device calculates a route to the location and guides you using voice prompts and information on the map (Your Route on the Map, page 4). If you need to stop at additional locations, you can add the locations to your route (Adding a Location to Your Route, page 4). You can also shape the route to adjust its course (Shaping Your Route, page 4). Going Home Select Where To? > Go Home. Editing Your Home Location Information 1 Select Where To? > Saved > Home. 2 Select . 3 Select > Edit. 4 Enter your changes. 5 Select Done. Your Route on the Map NOTICE The speed limit feature is for information only and does not replace your responsibility to abide by all posted speed limit signs and to use safe driving judgment at all times. Garmin will not be responsible for any traffic fines or citations you receive for failing to follow all applicable traffic laws and signs. As you travel, the device guides you to your destination using voice prompts and information on the map. Active Lane Guidance As you approach a turn while navigating a route, a detailed simulation of the road appears beside the map, if available. A colored line indicates the proper lane for the turn. À Viewing a List of Turns While navigating a route, you can view all of the turns and maneuvers for your entire route and the distance between turns. 1 While navigating a route, select the text bar on the top of the map. 2 Select a turn. The details for the turn appear. If available, an image of the junction appears for junctions on major roadways. Viewing the Entire Route on the Map 1 While navigating a route, select anywhere on the map. 2 Select . Adding a Location to Your Route Before you can add a location to your route, you must be navigating a route (Starting a Route, page 4). You can navigate to additional locations on the way to your destination. For example, you can add a fuel station as the next stop in your route. You can also add a location to the end of your route. TIP: To create complex routes with multiple locations or scheduled stops, you can use the trip planner to plan, edit, and save your route (Planning a Trip, page 5). 1 From the map, select > Where To?. 2 Search for a location (Finding Locations, page 7). 3 Select a location. 4 Select Go!. 5 Select an option: • To add the location as the next stop in your route, select Add As Next Stop. • To add the location to the end of your route, select Add As Last Stop. • To add the location and adjust the order of locations in your route, select Add to Active Route. Your device re-calculates the route to include the added location and guides you to the locations in order. Instructions for your next turn or exit, or other action appear across the top of the map. The symbol indicates the type of À action and the lane or lanes in which you should be traveling, if available. The device also displays the distance to the next action and the name of the street or exit associated with that Á action . Â A colored line highlights the course of your route on the map. Ã Arrows on the map indicate upcoming turns. When you Ä approach your destination, a checkered flag indicates the location of your destination. Your vehicle speed , the road on which you are traveling , and your estimated aÅrrival time appear at the bottom of thÆe Ç map. You can customize the arrival time data field to display other information (Changing the Map Data Field, page 11). A data field displaying the speed limit may appear as you travel on major roadways. This feature is not available in all areas. Shaping Your Route Before you can shape your route, you must start a route (Starting a Route, page 4). You can manually shape your route to change its course. This allows you to direct the route to use a certain road or go through a certain area without adding a stop or destination to the route. 1 Touch anywhere on the map. 2 Select . The device enters route shaping mode. 3 Select a location on the map. TIP: You can select to zoom in on the map and select a more precise location. The device recalculates the route to travel through the selected location. 4 Navigating to Your Destination
-
 1
1 -
2
-
 3
3 -
 4
4 -
 5
5 -
 6
6 -
 7
7 -
 8
8 -
 9
9 -
 10
10 -
 11
11 -
 12
12 -
 13
13 -
14
-
15
-
16
-
17
-
18
-
19
-
20
-
21
-
22
-
23
-
24
-
25
-
26
-
27
-
28
-
29
-
30
 |
 |
