Garmin fenix 3 Sapphire with Metal Band Owners Manual - Page 19
Navigation Settings, Pairing ANT+ Sensors, tempe, Putting On the Heart Rate Monitor
 |
View all Garmin fenix 3 Sapphire with Metal Band manuals
Add to My Manuals
Save this manual to your list of manuals |
Page 19 highlights
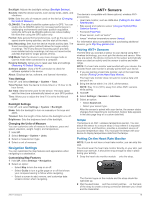
Backlight: Adjusts the backlight settings (Backlight Settings). Sounds: Sets the device sounds, such as key tones, alerts, and vibrations. Units: Sets the units of measure used on the device (Changing the Units of Measure). GLONASS: The default satellite system option is GPS. You can enable the GLONASS option for increased performance in challenging environments and faster position acquisition. Using the GPS and GLONASS options can reduce battery life more than using the GPS option only. Format: Sets general format preferences, such as the pace and speed shown during activities, and the start of the week. Data Recording: Sets how the device records activity data. The Smart recording option (default) allows for longer activity recordings. The Every Second recording option provides more detailed activity recordings, but may not record entire activities that last for longer periods of time. USB Mode: Sets the device to use mass storage mode or Garmin mode when connected to a computer. Restore Defaults: Allows you to reset user data and settings (Restoring All Default Settings). Software Update: Uses a Wi‑Fi connection to check for software updates to the device. About: Displays device, software, and license information. Time Settings Hold UP, and select Settings > System > Time. Time Format: Sets the device to show time in a 12-hour or 24- hour format. Set Time: Sets the time zone for the device. The Auto option sets the time zone automatically based on your GPS position. Time: Allows you to adjust the time if it is set to the Manual option. Backlight Settings Hold UP, and select Settings > System > Backlight. Mode: Sets the backlight to turn on manually or for keys and alerts. Timeout: Sets the length of time before the backlight turns off. Brightness: Sets the brighness level of the backlight. Changing the Units of Measure You can customize units of measure for distance, pace and speed, elevation, weight, height, and temperature. 1 Hold UP. 2 Select Settings > System > Units. 3 Select a measurement type. 4 Select a unit of measure. Navigation Settings You can customize the map features and appearance when navigating to a destination. Customizing Map Features 1 Hold UP, select Settings > Navigation. 2 Select an option: • Select Map to turn the map on or off. • Select Guide to turn a guide page on or off that shows your compass bearing to follow while navigating. • Select a screen to add, remove, and customize data screens shown when navigating. ANT+ Sensors The device is compatible with these optional, wireless ANT+ accessories. • Heart rate monitor, such as HRM-Run (Putting On the Heart Rate Monitor) • Bike speed and cadence sensor (Using an Optional Bike Cadence Sensor) • Foot pod (Foot Pod) • Power sensor, such as Vector™ • tempe™ wireless temperature sensor (tempe) For information about compatibility and purchasing additional sensors, go to http://buy.garmin.com. Pairing ANT+ Sensors The first time you connect a sensor to your device using ANT+ wireless technology, you must pair the device and sensor. After they are paired, the device connects to the sensor automatically when you start an activity and the sensor is active and within range. NOTE: If a heart rate monitor was bundled with your device, the included heart rate monitor is already paired with your device. 1 If you are pairing a heart rate monitor, put on the heart rate monitor (Putting On the Heart Rate Monitor). The heart rate monitor does not send or receive data until you put it on. 2 Bring the device within 3 m (10 ft.) of the sensor. NOTE: Stay 10 m (33 ft.) away from other ANT+ sensors while pairing. 3 Hold UP. 4 Select Settings > Sensors > Add New. 5 Select an option: • Select Search All. • Select your sensor type. After the sensor is paired with your device, the sensor status changes from Searching to Connected. Sensor data appears in the data page loop or a custom data field. tempe The tempe is an ANT+ wireless temperature sensor. You can attach the sensor to a secure strap or loop where it is exposed to ambient air, and therefore, provides a consistent source of accurate temperature data. You must pair the tempe with your device to display temperature data from the tempe. Putting On the Heart Rate Monitor NOTE: If you do not have a heart rate monitor, you can skip this task. You should wear the heart rate monitor directly on your skin, just below your sternum. It should be snug enough to stay in place during your activity. 1 Snap the heart rate monitor module onto the strap. À The Garmin logos on the module and the strap should be right-side up. 2 Wet the electrodes and the contact patches on the back Á Â of the strap to create a strong connection between your chest and the transmitter. ANT+ Sensors 15
-
 1
1 -
2
-
3
-
4
-
5
-
6
-
7
-
8
-
9
-
10
-
11
-
12
-
13
-
 14
14 -
 15
15 -
 16
16 -
 17
17 -
 18
18 -
 19
19 -
 20
20 -
 21
21 -
 22
22 -
 23
23 -
 24
24 -
25
-
26
 |
 |
