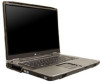
Gateway MT6452 8511725 - Gateway Service Guide - Page 40
Replacing the CMOS battery
 |
View all Gateway MT6452 manuals
Add to My Manuals
Save this manual to your list of manuals |
Page 40 highlights
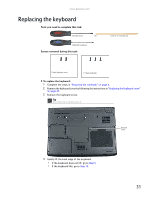
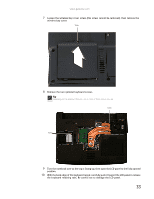
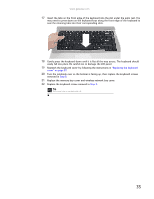
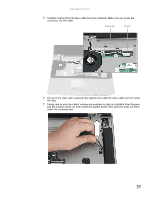
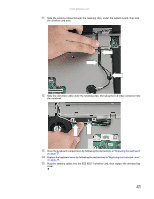
Replacing Notebook Components Replacing the CMOS battery Tools you need to complete this task: Flat-blade driver - OR - Phillips #0 screwdriver Screws removed during this task: Scribe or non-marring tool 2 black (keyboard cover) 1-3 black (keyboard) To replace the CMOS battery: 1 Complete the steps in "Preparing the notebook" on page 6. 2 Remove the keyboard cover by following the instructions in "Replacing the keyboard cover" on page 29. 3 Open the keyboard compartment by following the instructions in "Replacing the keyboard" on page 31. Tip You do not need to unplug the keyboard from the notebook. 4 Locate the old battery on the system board. If you have access to the battery connector on the system board, go to Step 5. -OR- If you do not have access to the battery connector on the system board, complete the following: a Remove the LCD panel by following the instructions in "Replacing the LCD panel assembly" on page 38. b Remove the palm rest by following the instructions in "Replacing the palm rest" on page 56, then go to Step 5. 36
-
 1
1 -
2
-
3
-
4
-
5
-
6
-
7
-
8
-
9
-
10
-
11
-
12
-
13
-
14
-
15
-
16
-
17
-
18
-
19
-
20
-
21
-
22
-
23
-
24
-
25
-
26
-
27
-
28
-
29
-
30
-
31
-
32
-
33
-
34
-
 35
35 -
 36
36 -
 37
37 -
 38
38 -
 39
39 -
 40
40 -
 41
41 -
 42
42 -
 43
43 -
 44
44 -
 45
45 -
46
-
47
-
48
-
49
-
50
-
51
-
52
-
53
-
54
-
55
-
56
-
57
-
58
-
59
-
60
-
61
-
62
-
63
-
64
-
65
-
66
-
67
-
68
-
69
-
70
-
71
-
72
-
73
-
74
-
75
-
76
-
77
-
78
 |
 |
