Gateway ZX190 8512740 - Gateway One Hardware Guide - Page 58
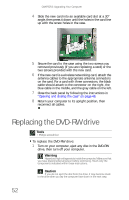
Replacing the DVD-RW drive
 |
View all Gateway ZX190 manuals
Add to My Manuals
Save this manual to your list of manuals |
Page 58 highlights
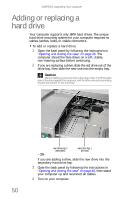
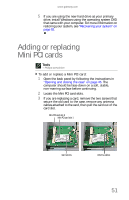
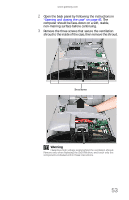
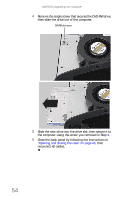
CHAPTER 3: Upgrading Your Computer 4 Slide the new card into an available card slot at a 30° angle, then press it down until the holes in the card line up with the screw holes in the case. 5 Secure the card to the case using the two screws you removed previously (if you are replacing a card) or the two screws provided with the new card. 6 If the new card is a wireless networking card, attach the antenna cables to the appropriate antenna connectors on the card. For a card with three connectors, the black cable should attach to the connector on the right, the blue cable in the middle, and the gray cable on the left. 7 Close the back panel by following the instructions in "Opening and closing the case" on page 46. 8 Return your computer to its upright position, then reconnect all cables. Replacing the DVD-RW drive Tools • Phillips screwdriver To replace the DVD-RW drive: 1 Turn on your computer, eject any disc in the DVD-RW drive, then turn off your computer. Warning Hazardous high voltage exists inside the computer. Make sure that you have disconnected all power before continuing. Touch only the components indicated within these instructions. Caution If you do not eject the disc from the drive, it may become stuck in the drive after you lay the computer face-down in the next step. 52
-
 1
1 -
2
-
3
-
4
-
5
-
6
-
7
-
8
-
9
-
10
-
11
-
12
-
13
-
14
-
15
-
16
-
17
-
18
-
19
-
20
-
21
-
22
-
23
-
24
-
25
-
26
-
27
-
28
-
29
-
30
-
31
-
32
-
33
-
34
-
35
-
36
-
37
-
38
-
39
-
40
-
41
-
42
-
43
-
44
-
45
-
46
-
47
-
48
-
49
-
50
-
51
-
52
-
 53
53 -
 54
54 -
 55
55 -
 56
56 -
 57
57 -
 58
58 -
 59
59 -
 60
60 -
 61
61 -
 62
62 -
 63
63 -
64
-
65
-
66
-
67
-
68
-
69
-
70
-
71
-
72
-
73
-
74
-
75
-
76
-
77
-
78
-
79
-
80
-
81
-
82
-
83
-
84
-
85
-
86
-
87
-
88
-
89
-
90
-
91
-
92
-
93
-
94
-
95
-
96
-
97
-
98
-
99
-
100
-
101
-
102
-
103
-
104
-
105
-
106
-
107
-
108
-
109
-
110
-
111
-
112
-
113
-
114
-
115
-
116
-
117
-
118
-
119
-
120
-
121
-
122
-
123
-
124
-
125
-
126
-
127
-
128
-
129
-
130
-
131
-
132
 |
 |
