GE 60-803-04 Installation Instructions - Page 5
Version 2.0 or Newer and Concord Express Panels
 |
UPC - 046188088645
View all GE 60-803-04 manuals
Add to My Manuals
Save this manual to your list of manuals |
Page 5 highlights
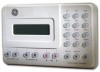
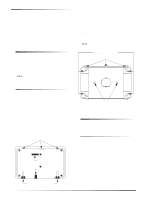
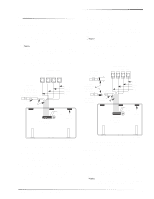
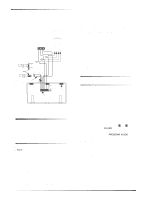
Power Up and Bus Communication Additional Touchpad 1. Disconnect the panel AC power transformer, backup battery, and turn off the power switch. 2. Connect all bus device wiring to the panel (including the wiring that was disconnected in step one of the first touchpad installation), but make sure no new touchpads are connected to their wiring harnesses yet. 3. Verify that all wiring at the panel and at the added touchpad wiring harnesses are correct (but do not connect any touchpads to their wiring harness). 4. Apply power to the panel (turn on the power switch). 5. Set the RUN/PROGRAM switch to PROGRAM. Existing (previously installed) touchpad(s) display PROGRAM MODE. Or-The display shows ENTER CODE or 1-OFF (1 blinking), indicating you need to enter the install code. After entering the install code, existing touchpads display PROGRAM MODE. Note After entering the install code to get into program mode, the panel allows you to switch between RUN and PROGRAM mode for 1 hour without re-entering the code. 6. At an existing touchpad, press BYPASS or STATUS until the display shows TOUCHPAD OPTIONS. 7. Press COMMAND and the display shows UNIT NUMBER. 8. Press COMMAND; existing touchpads will display DA 00N (where N is the unit number 0-7). Make a note of this touchpad unit number. 9. Check the unit numbers of all other existing touchpads and write them down. 10. Check the unit number DIP switches on other bus devices (ESM, HIM, etc.) and make a note of their respective unit numbers. 11. Connect the wiring harness to one new touchpad. 12. Put the new touchpad into the manual configuration mode by pressing and holding the touchpad D and 6 buttons until the display shows DA 001 (unit number 001). 13. Press BYPASS and the display shows ENTER _. 14. Enter a unit number different from that of the existing touchpads and any other bus devices in the system by pressing any of the touchpad buttons numbered 0 through 7. 15. Press BYPASS then STATUS to lock in and display the new unit number for the touchpad. 16. Disconnect this touchpad and repeat steps 11 through 16 for any other new alphanumeric touchpads. Be sure to disconnect each touchpad after assigning its unit number. 17. After assigning unit numbers to all the new touchpads, connect each touchpad to its respective wiring harness. 18. Set the RUN/PROGRAM switch to RUN. All touchpads should display 1 - OFF. 19. Set the RUN/PROGRAM switch to PROGRAM so the panel can learn all bus device unit numbers. All touchpads should display PROGRAM MODE. 20. Set the RUN/PROGRAM switch to RUN. 21. At each touchpad, verify correct operation by pressing STATUS. The display should show the current system status. Powering up Concord Panels with Software Version 2.0 or Newer and Concord Express Panels 1. Verify that all wiring between the panel and touchpad is correct. 2. Connect the panel battery and plug in the panel transformer. Alphanumeric touchpads show "SCANNING BUS DEVICES," then a date and time display. 3. Verify correct operation by pressing ,. The display should show the current system status. Note If after pressing , the touchpad does not display the current system status, see "Troubleshooting." Powering up Concord Panels with Software Versions 1.0-1.6 First Touchpad 1. Verify that all wiring between the panel and touchpad is correct. 2. Check the unit number DIP switches on all other bus devices (ESM, HIM, etc.) and make note of their respective unit numbers. Note Touchpads default to unit number 001 when first installed. If possible, leave this unit number open. If unit number 001 is not available, or there are multiple touchpads installed see the section "Additional Touchpads" below. 3. Connect the panel battery and plug in the panel transformer. Alphanumeric touchpads show "SCANNING BUS DEVICES," then a date and time display. 4. Verify correct operation by pressing ,. The display should show the current system status. Note If after pressing , the touchpad does not display the current system status, see "Troubleshooting." Additional Touchpads 1. Verify that all wiring between the panel and touchpad is correct. 2. Check the unit number DIP switches on other bus devices (ESM, HIM, etc.) and make a note of their respective unit numbers. 3. Connect the panel battery and plug in the panel transformer. Alphanumeric touchpads show "SCANNING BUS DEVICES," then a date and time display. SuperBus® 2000 2 x 20 LCD Alphanumeric Touchpad 5
-
 1
1 -
 2
2 -
 3
3 -
 4
4 -
 5
5 -
 6
6 -
 7
7 -
 8
8
 |
 |
