GE CWB7030SLSS Installation Instructions - Page 10
Double Advantium/Convection 120, Installation, Installation under a GE Appliances/Monogram 30 or 36
 |
View all GE CWB7030SLSS manuals
Add to My Manuals
Save this manual to your list of manuals |
Page 10 highlights
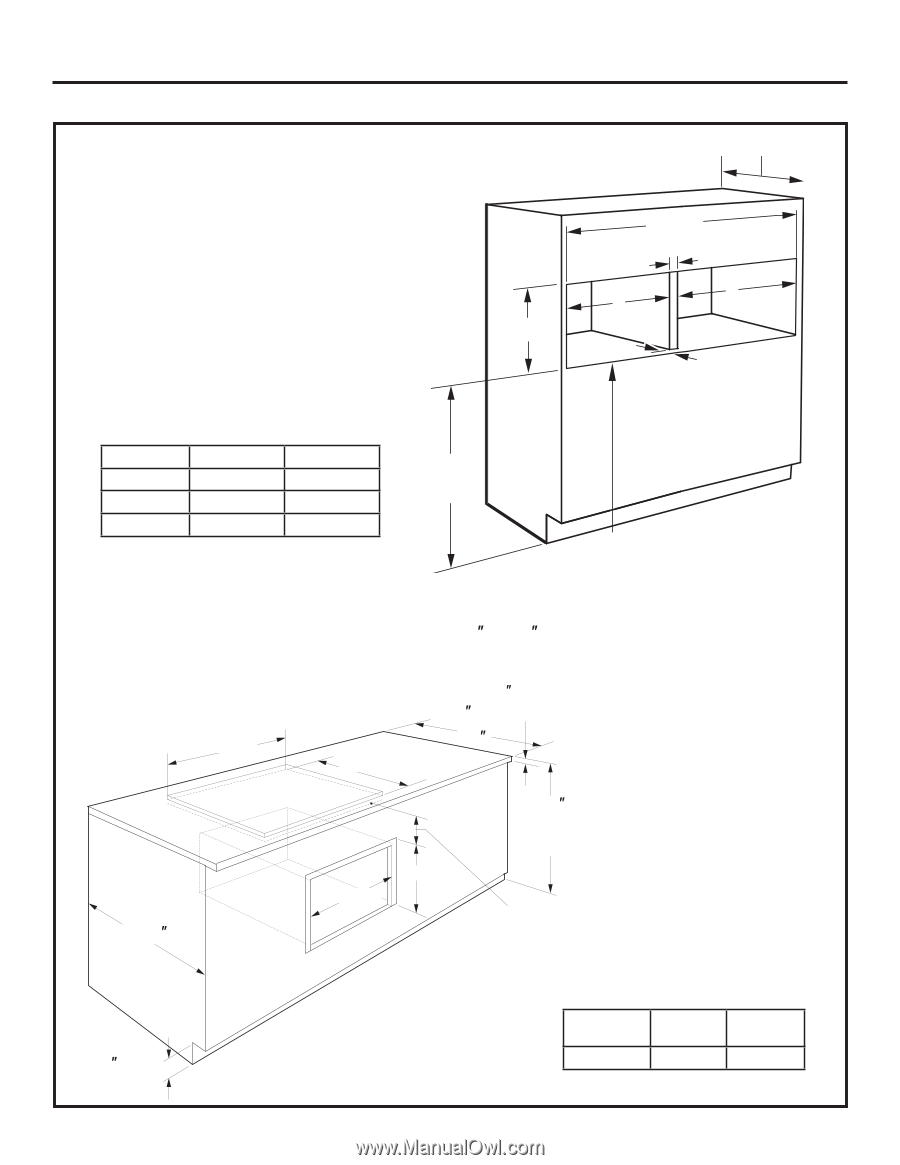
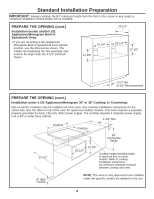
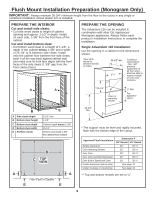
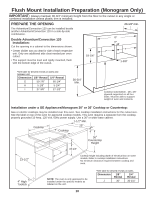
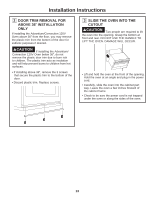
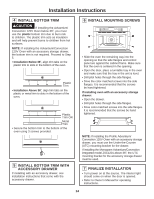
Flush Mount Installation Preparation (Monogram Only) IMPORTANT: Always maintain 36-3/4" minimum height from the floor to the cutout in any single or combined installation unless plastic trim is installed. PREPARE THE OPENING 23-1/2" min. The Advantium/Convection 120 can be installed beside another Advantium/Convection 120 in a side-by-side combination. Double Advantium/Convection 120 Installation: Cut the opening in a cabinet to the dimensions shown. • Center divider acts as cleat for side of each respective unit. Only one additional side cleat needed per oven cutout. • The support must be level and rigidly mounted, flush with the bottom edge of the cutout. 19-1/4" G* H* I* I* 1-3/8" *See table for desired reveals on sides and between unit. Dimension 1/8" Reveal 1/4" Reveal G 59-7/8" 60-1/4" H 5-1/8" 5-1/4" I 27-3/8" 27-1/2" 36-3/4" Min. Construct solid bottom - Min. 3/8" plywood supported on all four sides. Must be able to support weight of oven and contents. Installation under a GE Appliances/Monogram 30Ǝ or 36Ǝ Cooktop or Countertop: Gas or electric cooktops may be installed over this oven. See cooktop installation instructions for the cutout size. See the label on top of the oven for approved cooktop models. This oven requires a separate from the cooktop, properly grounded 15-Amp, 120-Volt, 60Hz power supply. Use a 36Ǝ or wider base cabinet. 1-1/2Ǝ Min. Cooktop 25Ǝ Cooktop 36Ǝ Countertop Height 23-1/2Ǝ 19-1/4" J* Cooktop height including depth of electrical box on some models. Refer to cooktop installation instructions. No minimum clearance required between cooktop and oven. 4Ǝ High Toekick NOTE: The oven is only approved to be installed under the specific models as labeled on the unit. 10 *See table for desired reveals on sides. Dimension 1/8" 1/4" Reveal Reveal J 30" 30-1/4"
-
 1
1 -
2
-
3
-
4
-
 5
5 -
 6
6 -
 7
7 -
 8
8 -
 9
9 -
 10
10 -
 11
11 -
 12
12 -
 13
13 -
 14
14 -
 15
15 -
16
-
17
-
18
-
19
-
20
-
21
-
22
-
23
-
24
-
25
-
26
-
27
-
28
-
29
-
30
-
31
-
32
 |
 |