GE DPVH890EJWW Owners Manual - Page 32
Final Setup, Level The Dryer, Attach Serial Cable, Plug Dryer In, Grounding Instructions
 |
View all GE DPVH890EJWW manuals
Add to My Manuals
Save this manual to your list of manuals |
Page 32 highlights
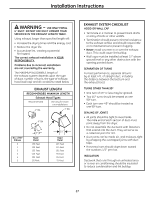
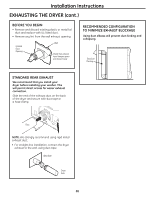
FINAL SETUP Installation Instructions 1 LEVEL THE DRYER Stand the dryer upright near the final location and adjust the four leveling legs at the corners to ensure that the dryer is level from side to side and front to rear. 4 GROUNDING INSTRUCTIONS This appliance must be grounded. In the event of malfunction or breakdown, grounding will reduce the risk of electric shock by providing a path of least resistance for electric current. This appliance is equipped with a cord having an equipment-grounding conductor and a grounding plug. The plug must be plugged into an appropriate outlet that is properly installed and grounded in accordance with all local codes and ordinances. Raise Lower 2 ATTACH SERIAL CABLE Attach the serial cable for washer and dryer connection to the serial port on the back of the dryer. Attach the other end of the cable to the washer before pushing the washer into its final position. 5 DRYER STARTUP Press the POWER button. NOTE: If the dryer has been exposed to temperatures below freezing for an extended period of time, allow it to warm up before pressing POWER. Otherwise, the display will not come on. The dryer is now ready for use. Serial Port Rear of Dryer 3 PLUG DRYER IN Ensure proper ground exists before use. SERVICING WARNING - Label all wires prior to disconnection when servicing controls. Wiring errors can cause improper and dangerous operation after servicing/installation. For replacement parts and other information, refer to the back cover for servicing phone numbers. 32
-
 1
1 -
2
-
3
-
4
-
5
-
6
-
7
-
8
-
9
-
10
-
11
-
12
-
13
-
14
-
15
-
16
-
17
-
18
-
19
-
20
-
21
-
22
-
23
-
24
-
25
-
26
-
 27
27 -
 28
28 -
 29
29 -
 30
30 -
 31
31 -
 32
32 -
 33
33 -
 34
34 -
 35
35 -
 36
36 -
 37
37 -
38
-
39
-
40
-
41
-
42
-
43
-
44
-
45
-
46
-
47
-
48
-
49
-
50
-
51
-
52
-
53
-
54
-
55
-
56
-
57
-
58
-
59
-
60
-
61
-
62
-
63
-
64
-
65
-
66
-
67
-
68
-
69
-
70
-
71
-
72
-
73
-
74
-
75
-
76
-
77
-
78
-
79
-
80
-
81
-
82
-
83
-
84
-
85
-
86
-
87
-
88
-
89
-
90
-
91
-
92
-
93
-
94
-
95
-
96
-
97
-
98
-
99
-
100
-
101
-
102
-
103
-
104
-
105
-
106
-
107
-
108
-
109
-
110
-
111
-
112
-
113
-
114
-
115
-
116
-
117
-
118
-
119
-
120
-
121
-
122
-
123
-
124
-
125
-
126
-
127
-
128
-
129
-
130
-
131
-
132
-
133
-
134
-
135
-
136
-
137
-
138
-
139
-
140
-
141
-
142
-
143
-
144
-
145
-
146
-
147
-
148
-
149
-
150
-
151
-
152
-
153
-
154
-
155
-
156
 |
 |
