GE GTE21GSHSS Use and Care Manual - Page 19
Installation Instructions
 |
View all GE GTE21GSHSS manuals
Add to My Manuals
Save this manual to your list of manuals |
Page 19 highlights
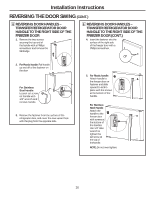
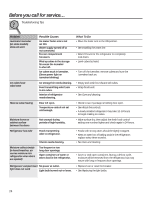
Installation Instructions 5 REVERSING DOOR HANDLES - TRANSFER FREEZER DOOR HANDLE TO THE RIGHT SIDE OF THE REFRIGERATOR DOOR 5 REVERSING DOOR HANDLES - TRANSFER FREEZER DOOR HANDLE TO THE RIGHT SIDE OF THE REFRIGERATOR DOOR (CONT.) 4. Remove the plug button from the surface of the right side of the refrigerator door and insert the fastener with a Phillips screwdriver. 1. Remove the two screws securing the bottom end of the handle with a Phillips screwdriver and remove the GE bacge. 2. For Plastic handles: Pull handle down and off of the fastener on the door. For Stainless Steel handeles: Loosen the set screw on the handle with 1/8" wrench and remove handle. 3. Remove the fastener from the surface of the freezer door, and cover the new vacant hole with the GE Badge. (For a new unit, the GE Badge can be found in your handle kit. If you need a new badge call 800.GE.CARES (800.432.2737) (in Canada call 800.561.3344). 5. For Plasic handle: Attach handle to fresh food door on fastener and slide downward to lock in place with the screws at the top of the handle. For Stainless Steel handle: Attach handle to fresh food door with screws at the top of the handle. Use 1/8" allen wrench to tighten the set screw at the bottom of the handle. NOTE: Do not over-tighten. 19
-
 1
1 -
2
-
3
-
4
-
5
-
6
-
7
-
8
-
9
-
10
-
11
-
12
-
13
-
 14
14 -
 15
15 -
 16
16 -
 17
17 -
 18
18 -
 19
19 -
 20
20 -
 21
21 -
 22
22 -
 23
23 -
 24
24 -
25
-
26
-
27
-
28
-
29
-
30
-
31
-
32
-
33
-
34
-
35
-
36
-
37
-
38
-
39
-
40
-
41
-
42
-
43
-
44
-
45
-
46
-
47
-
48
-
49
-
50
-
51
-
52
-
53
-
54
-
55
-
56
-
57
-
58
-
59
-
60
-
61
-
62
-
63
-
64
-
65
-
66
-
67
-
68
-
69
-
70
-
71
-
72
-
73
-
74
-
75
-
76
-
77
-
78
-
79
-
80
-
81
-
82
-
83
-
84
 |
 |
