GE JB968 Owners Manual - Page 10
Using the surface units, Knob-controlled models
 |
View all GE JB968 manuals
Add to My Manuals
Save this manual to your list of manuals |
Page 10 highlights
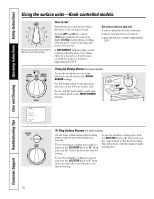
Consumer Support Troubleshooting Tips Care and Cleaning Operating Instructions Safety Instructions Using the surface units-Knob-controlled models. Be sure you turn the control knob to OFF when you finish cooking. How to Set Push the knob in and turn in either direction to the setting you want. At both OFF and HI the control clicks into position. You may hear slight clicking sounds during cooking, indicating the control is keeping the power level you set. A HOT SURFACE indicator light, on the cooktop, will glow when any radiant element is turned on. It will remain on until the surface is cooled to approximately 150°F. Hot surface indicator light will: s come on when the unit is hot to the touch. s stay on even after the unit is turned off. s glow until the unit is cooled to approximately 150°F. Using the Bridge Burner (on some models) To use the bridge burner, turn the left front control knob to the BRIDGE BURNER settings. For full bridge surface unit operation, also turn on the left rear surface unit. To use only the front surface unit, turn the control knob to the FRONT BURNER settings. BURNER SIZE 6" 9" 12" Tri-Ring Surface Element (on some models) The rear center surface element offers 3 cooking areas to match the size of the cookware you are using. To use the largest cooking area, push in and turn the SELECTOR knob to 12″. Push and turn the control knob to the desired setting. To use the smallest cooking area, turn the SELECTOR knob to 6″. Push and turn the control knob to the desired setting. This will activate only the smallest inside heating area. To use the medium cooking area, press and turn the SELECTOR knob to 9″. Push down and turn the control knob to the desired setting. 10
-
 1
1 -
2
-
3
-
4
-
 5
5 -
 6
6 -
 7
7 -
 8
8 -
 9
9 -
 10
10 -
 11
11 -
 12
12 -
 13
13 -
 14
14 -
 15
15 -
16
-
17
-
18
-
19
-
20
-
21
-
22
-
23
-
24
-
25
-
26
-
27
-
28
-
29
-
30
-
31
-
32
-
33
-
34
-
35
-
36
-
37
-
38
-
39
-
40
-
41
-
42
-
43
-
44
-
45
-
46
-
47
-
48
-
49
-
50
-
51
-
52
 |
 |
