GE JB968 Owners Manual - Page 11
Safety Instructions, Care and Cleaning, Troubleshooting Tips, Consumer Support, Operating Instructions - model
 |
View all GE JB968 manuals
Add to My Manuals
Save this manual to your list of manuals |
Page 11 highlights
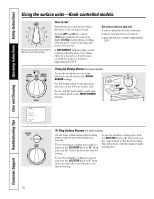
Safety Instructions Operating Instructions Care and Cleaning Troubleshooting Tips Consumer Support ge.com Using the Warming Zone (on some models) The WARMING ZONE is located in the back center of the glass surface. Always start with hot food. Do not use to heat cold food. Placing uncooked or cold food on the WARMING ZONE could result in foodborne illness. To use the WARMING ZONE: Touch the WARMING ZONE ON/OFF pad. Touch the 1 (LO), 2 (MED) or 3 (HI) pad to select the desired control setting. Touch the START pad. "WARMER ON" will be in the control display. To turn off the WARMING ZONE: Touch the WARMING ZONE ON/OFF pad. Food Type Sauces Soups (cream) Stews Vegetables Hot Beverages Soups (other than cream) Breads/Pastries Control Setting LO Medium Medium Medium HI HI LO The chart above shows initial suggested settings only. The temperature, type and amount of food, type of pan and the time held will affect the quality of the food. CAUTION: Do not leave food on the WARMING ZONE for more than 2 hours. s Do not use plastic wrap to cover food. Plastic may melt onto the surface and be very difficult to clean. NOTE: The CLEAR/OFF pad will not turn off the s Use only cookware recommended for WARMING ZONE. top-of-range cooking. For best results, all foods on the WARMING ZONE should be covered with a lid or aluminum foil. Always use pot holders or oven mitts when removing food from the WARMING ZONE, as cookware will be hot. A HOT surface indicator light will glow when the glass surface is hot and will remain on until the surface is cool enough to touch. Lower settings may not heat the glass surface enough to cause the HOT surface indicator light to come on. NOTE: The WARMING ZONE will not glow red like the cooking elements. 11
-
 1
1 -
2
-
3
-
4
-
5
-
 6
6 -
 7
7 -
 8
8 -
 9
9 -
 10
10 -
 11
11 -
 12
12 -
 13
13 -
 14
14 -
 15
15 -
 16
16 -
17
-
18
-
19
-
20
-
21
-
22
-
23
-
24
-
25
-
26
-
27
-
28
-
29
-
30
-
31
-
32
-
33
-
34
-
35
-
36
-
37
-
38
-
39
-
40
-
41
-
42
-
43
-
44
-
45
-
46
-
47
-
48
-
49
-
50
-
51
-
52
 |
 |
