GE NX-108E User Manual - Page 13
Assigning User Code Authority Levels
 |
UPC - 782136402414
View all GE NX-108E manuals
Add to My Manuals
Save this manual to your list of manuals |
Page 13 highlights
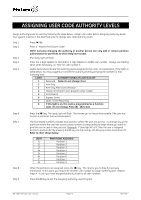
ASSIGNING USER CODE AUTHORITY LEVELS Assign authority levels to users by following the steps below. Assign user codes before assigning authority levels. Your system must be in the disarmed state to change user code authority levels. Step 1 Step 2 Step 3 Step 4 Step 5 Press [r]-[6]. Enter a "Master Arm/Disarm Code". NOTE: Someone changing the authority of another person can only add or remove partition authorization for partitions to which they have access. The ready light will flash. Enter the 2-digit (applies to NX4/6/8) or 3-digit (applies to NX8E) user number. Always use leading zeros when necessary, i.e. "004" for user number 4. Lights illuminated indicate the authority levels assigned to this code. An explanation of the lights is listed below. You may toggle (turn on/off) the authority level by pressing the number for that authority level. LIGHT AUTHORITY LEVELS IF LIGHT 8 IS OFF 1 Reserved (Note: Do not change if on.) 2 Arm Only 3 Arm Only After Close Window 4 Master Arm/Disarm (can program other codes) 5 Arm/Disarm 6 Bypass Zones 7 Open / Close Reporting 8 If this light is on, this code is programmed as a function code. Do not change, Press [#] - [#] to exit. Step 6 Step 7 Step 8 Step 9 Press the [r] key. The ready light will flash. This moves you to the partition enable. (The user has access in partitions that are illuminated.) The illuminated numbers indicate each partition where the user has access. To change any of the partitions where the user has access, press numbers corresponding to areas where you want to give the user access or deny access. (Example: If zone light #2 is lit, then the user is assigned access to partition #2. By pressing the [2] key, the light will go off, denying access to partition #2. Refer to chart shown below. LIGHT 1 2 3 4 5 6 7 8 PARTITIONS ASSIGNED Partition 1 Partition 2 Partition 3 Partition 4 Partition 5 Partition 6 Partition 7 Partition 8 When the partitions are assigned, press the [r] key. This returns you to Step 3 previously mentioned. At this point you may enter another user number to assign authority level. Repeat Steps 4 - 8 until you have assigned authority levels to all user numbers. Press the [#] key to exit the Assigning Authority Level Program. NX-108/116/124E User manual Page 13 10/11/05
-
 1
1 -
2
-
3
-
4
-
5
-
6
-
7
-
 8
8 -
 9
9 -
 10
10 -
 11
11 -
 12
12 -
 13
13 -
 14
14 -
 15
15 -
 16
16 -
 17
17 -
 18
18 -
19
 |
 |