Gigabyte GA-8I915P-D Pro Manual
Gigabyte GA-8I915P-D Pro Manual
 |
View all Gigabyte GA-8I915P-D Pro manuals
Add to My Manuals
Save this manual to your list of manuals |
Gigabyte GA-8I915P-D Pro manual content summary:
- Gigabyte GA-8I915P-D Pro | Manual - Page 1
GA-8I915P-D Pro Intel® Pentium® 4 LGA775 Processor Motherboard User's Manual Rev. 2003 12ME-8I915PDP-2003 - Gigabyte GA-8I915P-D Pro | Manual - Page 2
Motherboard GA-8I915P-D Pro Jun. 11, 2004 Motherboard GA-8I915P-D Pro Jun. 11, 2004 - Gigabyte GA-8I915P-D Pro | Manual - Page 3
property of Gigabyte. No partof this manual may be reproduced, copied, translated, or transmitted in any form or by any means without Gigabyte's prior written related to Gigabyte's unique features, please go to "Technology Guide" section on Gigabyte's website to read or download the information you - Gigabyte GA-8I915P-D Pro | Manual - Page 4
Table of Contents GA-8I915P-D Pro Motherboard Layout 6 Block Diagram ...7 Chapter 1 Hardware Installation 9 1-1 Considerations Prior to Installation 9 1-2 Feature Summary 10 1-3 Installation of the CPU and Heatsink 12 1-3-1 Installation of the CPU 12 1-3-2 Installation of the Heatsink 13 1-4 - Gigabyte GA-8I915P-D Pro | Manual - Page 5
3-3 Driver CD Information 50 3-4 Hardware Information 51 3-5 Contact Us ...51 Chapter 4 Appendix 53 4-1 Unique Software Utilities 53 4-1-1 Xpress Recovery Introduction 54 4-1-2 Flash BIOS Method Introduction 57 4-1-3 2- / 4- / 6- / 8- Channel Audio Function Introduction 68 4-2 Troubleshooting - Gigabyte GA-8I915P-D Pro | Manual - Page 6
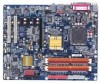
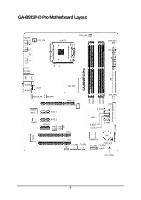
Motherboard Layout KB_MS SP DIF_O SPDI F_I ATX_12V LGA 775 C PU _FAN PWR_FA N ATX LPT GA-8I915P-D Pro IDE USB COMA R_U SB LAN AUDIO1 AUDIO2 C D_ IN AZALI A_FP N B_ FAN Intel 915P PC IE_16 DDRII1 DDRII2 DDRII3 DDRII4 SYS_FAN FDD IT8712 M arv ell 8001 C ODEC PCI E_1 S - Gigabyte GA-8I915P-D Pro | Manual - Page 7
Block Diagram PCI-ECLK (100M Hz) LGA775 Processor CPUCLK+/-(200/133M Hz) Ho st Interfa ce DDRII 600(Note)/533/400MHz DIMM PCI-ECLK (100M Hz) PCI Express x16 In te l 915P MCH 3 PCI Express x 1 Ports Dual Channel Memory MCHCLK (133/200MHz) 66MHz 33MHz 14.318M Hz 48MHz PCI Express x1 Bus - Gigabyte GA-8I915P-D Pro | Manual - Page 8
- 8 - - Gigabyte GA-8I915P-D Pro | Manual - Page 9
, please follow the instructions below: 1. Please turn when handling electronic components (CPU, RAM). 4. Prior information in the provided manual. 3. Before using the any installation steps or have a problem related to the use of the conditions recommended in the user manual. 3. Damage due to - Gigabyte GA-8I915P-D Pro | Manual - Page 10
Onboard SATA Peripherals Onboard LAN Onboard Audio I/O Control w Supports the latest Intel® Pentium® 4 LGA775 CPU w Supports 800/533MHz FSB w L2 cache varies with CPU w Northbridge: Intel® , you must install an 800MHz FSB processor and overclock in BIOS. GA-8I915P-D Pro Motherboard - 10 - - Gigabyte GA-8I915P-D Pro | Manual - Page 11
/ System / Power fan speed detection w CPU warning temperature w CPU / System / Power fan failure warning w CPU smart fan control w Use of licensed AWARD BIOS w Supports Dual BIOS/Q-Flash/Multilanguage w Supports @BIOS w Supports EasyTune w Over Voltage via BIOS (CPU/DDR II/PCI-E) w Over Clock via - Gigabyte GA-8I915P-D Pro | Manual - Page 12
motherboard supports the CPU. 2. Please take note of the one indented corner of the CPU. If you install the CPU in the wrong direction, the CPU will might cause damage to the CPU during installation.) GA-8I915P-D Pro Motherboard - 12 - Fig. 4 Once the CPU is properly inserted, please replace - Gigabyte GA-8I915P-D Pro | Manual - Page 13
the CPU and make sure the push pins aim to the pin hole on the motherboard.Pressing down the push pins diagonally. Fig. 4 Please make sure the Male and Female push pin are joined closely. (for detailed installation instructions, please refer to the heatsink installation section of the user manual - Gigabyte GA-8I915P-D Pro | Manual - Page 14
If you are unable to insert the module, please switch the direction. The motherboard supports DDR II memory modules, whereby BIOS will automatically detect memory capacity and specifications. Memory modules steps when you wish to remove the DIMM module. GA-8I915P-D Pro Motherboard - 14 - - Gigabyte GA-8I915P-D Pro | Manual - Page 15
English Dual Channel DDR II GA-8I915P-D Pro supports the Dual Channel Technology. After operating the Dual Channel Technology, the bandwidth of Memory Bus will add double up to 8.5GB/s. GA-8I915P-D Pro includes 4 DIMM sockets, and each Channel has two DIMM sockets as following: Channel A : DDR II - Gigabyte GA-8I915P-D Pro | Manual - Page 16
outlined below: 1. Read the related expansion card's instruction document before install the expansion card into the setup BIOS utility of expansion card from BIOS. 8. Install related driver from the operating system. Installing a PCI Express x 16 expansion GA-8I915P-D Pro Motherboard - 16 - - Gigabyte GA-8I915P-D Pro | Manual - Page 17
USB interface. Also make sure your OS supports USB controller. If your OS does not support USB controller, please contact OS vendor for possible patch or driver upgrade. For more information please contact your OS or device(s) vendors. LAN Port The provided Internet connection is Gigabit Ethernet - Gigabyte GA-8I915P-D Pro | Manual - Page 18
8) IDE 9) S_ATA0 / S_ATA1 / S_ATA2 / S_ATA3 10) PWR_LED 11) F_PANEL 12) AZALIA_FP 13) CD_IN 14) F_USB1 / F_USB2 15) F1_1394 / F2_1394 16) IR 17) CLR_CMOS 18) BAT GA-8I915P-D Pro Motherboard - 18 - - Gigabyte GA-8I915P-D Pro | Manual - Page 19
installed. Align the power connector with its proper location on the motherboard and connect tightly. The ATX_12V power connector mainly supplies power to the CPU. If the ATX_12V power connector is not connected, the system will not start. Caution! Please use a power supply that is able to handle - Gigabyte GA-8I915P-D Pro | Manual - Page 20
cooler to prevent system overheating and failure. Caution! Please remember to connect the power to the CPU fan to prevent CPU overheating and failure. 1 CPU_FAN 1 PWR_FAN 1 SYS_FAN Pin No. 1 2 3 4 black cable is GND) Pin No. Definition 1 +12V 2 GND 1 GA-8I915P-D Pro Motherboard - 20 - - Gigabyte GA-8I915P-D Pro | Manual - Page 21
cable while the other end of the cable connects to the FDD drive. The types of FDD drives supported are: 360KB, 720KB, 1.2MB, 1.44MB and 2.88MB. Please connect the red power connector wire to , please refer to the instructions located on the IDE device). 40 39 2 1 - 21 - Hardware Installation - Gigabyte GA-8I915P-D Pro | Manual - Page 22
can provide 150MB/s transfer rate. Please refer to the BIOS setting for the Serial ATA and install the proper driver in order to work properly. Pin No. Definition 1 GND 1 7 2 TXP 3 TXN 4 GND 5 mode. Pin No. Definition 1 1 MPD+ 2 MPD- 3 MPD- GA-8I915P-D Pro Motherboard - 22 - - Gigabyte GA-8I915P-D Pro | Manual - Page 23
English 11) F_PANEL (Front Panel Jumper) Please connect the power LED, PC peaker, reset switch and power switch etc of your chassis front panel to the F_PANEL connector according to the pin assignment below. Speaker Connector SPEAK- 20 19 Power Switch Message LED/ Power/ Sleep LED SPEAK+ PWPW+ - Gigabyte GA-8I915P-D Pro | Manual - Page 24
is the same as the pin assigment on the motherboard header. To find out if the chassis you are buying support front audio panel connector, please contact your dealer. 10 9 2 1 Pin No. 1 2 3 4 . Pin No. Definition 1 CD-L 2 GND 1 3 GND 4 CD-R GA-8I915P-D Pro Motherboard - 24 - - Gigabyte GA-8I915P-D Pro | Manual - Page 25
to work or even damage it. For optional front USB cable, please contact your local dealer. The "USB Device Wake up From S3" is only supported by rear USB ports. 2 10 1 9 Pin No. 1 2 3 4 5 6 7 8 9 10 Definition Power Power USB DXUSB DyUSB DX+ USB Dy+ GND GND No Pin NC 15) F1_1394/F2_1394 - Gigabyte GA-8I915P-D Pro | Manual - Page 26
this jumper. To clear CMOS, temporarily short 1-2 pin. Default doesn't include the "Shunter" to prevent from improper use this jumper. 1 Open: Normal 1 Short: Clear CMOS GA-8I915P-D Pro Motherboard - 26 - - Gigabyte GA-8I915P-D Pro | Manual - Page 27
is incorrectly replaced. Replace only with the same or equivalent type recommended by the manufacturer. Dispose of used batteries according to the manufacturer's instructions. If you want to erase CMOS... 1.Turn OFF the computer and unplug the power cord. 2.Remove the battery, wait for 30 second - Gigabyte GA-8I915P-D Pro | Manual - Page 28
English GA-8I915P-D Pro Motherboard - 28 - - Gigabyte GA-8I915P-D Pro | Manual - Page 29
English Chapter 2 BIOS Setup BIOS (Basic Input and Output Sy stem) includes a CMOS SETUP utility w hichallow s user toconfigure required settings or to activ ate certain sy stem features. The CMOS SETUP sav es the configuration in the CMOS SRAM of the motherboard. When the pow er is turned off, the - Gigabyte GA-8I915P-D Pro | Manual - Page 30
BIOS/Q- Flash F3:Change Lan guage F10: Save & CPU clock and frequency ratio. n Sel ect Language This setup page is select multi language. n Load Fail -Safe Defaults Fail-Safe Defaults indicates the v alue of the sy stem parameters w hich the sy stem w ould be in safe configu ration. GA-8I915P-D Pro - Gigabyte GA-8I915P-D Pro | Manual - Page 31
English n Load Optimized Defaults Optimized Defaults indicates the v alue of the sy stem parameters w hich the sy stem w ould be in best performancec onfiguration. n Set Supervisor Password Change, set, or disable passw ord. It allows y ou to limitaccess to the sy stem and Setup, or just to Setup. - Gigabyte GA-8I915P-D Pro | Manual - Page 32
stem w ill skip the automatic detection step and allow for faster sy stem start up. Manual User can manually input the correct settings Access Mode Use this toset the access mode forthe hard driv e. The has not been installed, select NONEand press . GA-8I915P-D Pro Motherboard - 32 - - Gigabyte GA-8I915P-D Pro | Manual - Page 33
1.44M, 3.5" 2.88M, 3.5" 3.5 inch double-sided driv e; 1.44M by te capacity . 3.5 inch double-sided driv e; 2.88M by te capacity . Floppy 3 Mode Support (for Japan Area) Disabled Normal Floppy Driv e. (Default v alue) Driv eA Driv e B Drive A is 3mode Floppy Driv e. Drive B is 3 mode Floppy - Gigabyte GA-8I915P-D Pro | Manual - Page 34
USB-CDROM. USB- HDD Select your boot dev ice priority by USB-HDD. LAN Select y our boot dev ice priority by LAN. Disabled Selecty our bootdev ice priority by Disabled. Password Check Setup The sy passw ord, please just press ENTER to make [SETUP] empty . GA-8I915P-D Pro Motherboard - 34 - - Gigabyte GA-8I915P-D Pro | Manual - Page 35
Threading Feature. Please note that this feature is only working for operating sy stem w ith multi processors mode supported. (Default v alue) Disabled Disables CPU Hy per Threading. Limit CPUID Max. to 3 Enab led Disabled Limit CPUID Max imum v alue to 3 w hen use older OS like NT4. (Default - Gigabyte GA-8I915P-D Pro | Manual - Page 36
.0 Contr oller USBK ey board Su pport USB Mouse Supp ort Azalia Codec Onboard H/W 1394 Onboard H/W LAN Onboa rd LAN Boo t ROM Onboar d Serial P ort1 Onboard I rDA Port UART Mod e Select UR2 Duplex Mode v alue) Disabled Disable onboard 1st channel IDE port. GA-8I915P-D Pro Motherboard - 36 - - Gigabyte GA-8I915P-D Pro | Manual - Page 37
USB Mouse Support. (Default v alue) Azalia Codec Au to Auto detect Azalia audio function. (Default v alue) Disabled Disable Azalia audio function. Onboard H/W 1394 Enab led Enable onboard IEEE 1394 function.(Default v alue) Disabled Disable thi s function. Onboard H/W LAN Enab led - Gigabyte GA-8I915P-D Pro | Manual - Page 38
t ROM This function decide w hether to inv oke the boot ROM of the onboard LAN chip. Enab led Enable this function. Disabled Disable this function. (Default v alue) Onboard Serial 3 Set ECP Mode Use DMA to 3. (Default v alue) 1 Set ECP ModeUse DMA to 1. GA-8I915P-D Pro Motherboard - 38 - - Gigabyte GA-8I915P-D Pro | Manual - Page 39
English 2-4 Power Management Setup CMOS Setup Utility -Cop y right (C) 198 4-2004 Award Software Power Manag ementSetup ACPI Susp end Ty pe Soft-Off b y PWR-BTTN PME E vent Wake Up Power On by Ring Resumeby Alarm x Date (of Month) Alarm x Time(hh:mm:ss)Alarm Power On By Mouse Power On By Key - Gigabyte GA-8I915P-D Pro | Manual - Page 40
" state. Memory When AC-pow er back to the sy stem, the sy stem w ill return to the Last state before AC-pow er off. GA-8I915P-D Pro Motherboard - 40 - - Gigabyte GA-8I915P-D Pro | Manual - Page 41
English 2-5 PnP/PCI Configurations CMOS Setup Utility -Cop y right (C) 198 4-2004 Award Software PnP/PCIConfigur ations PCI 1 IRQ Assignm ent PCI 2 IRQ Assignm ent [Auto] [Auto] Item Help Menu Level} higf: M ove F3: La ngua ge Enter: Select +/-/PU/P D:Value F10: Save F5:Previo us Values F6 - Gigabyte GA-8I915P-D Pro | Manual - Page 42
Celsius, CPU fan w ill run at full speed. b. The speed of CPU fan w ill increase linearly depand onthe temperature if the temperature is more than 41 degree and less than 65 degree. c. Whenthe CPU temperature is lower than 40 degrees Celsius, CPU fanw ill be disable. GA-8I915P-D Pro Motherboard - Gigabyte GA-8I915P-D Pro | Manual - Page 43
Co ntrol NormalCPU Vcore [15X] [Disabled] [Disabled] 200 [Auto] 533 [Norm al] [Norm al] [Norm al] 1.40 00V Item Help Menu Level} Set CPU Ratio if CPU Ratio is unclocked higf: M ove F3: La ngua ge Enter: Select +/-/PU/P D:Value F10: Save F5:Previo us Values F6: Fail-Safe De fault ESC - Gigabyte GA-8I915P-D Pro | Manual - Page 44
: CPU may be damaged orreduce CPU life-cy cle w hen CPU is ov er-v oltage. Normal CPU Vcore Display y our CPU Vcore Voltage. (Note) To use a DDRII 600 memory module on the motherboard, y ou must install an 800MHz FSB processorand set Memory FrequencyFor to 3.00. GA-8I915P-D Pro Motherboard - Gigabyte GA-8I915P-D Pro | Manual - Page 45
SetUser Password Save & Exit Setup Exit Without Saving ESC: Qu it F8:Du al BIOS/Q- Flash F3:Change Lan guage F10: Save & Exit Setup Multi-language supports 7 languages. There are English, French, German, Spanish, Traditional Chinese, Simplified Chinese and Japanese. 2-9 Load Fail-Safe Defaults - Gigabyte GA-8I915P-D Pro | Manual - Page 46
Save & Exit Setup Exit Without Saving ESC: Qu it F8:Du al BIOS/Q- Flash F3:Change Lan guage F10: Save & Exit Setup Change/Set/Dis able Password Selecting this field loads the factory defaults Menu, y ou w ill be prompted only w hen y ou try to enter Setup. GA-8I915P-D Pro Motherboard - 46 - - Gigabyte GA-8I915P-D Pro | Manual - Page 47
(M. I.T.) Exit Without Saving ESC: Qu it F8:Du al BIOS/Q- Flash F3:Change Lan guage F10: Save & Exit Setup Save & Exit Setup Ty pe "Y" w ill I.T.) Exit Without Saving ESC: Qu it F8:Du al BIOS/Q- Flash F3:Change Lan guage F10: Save & Exit Setup Abandon allData Ty pe "Y" w ill quitthe Setup - Gigabyte GA-8I915P-D Pro | Manual - Page 48
English GA-8I915P-D Pro Motherboard - 48 - - Gigabyte GA-8I915P-D Pro | Manual - Page 49
will continue to install other drivers. System will reboot automatically after install the drivers, afterward you can install others application. For USB2.0 driver support under Windows XP operating system, please use Windows Service Pack. After install Windows Service Pack, it will show a question - Gigabyte GA-8I915P-D Pro | Manual - Page 50
Applications This page displays all the tools that Gigabyte developed and some free software, you can choose anyone you want and press "install" to install them. 3-3 Driver CD Information This page lists the contents of software and drivers in this CD-title. GA-8I915P-D Pro Motherboard - 50 - - Gigabyte GA-8I915P-D Pro | Manual - Page 51
English 3-4 Hardware Information This page lists all device you have for this motherboard. 3-5 Contact Us Please see the last page for details. - 51 - Install Drivers - Gigabyte GA-8I915P-D Pro | Manual - Page 52
English GA-8I915P-D Pro Motherboard - 52 - - Gigabyte GA-8I915P-D Pro | Manual - Page 53
Not all model support these Unique Software over-enhancement by the user. With GIGABYTE's proprietary S.O.S. feature, users no longer drivers with the option for download. C.O.M. (Corporate Online Management) A web-based system management tool that allows system hardware information such as CPU - Gigabyte GA-8I915P-D Pro | Manual - Page 54
used with an IDE hard disk supporting HPA 5. The first partition must CD-ROM. Insert the provided driver CD into your CD drive, GIGABYTE Technology CO. , Ltd. 1. Execute Backup Utility 2. Execute Restore Utility 3. Remove Backup Image 4. Set Password 5. Exit and Restart Build 2011 GA-8I915P-D Pro - Gigabyte GA-8I915P-D Pro | Manual - Page 55
F9 during powering on the computer . Award Modular BIOS v6.00PG, An Energy Star Al ly Copyright (C) 1984-2004, Award Software, Inc. Intel 865PE AGPSet BIOS for 8IPE1000MT F1 Check System Health OK . . after OS and all required driver and software installations are complete. - 55 - Appendix - Gigabyte GA-8I915P-D Pro | Manual - Page 56
your system and back up data as a backup image in your hard drive. Not all systems support access to Xpress Recovery by pressing the F9 key during computer power on. If this is the case password requirement. 5. Exit and Restart: Exit and restart your computer. GA-8I915P-D Pro Motherboard - 56 - - Gigabyte GA-8I915P-D Pro | Manual - Page 57
English 4-1-2 Flash BIOS Method Introduction A. What is Dual BIOS Technology? Dual BIOS means that there are two system BIOS (ROM) on the motherboard, one is the Main BIOS and the other is Backup BIOS. Under the normal circumstances, the system works on the Main BIOS. If the Main BIOS is corrupted - Gigabyte GA-8I915P-D Pro | Manual - Page 58
2: If the ROM BIOS on peripherals cards(ex. SCSI Cards, LAN Cards,..) emits signals torequest restart of the system after the user make screen, and the system will pause and wait for the user's instruction. If Auto Recovery :Disable, it will show - Gigabyte GA-8I915P-D Pro | Manual - Page 59
sections, we take GA-8KNXP Ultra as the example to guide you how to flash BIOS from an older version to the latest version. For example, from Fa3 to Fba. The BIOS file is Fa3 before updating Award Modular BIOS v6.00PG, An Energy Star Ally Copyright (C) 1984-2003, Award Software, Inc. Intel i875P - Gigabyte GA-8I915P-D Pro | Manual - Page 60
: Contains the names of four actions needed to operate the Q-Flash/Dual BIOS utility. Pressing the buttons mentioned on your keyboards to perform these actions. GA-8I915P-D Pro Motherboard - 60 - - Gigabyte GA-8I915P-D Pro | Manual - Page 61
Later, you will see a box pop up showing the BIOS files you previously downloaded to the floppy disk. If you want to save the current BIOS for backup purpose in the floppy disk. After pressing Enter, you'll then see the progress of reading the BIOS file from the floppy disk. Dual BIOS Utility Boot - Gigabyte GA-8I915P-D Pro | Manual - Page 62
update BIOS. Then it will begin to update BIOS. The progress of updating BIOS will be displayed. Please do not take updating. Award Modular BIOS v6.00PG, An Energy Star Ally Copyright (C) 1984-2003, Award Software, Inc. Intel i875P AGPset BIOS for 8KNXP Ultra -00 GA-8I915P-D Pro Motherboard - 62 - - Gigabyte GA-8I915P-D Pro | Manual - Page 63
Type... Press Y on your keyboard to save and exit. Part Two: Updating BIOS with Q-FlashTM Utility on Single-BIOS Motherboards. This part guides users of single-BIOS motherboards how to update BIOS using the Q-FlashTM utility. CMOS Setup Utility-Copyright (C) 1984-2004 Award Software } Standard - Gigabyte GA-8I915P-D Pro | Manual - Page 64
menu and press Enter button. Later, you will see a box pop up showing the BIOS files you previously downloaded to the floppy disk. If you want to save the current BIOS for backup purpose, you can begin not take out the floppy disk when it begins flashing BIOS. GA-8I915P-D Pro Motherboard - 64 - - Gigabyte GA-8I915P-D Pro | Manual - Page 65
sure to update BIOS. Then it will begin to update BIOS. The progress of updating BIOS will be shown at the same time. Q-Flash Utility F4 after updating Award Modular BIOS v6.00PG, An Energy Star Ally Copyright (C) 1984-2003, Award Software, Inc. Intel 845GE AGPSet BIOS for 8GE800 F4 Check System - Gigabyte GA-8I915P-D Pro | Manual - Page 66
download the latest version of BIOS. Fig 1. Installing the @BIOS utility Fig 2. Installation Complete and Run @BIOS Click Sart/ Programs/ GIGABYTE downloading from internet or any other methods (such as: 8I915P-D Pro.E2). e. Complete update process following the instruction. GA-8I915P-D Pro - Gigabyte GA-8I915P-D Pro | Manual - Page 67
box. It means to save the current BIOS version. IV. Check out supported motherboard and Flash ROM: In the very beginning, there is "About this program need cannot be found in @BIOSTM server, please go onto Gigabyte's web site for downloading and updating it according to method II. IV. Please note - Gigabyte GA-8I915P-D Pro | Manual - Page 68
for Windows 2000/ XP is very simple. Please follow the steps to install the function.(Following pictures are in Windows XP) Stereo Speakers of the audio driver, you find a Sound Effect icon on the lower right hand taskbar. Click the icon to select the function. GA-8I915P-D Pro Motherboard - 68 - Gigabyte GA-8I915P-D Pro | Manual - Page 69
STEP 1 : Connect the front channels to "Front Speaker Out", the rear channels to "Rear Speaker Out". STEP 2 : Following installation of the audio driver, you find a Sound Effect icon on the lower right hand taskbar. Click the icon to select the function. STEP 3: Click "Speaker Configuration" then - Gigabyte GA-8I915P-D Pro | Manual - Page 70
Center/Subwoofer channels to "Center/Subwoofer Speaker Out". STEP 2 : Following installation of the audio driver, you find a Sound Effect icon on the lower right hand taskbar. Click the icon to Front Speaker Out Rear Speaker Out Center/Subwoofer Speaker Out GA-8I915P-D Pro Motherboard - 70 - - Gigabyte GA-8I915P-D Pro | Manual - Page 71
Center/ Subwoofer channels to "Center/Subwoofer Speaker Out", and the side channels to "Side Speaker Out". STEP 2 : Following installation of the audio driver, you find a Sound Effect icon on the lower right hand taskbar. Click the icon to select the function. STEP 3: Click "Speaker Configuration - Gigabyte GA-8I915P-D Pro | Manual - Page 72
. Install Microsoft DirectX8.1 or later version before to enable Jack-Sensing support for Windows 2000. After you install an audio device, a screen following the arrow instruction. The correct icon for audio device will be displayed after the reinstallation. GA-8I915P-D Pro Motherboard - 72 - - Gigabyte GA-8I915P-D Pro | Manual - Page 73
Troubleshooting , please refer to the Clear CMOS steps in the manual. If your board doesn't have such jumper, you instability still remains, please clear CMOS to solve the problem. Question 5: Why do I still get a VGA card? Answer: Gigabyte motherboards will auto-detect the external VGA card after - Gigabyte GA-8I915P-D Pro | Manual - Page 74
Answer: Please refer to the user manual and check whether you have connected any Answer: The beep codes below may help you identify the possible computer problems. However, they are only for reference purposes. The situations might short beeps: Power error GA-8I915P-D Pro Motherboard - 74 - - Gigabyte GA-8I915P-D Pro | Manual - Page 75
- 75 - Appendix English - Gigabyte GA-8I915P-D Pro | Manual - Page 76
English GA-8I915P-D Pro Motherboard - 76 - - Gigabyte GA-8I915P-D Pro | Manual - Page 77
- 77 - Appendix English - Gigabyte GA-8I915P-D Pro | Manual - Page 78
English GA-8I915P-D Pro Motherboard - 78 - - Gigabyte GA-8I915P-D Pro | Manual - Page 79
://tw.giga-byte.com/TechSupport/ServiceCenter.htm Non-Tech. Support(Sales/Marketing) : http://ggts.gigabyte.com.tw/nontech.asp WEB address (English): http://www.gigabyte.com.tw WEB address (Chinese): http://chinese.giga-byte.com - U.S.A. G.B.T. INC. Address: 17358 Railroad St, City of Industry, CA - Gigabyte GA-8I915P-D Pro | Manual - Page 80
www.gigabyte.ru - Poland Representative Office Of Giga-Byte Technology Co., Ltd. POLAND Tech. Support : http://tw.giga-byte.com/TechSupport/ServiceCenter.htm Non-Tech. Support(Sales/Marketing) : http://ggts.gigabyte.com.tw/nontech.asp WEB address : http://www.gigabyte.pl GA-8I915P-D Pro Motherboard
-
 1
1 -
 2
2 -
 3
3 -
 4
4 -
 5
5 -
 6
6 -
 7
7 -
8
-
9
-
10
-
11
-
12
-
13
-
14
-
15
-
16
-
17
-
18
-
19
-
20
-
21
-
22
-
23
-
24
-
25
-
26
-
27
-
28
-
29
-
30
-
31
-
32
-
33
-
34
-
35
-
36
-
37
-
38
-
39
-
40
-
41
-
42
-
43
-
44
-
45
-
46
-
47
-
48
-
49
-
50
-
51
-
52
-
53
-
54
-
55
-
56
-
57
-
58
-
59
-
60
-
61
-
62
-
63
-
64
-
65
-
66
-
67
-
68
-
69
-
70
-
71
-
72
-
73
-
74
-
75
-
76
-
77
-
78
-
79
-
80
 |
 |

GA-8I915P-D Pro
Intel
®
Pentium
®
4 LGA775 Processor Motherboard
User's Manual
Rev. 2003
12ME-8I915PDP-2003