Gigabyte GA-K8U User Manual - Page 68
Delete RAID Settings & Partition, Delete All RAID Settings & Partition, Rebuild RAID Array
 |
View all Gigabyte GA-K8U manuals
Add to My Manuals
Save this manual to your list of manuals |
Page 68 highlights
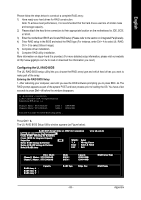
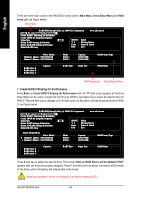
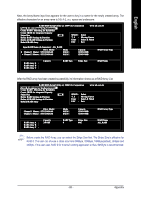
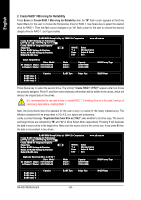
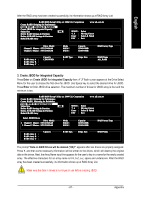
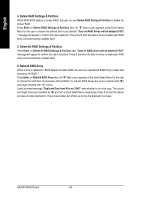
English 4. Delete RAID Settings & Partition When RAID BIOS detects a broken RAID, the user can use Delete RAID Setting & Partition to delete the broken RAID. Press Enter on Delete RAID Settings & Partition item. An "E" flash cursor appears at the Drive Select Menu for the user to choose the defined drive to be deleted. "Data on RAID drives will be deleted (Y/N)? " message will appear to confirm the user's selection. Press Y and then the data in drives is destroyed. RAID Array List automatically updates itself. 5. Delete All RAID Settings & Partition Press Enter on Delete All RAID Settings & Partition item. "Data on RAID drives will be deleted (Y/N)?" message will appear to confirm the user's selection. Press Y and then the data in drives is destroyed. RAID Array List automatically updates itself. 6. Rebuild RAID Array When a drive is replaced or BIOS detects a broken RAID, the user can use Rebuild RAID Array to keep data coherency for RAID 1. Press Enter on Rebuild RAID Array item. An "R" flash cursor appears at the Drive Select Menu for the user to choose the valid drive of previously defined RAID 1 to rebuild. BIOS shows the source (marked with "M") and target (marked with "m") drives. Lastly a prompt message "Duplicate Data from M to m (Y/N)?" asks whether to do drive copy. The source and target drives are indicated by "M" and "m" in Drive Select Menu respectively. Press Y to start the rebuild process and data duplication. The process status bar shows up during the duplication process. GA-K8U Motherboard - 68 -
-
 1
1 -
2
-
3
-
4
-
5
-
6
-
7
-
8
-
9
-
10
-
11
-
12
-
13
-
14
-
15
-
16
-
17
-
18
-
19
-
20
-
21
-
22
-
23
-
24
-
25
-
26
-
27
-
28
-
29
-
30
-
31
-
32
-
33
-
34
-
35
-
36
-
37
-
38
-
39
-
40
-
41
-
42
-
43
-
44
-
45
-
46
-
47
-
48
-
49
-
50
-
51
-
52
-
53
-
54
-
55
-
56
-
57
-
58
-
59
-
60
-
61
-
62
-
 63
63 -
 64
64 -
 65
65 -
 66
66 -
 67
67 -
 68
68 -
 69
69 -
 70
70 -
 71
71 -
 72
72 -
 73
73 -
74
-
75
-
76
-
77
-
78
-
79
-
80
-
81
-
82
-
83
-
84
-
85
-
86
-
87
-
88
 |
 |
