Gigabyte GA-M51GM-S2G Manual - Page 15
Clear Disk Data
 |
UPC - 818313002914
View all Gigabyte GA-M51GM-S2G manuals
Add to My Manuals
Save this manual to your list of manuals |
Page 15 highlights
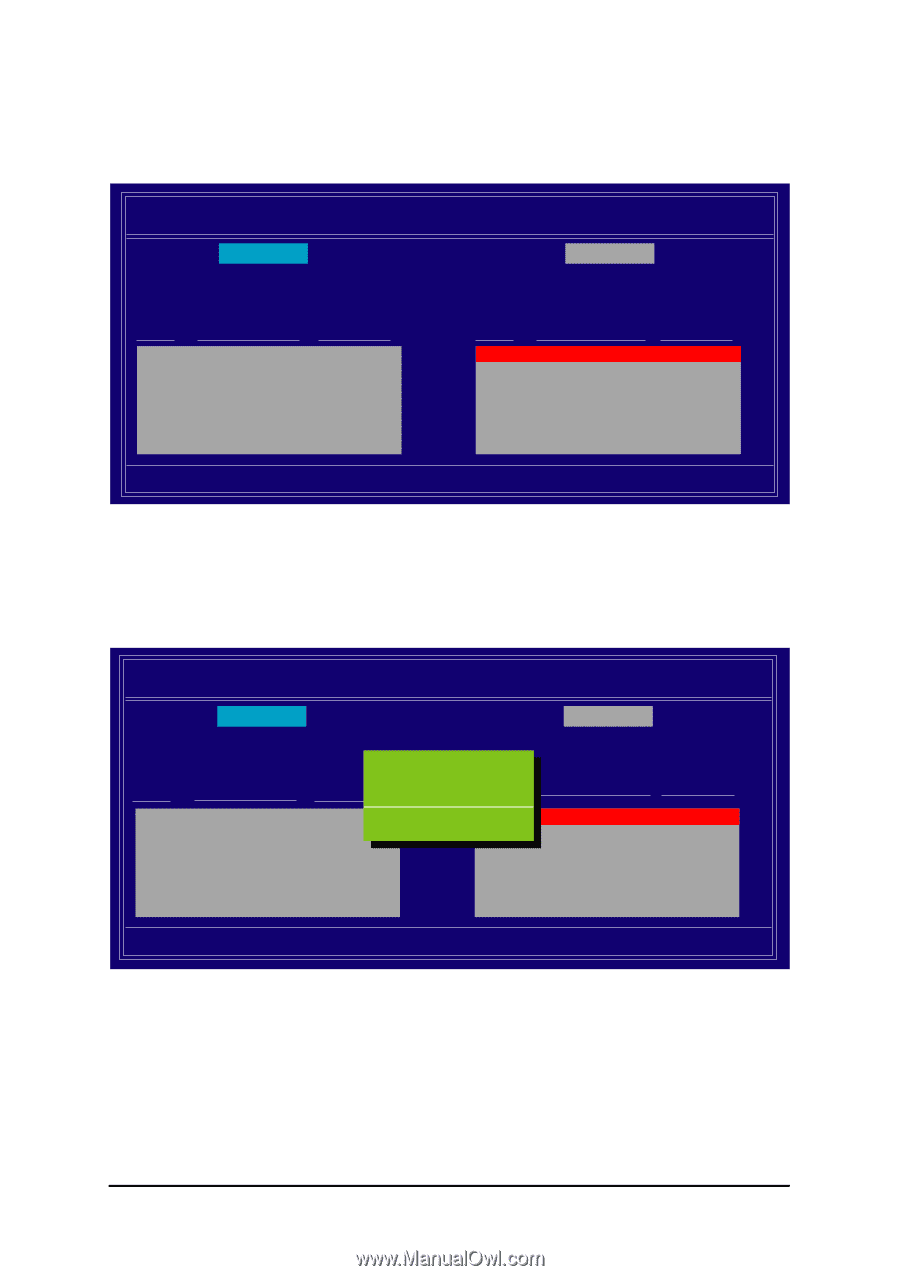
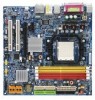
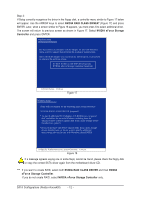
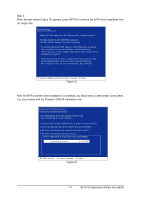
Step 3: After system restarts, press F10 to enter the NVIDIA RAID setup utility. Select Striping in the RAID Mode filed (Figure 23). Move to the Free Disks section with the TAB key. Select the desired disk and use the RIGHT ARROW key to add it to Array Disks menu. RAID Mode: Striping MediaShield RAID Utility July 27 2005 - Define a New Array - Striping Block: Optimal Free Disks Loc Disk Model Capacity Array Disks Loc Disk Model [g] Add 2.0.M ST3120026AS 2.1.M ST3120026AS Capacity 111.78G 111.78G [f ] Del [ESC] Quit [F6] Back [F7] Finish [TAB] Navigate [hi] Select [ENTER] Popup Figure 23 Step 4: After all the settings, press F7 to complete the configuration. When prompted to Clear Disk Data (Figure 24), press N. Then press CTRL+X to exit the NVIDIA RAID BIOS. Restart the computer to boot into Windows 2000. RAID Mode: Striping MediaShield RAID Utility July 27 2005 - Define a New Array - Striping Block: Optimal Free Disks Loc Disk Model Capacity Clear disk daAtarr?ay Disks Loc Disk Model 1.0.M ST3120026AS [Y[]gY]EASdd [N] 1N.1O.M ST3120026AS Capacity 111.79G 111.79G [f ] Del [ESC] Quit [F6] Back [F7] Finish [TAB] Navigate [hi] Select [ENTER] Popup Figure 24 - 15 - SATA Configurations (Nvidia nForce430)
-
 1
1 -
2
-
3
-
4
-
5
-
6
-
7
-
8
-
9
-
 10
10 -
 11
11 -
 12
12 -
 13
13 -
 14
14 -
 15
15 -
 16
16
 |
 |