Gigabyte GA-X38T-DQ6 Manual - Page 16
Removing the Crazy Cool Heatsink from the Back of the Motherboard - cooling
 |
UPC - 818313004239
View all Gigabyte GA-X38T-DQ6 manuals
Add to My Manuals
Save this manual to your list of manuals |
Page 16 highlights
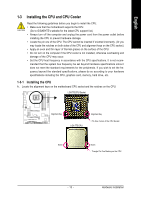
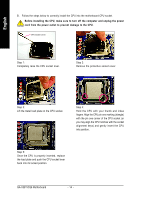
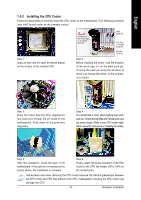
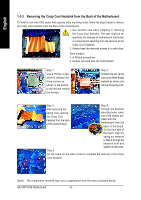
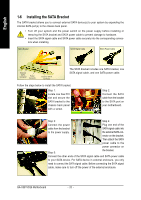
English 1-3-3 Removing the Crazy Cool Heatsink from the Back of the Motherboard To install a non-Intel CPU cooler that requires extra mounting holes, follow the steps below to remove the Crazy Cool heatsink from the back of the motherboard. 1. Use extreme care when installing or removing the Crazy Cool heatsink. The user shall be responsible for damage of motherboard function(s) or component(s) resulting from the removal of the Crazy Cool heatsink. 2. Always keep the removed screws in a safe place. The Crazy Cool Heatsink Tools needed: 1. A Philips screwdriver 2. Screws provided with the motherboard Step 1: Use a Philips screwdriver to unfasten the three screws as shown in the picture to the left and remove the screws. Step 2: Unfasten the two spring nuts on the North Bridge heatsink as shown and remove the spring nuts. Step 3: Step 4: After removing the spring nuts, remove the Crazy Cool heatsink from the back of the motherboard. Through the heatsink mounting holes, insert one of the screws provided with the motherboard from the back of the board. On the front side of the board, align the spring nut removed in Step 2 through the heatsink hole and tighten it to the screw. Step 5: Do the same for the other screw to complete the removal of the Crazy Cool heatsink. (Note) The components received may vary in appearance from the ones illustrated above. GA-X38T-DQ6 Motherboard - 16 -
-
 1
1 -
2
-
3
-
4
-
5
-
6
-
7
-
8
-
9
-
10
-
 11
11 -
 12
12 -
 13
13 -
 14
14 -
 15
15 -
 16
16 -
 17
17 -
 18
18 -
 19
19 -
 20
20 -
 21
21 -
22
-
23
-
24
-
25
-
26
-
27
-
28
-
29
-
30
-
31
-
32
-
33
-
34
-
35
-
36
-
37
-
38
-
39
-
40
-
41
-
42
-
43
-
44
-
45
-
46
-
47
-
48
-
49
-
50
-
51
-
52
-
53
-
54
-
55
-
56
-
57
-
58
-
59
-
60
-
61
-
62
-
63
-
64
-
65
-
66
-
67
-
68
-
69
-
70
-
71
-
72
-
73
-
74
-
75
-
76
-
77
-
78
-
79
-
80
-
81
-
82
-
83
-
84
-
85
-
86
-
87
-
88
-
89
-
90
-
91
-
92
-
93
-
94
-
95
-
96
-
97
-
98
-
99
-
100
-
101
-
102
-
103
-
104
-
105
-
106
-
107
-
108
-
109
-
110
-
111
-
112
-
113
-
114
-
115
-
116
 |
 |
