Graco 1757845 Instruction Manual - Page 16
Forward-facing, Vehicle Seat Belts
 |
UPC - 047406106110
View all Graco 1757845 manuals
Add to My Manuals
Save this manual to your list of manuals |
Page 16 highlights
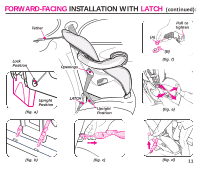
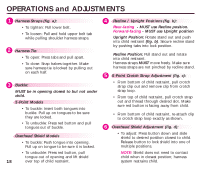
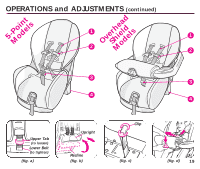
FORWARD-FACING INSTALLATION WITH VEHICLE SEAT BELTS WARNING LATCH belt MUST be stored when using vehicle seat belt to install child restraint. 5 Pull front to back and left to right to check for secure installation (fig. e). Vehicle lap belt MUST stay tight. If not secure, see "Vehicle Seat Belts" page 26. 1 Store LATCH belt by attaching to connectors through rear-facing openings (see page 25, fig. q). • Attach connectors to storage bar on each side (fig. a). • Adjust LATCH belt to remove excess slack by pulling adjustment belt. 2 Adjust car seat to upright position (see fig. b and pages 18 and 19, fig. b). Secure recline stand into Upright Position by pushing tabs into lock position. Place forward-facing on vehicle seat. 6 Attach tether strap hook (A) to anchor hardware (B) and tighten adjustment belt to remove any slack (fig. f) . If vehicle does not have anchor points to attach tether hook, tether hook should be stored, see "Tether Storage", page 32. Belt must lay flat and not be twisted. Periodically check that child restraint is securely installed; adjust if necessary. 3 Lift seat pad flap (available on some models). Thread vehicle seat belt through openings. Buckle belt (fig. c). 4 Press down firmly in center of child restraint to compress vehicle seat cushion while tightening vehicle seat belt. Use your knee to press down in center of child restraint (fig. d). 14
-
 1
1 -
2
-
3
-
4
-
5
-
6
-
7
-
8
-
9
-
10
-
 11
11 -
 12
12 -
 13
13 -
 14
14 -
 15
15 -
 16
16 -
 17
17 -
 18
18 -
 19
19 -
 20
20 -
 21
21 -
22
-
23
-
24
-
25
-
26
-
27
-
28
-
29
-
30
-
31
-
32
-
33
-
34
-
35
-
36
-
37
-
38
-
39
-
40
-
41
-
42
-
43
-
44
-
45
-
46
-
47
-
48
-
49
-
50
-
51
-
52
-
53
-
54
-
55
-
56
-
57
-
58
-
59
-
60
-
61
-
62
-
63
-
64
-
65
-
66
-
67
-
68
-
69
-
70
-
71
-
72
-
73
-
74
-
75
-
76
-
77
-
78
-
79
-
80
-
81
-
82
-
83
-
84
-
85
-
86
-
87
-
88
 |
 |
