HTC P3650 User Manual - Page 28
Calibrate the device, Manage screen settings, Switch your device to Sleep mode - tip
 |
UPC - 890552608515
View all HTC P3650 manuals
Add to My Manuals
Save this manual to your list of manuals |
Page 28 highlights
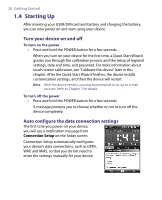
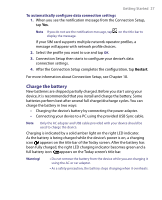
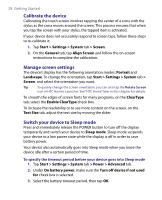
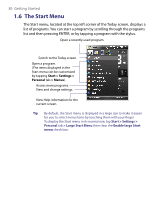
28 Getting Started Calibrate the device Calibrating the touch screen involves tapping the center of a cross with the stylus as the cross moves around the screen. This process ensures that when you tap the screen with your stylus, the tapped item is activated. If your device does not accurately respond to screen taps, follow these steps to re-calibrate it: 1. Tap Start > Settings > System tab > Screen. 2. On the General tab, tap Align Screen and follow the on-screen instructions to complete the calibration. Manage screen settings The device's display has the following orientation modes: Portrait and Landscape. To change the orientation, tap Start > Settings > System tab > Screen, and select the orientation you want. Tip To quickly change the screen orientation, you can also tap the Rotate Screen icon in HTC Home's Launcher. See "HTC Home" later in this chapter for details. To smooth the edges of screen fonts for many programs, on the ClearType tab, select the Enable ClearType check box. To increase the readability or to see more content on the screen, on the Text Size tab, adjust the text size by moving the slider. Switch your device to Sleep mode Press and immediately release the POWER button to turn off the display temporarily and switch your device to Sleep mode. Sleep mode suspends your device to a low power state while the display is off in order to save battery power. Your device also automatically goes into Sleep mode when you leave the device idle after a certain period of time. To specify the timeout period before your device goes into Sleep mode 1. Tap Start > Settings > System tab > Power > Advanced tab. 2. Under On battery power, make sure the Turn off device if not used for check box is selected. 3. Select the battery timeout period, then tap OK.
-
 1
1 -
2
-
3
-
4
-
5
-
6
-
7
-
8
-
9
-
10
-
11
-
12
-
13
-
14
-
15
-
16
-
17
-
18
-
19
-
20
-
21
-
22
-
 23
23 -
 24
24 -
 25
25 -
 26
26 -
 27
27 -
 28
28 -
 29
29 -
 30
30 -
 31
31 -
 32
32 -
 33
33 -
34
-
35
-
36
-
37
-
38
-
39
-
40
-
41
-
42
-
43
-
44
-
45
-
46
-
47
-
48
-
49
-
50
-
51
-
52
-
53
-
54
-
55
-
56
-
57
-
58
-
59
-
60
-
61
-
62
-
63
-
64
-
65
-
66
-
67
-
68
-
69
-
70
-
71
-
72
-
73
-
74
-
75
-
76
-
77
-
78
-
79
-
80
-
81
-
82
-
83
-
84
-
85
-
86
-
87
-
88
-
89
-
90
-
91
-
92
-
93
-
94
-
95
-
96
-
97
-
98
-
99
-
100
-
101
-
102
-
103
-
104
-
105
-
106
-
107
-
108
-
109
-
110
-
111
-
112
-
113
-
114
-
115
-
116
-
117
-
118
-
119
-
120
-
121
-
122
-
123
-
124
-
125
-
126
-
127
-
128
-
129
-
130
-
131
-
132
-
133
-
134
-
135
-
136
-
137
-
138
-
139
-
140
-
141
-
142
-
143
-
144
-
145
-
146
-
147
-
148
-
149
-
150
-
151
-
152
-
153
-
154
-
155
-
156
-
157
-
158
-
159
-
160
-
161
-
162
-
163
-
164
-
165
-
166
-
167
-
168
-
169
-
170
-
171
-
172
-
173
-
174
-
175
-
176
-
177
-
178
-
179
-
180
-
181
-
182
-
183
-
184
-
185
-
186
-
187
-
188
-
189
-
190
-
191
-
192
-
193
-
194
-
195
-
196
-
197
-
198
-
199
-
200
-
201
-
202
-
203
-
204
-
205
-
206
-
207
-
208
-
209
-
210
-
211
-
212
-
213
-
214
-
215
-
216
-
217
-
218
-
219
-
220
-
221
-
222
-
223
-
224
-
225
-
226
-
227
-
228
-
229
-
230
-
231
-
232
-
233
-
234
-
235
-
236
-
237
-
238
-
239
-
240
-
241
-
242
-
243
-
244
-
245
-
246
-
247
-
248
-
249
-
250
-
251
-
252
-
253
-
254
-
255
-
256
-
257
-
258
-
259
-
260
 |
 |