Haier HLTD500AEW User Manual - Page 31
Replace Interior Drum Light Bulb, Vacationing Precautions, Moving Or Storage Preparation
 |
View all Haier HLTD500AEW manuals
Add to My Manuals
Save this manual to your list of manuals |
Page 31 highlights
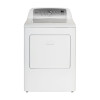
REPLACE INTERIOR DRUM LIGHT BULB Your dryer is equipped with a LED light , fixture inside the drum above the door opening. This light is designed to last for the life of the dryer; however, if the light stops operating, please contact a certified technician for replacement. Replace with with 1W LED, T7Shape, Intermediate (E17) Base, 120 volt appliance bulb ONLY. 1. Disconnect power, or unplug the dryer. 2. Open the dryer door. The light is located inside the drum above the door opening. 3. Using a Phillips screwdriver, remove the screw from the Clear Light Cover. A Housing Tabs Clear Light Cover B Screw C 4. Remove the Clear Light Cover by rotating it forward and lifting it o of the two Housing Tabs. 5. Turn the light bulb counterclockwise to unscrew. 6. Replace the bulb with a 1W LED, T7 Shape, Intermediate (E17) Base, 120 volt appliance bulb ONLY. 7. Replace the Clear Light Cover and secure it with the screw. 8. Reconnect power, or plug in the dryer. VACATIONING PRECAUTIONS Unplug the dryer from the electrical outlet or disconnect the power. Wash the lint screen. See the "Washing the Lint Screen" section. (For gas dryers only): Close shuto valve in gas supply line. MOVING OR STORAGE PREPARATION In addition to performing the steps in "Vacationing Precautions," complete the following additional steps. Disconnect the dryer from the exhaust system. Turn the leveling feet so that they are fully retracted into the dryer cabinet. Use masking tape to secure dryer door. Move and store your dryer in an upright position only. NOTE: For gas dryers, turn o the gas being supplied to the dryer. Disconnect the dryer from the gas supply line and remove ttings attached to the dryer's gas inlet pipe. Cap the gas supply line. 29
-
 1
1 -
2
-
3
-
4
-
5
-
6
-
7
-
8
-
9
-
10
-
11
-
12
-
13
-
14
-
15
-
16
-
17
-
18
-
19
-
20
-
21
-
22
-
23
-
24
-
25
-
 26
26 -
 27
27 -
 28
28 -
 29
29 -
 30
30 -
 31
31 -
 32
32 -
 33
33 -
 34
34 -
 35
35 -
 36
36 -
37
-
38
-
39
-
40
-
41
-
42
-
43
-
44
-
45
-
46
-
47
-
48
-
49
-
50
-
51
-
52
-
53
-
54
-
55
-
56
-
57
-
58
-
59
-
60
-
61
-
62
-
63
-
64
-
65
-
66
-
67
-
68
-
69
-
70
-
71
-
72
-
73
-
74
-
75
-
76
-
77
-
78
-
79
-
80
-
81
-
82
-
83
-
84
-
85
-
86
-
87
-
88
-
89
-
90
-
91
-
92
-
93
-
94
-
95
-
96
-
97
-
98
-
99
-
100
-
101
-
102
-
103
-
104
-
105
-
106
-
107
-
108
 |
 |
