Haier HRF-370 User Manual - Page 25
Defrosting
 |
View all Haier HRF-370 manuals
Add to My Manuals
Save this manual to your list of manuals |
Page 25 highlights
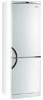
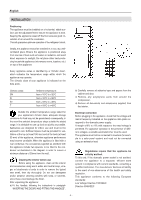
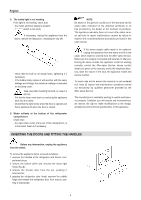
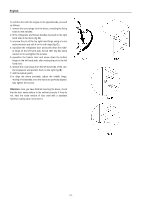
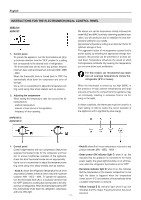
English - Lie the food to be frozen horizontally in the freezer compartment so that it can freeze as quickly as possible, even in the middle; - In order to prevent frozen food from thawing, arrange fresh food so that it does not come into contact with already frozen food. When freezing small amounts of food (1-2 kg) there is no need to adjust the thermostat knob. When freezing larger amounts, follow the advice given in the control panel user manual. Important - Never store bottled drinks, especially carbonated, in the freezer compartment or low temperature compartment; as the drinks freeze, the contents expand and the bottles can explode. Calendar The symbols on the calendar inside the freezer door indicate the various products that can be frozen. The numbers indicate the recommended storage time, expressed in months, for each food type. The higher number can be taken as the valid storage period for premium quality products, properly frozen. Defrosting food For optimum results when cooking frozen food, allow it to defrost first in the refrigerator or at ambient temperature: thawing time will be shorter at ambient temperature. If you need to cook food quickly, as long as the portions are small, you cook it straight from frozen, increasing the cooking time slightly. Average to larger portions can be defrosted in a microwave oven before cooking. Once thawed, food perishes quickly and must therefore be used within12-24 hours. Once cooked, (boiled or cooked) it can be frozen again. DEFROSTING The frost that builds up on the inside walls of the refrigerator defrosts automatically each time the compressor stops. This defrost water is routed to a special basin positioned above the compressor at the rear of the appliance, from where it evaporates thanks to the heat generated by the compressor. Excessive build-up of frost can be caused by the thermostat being turned up too high or by poorly fitting door seals. 1. 24 hours before defrosting, turn the thermostat knob to the highest setting or select the SUPER FREEZING function (if provided). Frozen food will be adequately frozen and may be removed from the appliance. 2. Dry your hands thoroughly (or wear rubber gloves if possible) to avoid damage to skin in the event you inadvertently touch the ice. Remember to clean the defrost water drain outlet from time to time (positioned in the middle of the drain channel in the refrigerator). 3. Remove frozen food (empty all food from the refrigerator compartment too), wrap and store it in a dry, cool place. Defrosting the freezer compartment It is perfectly normal for frost and ice to form in the freezer compartment. Nonetheless, if the layer becomes excessively thick, it acts an insulator and compromises cooling. If ice formation in the compartment is excessive, check that the freezer door closes properly and that the door seals adhere well and are in a good state of repair. Defrost the freezer compartment periodically, and whenever the layer of icereaches a thickness of around 5 mm. Up to a thickness of around 3-4 mm, ice can be removed using a plastic scraper. If the layer of ice is thicker, proceed as follows: 4. Unplug the appliance from the mains. 5. Leave the appliance door open and scrape the ice carefully off the walls using the plastic scraper; collect the pieces of ice and allow them to melt in the kitchen sink. 6. Remove the defrost water drain channel (if provided) from the bottom of the appliance and position a basin to collect the defrost water. If your appliance does not have a defrost water drain channel, place a towel in front of the appliance and continually remove the water with the help of a sponge. - 7 -
-
 1
1 -
2
-
3
-
4
-
5
-
6
-
7
-
8
-
9
-
10
-
11
-
12
-
13
-
14
-
15
-
16
-
17
-
18
-
19
-
 20
20 -
 21
21 -
 22
22 -
 23
23 -
 24
24 -
 25
25 -
 26
26 -
 27
27 -
 28
28 -
 29
29 -
 30
30 -
31
-
32
-
33
-
34
-
35
-
36
-
37
-
38
-
39
-
40
-
41
-
42
-
43
-
44
-
45
-
46
-
47
-
48
-
49
-
50
-
51
-
52
-
53
-
54
-
55
-
56
-
57
-
58
-
59
-
60
-
61
-
62
-
63
-
64
-
65
-
66
-
67
-
68
-
69
-
70
-
71
-
72
-
73
-
74
-
75
-
76
-
77
-
78
-
79
-
80
-
81
-
82
-
83
-
84
-
85
-
86
-
87
-
88
-
89
-
90
-
91
-
92
-
93
-
94
-
95
-
96
-
97
-
98
-
99
-
100
-
101
-
102
-
103
-
104
-
105
-
106
-
107
-
108
-
109
-
110
-
111
-
112
-
113
-
114
-
115
-
116
 |
 |