Harman Kardon A250 Owners Manual - Page 11
overloading
 |
View all Harman Kardon A250 manuals
Add to My Manuals
Save this manual to your list of manuals |
Page 11 highlights
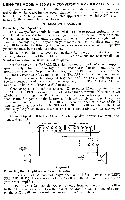
Connecting Your Tuner: The FM output of your Harman-Kardon stereo tuner should be connected to the LEFT CHANNEL TUNER input jack located on the top rear of the chassis. The AM output should be connected to the RIGHT CHANNEL TUNER input jack. The same method applies if you are using separate FM and AM tuners. Plug the AC line cord of your tuner into one of the AC convenience outlets located on the rear of the chassis. Connecting Your Stereo Record Player: A stereo cartridge uses two output plugs. If you are using a magnetic type low output cartridge plug one of the output leads into the LEFT CHANNEL MAGNETIC input jack and the other lead into the RIGHT CHANNEL MAGNETIC input jack. Stereo crystal or ceramic cartridges may also be used with this amplifier. They must be plugged into the LEFT CHANNEL and RIGHT CHANNEL CER-XTAL input jacks. Connecting Your Stereo Tape Player: A stereophonic tape deck utilizes two playback heads usually contained in one head assembly. Each head has its own output plug. Connect one plug to the LEFT CHANNEL TAPE HD input jack and the other plug to the RIGHT CHANNEL TAPE HD input jack. Connecting Your Stereo Tape Recorder: Since most stereophonic tape recorders have their own preamplifiers, it is not desirable to plug the output of the recorder into the TAPE HD input jacks. This might result in overloading of the input stage and cause distortion. Connect one of the output plugs into the LEFT CHANNEL AUX 1 or AUX 2 input jacks and the other plug into the RIGHT CHANNEL AUX I or AUX 2 input jacks. Connecting Your Tape Recorder To Make A Recording: Provision is made on your Model A-250 to permit the recording of any program material. Connect the left input of your stereo tape recorder to the jack marked LEFT CHANNEL TAPE OUT and the right input of your stereo tape recorder to the jack marked RIGHT CHANNEL TAPE OUT. To connect a monaural tape recorder, connect its input to either LEFT or RIGHT CHANNEL TAPE OUT receptacle. If the program source you desire to record is plugged into the left preamplifier channel, use the LEFT TAPE OUT jack, and if it is plugged into the right preamplifier channel, use the RIGHT TAPE OUT jack, This will enable you to make a recording with the proper recording equalization as determined by your recorder, while simultaneously monitoring the program with the proper tone control, contour and loudness setting. Lead Dress: A black plastic clamp is located on the rear of the chassis near the input receptacles. Remove the rubber clamp on the upper portion of the block, insert the shielded leads into the clamp assembly and replace the rubber clamp. This will offer a neat installation. OPERATING THE MODEL A-25O AS A STEREOPHONIC AMPLIFIER Every control on a well designed and honestly considered high fidelity instrutnent has a specific useful function, related to each of the other controls. A brief explanatory note on the relationship of the various front panel controls will doubtless prove useful in organizing and clarifying them for you,
-
 1
1 -
2
-
3
-
4
-
5
-
 6
6 -
 7
7 -
 8
8 -
 9
9 -
 10
10 -
 11
11 -
 12
12 -
 13
13 -
 14
14 -
 15
15 -
 16
16
 |
 |
