Harman Kardon A250 Owners Manual - Page 3
furnishing
 |
View all Harman Kardon A250 manuals
Add to My Manuals
Save this manual to your list of manuals |
Page 3 highlights
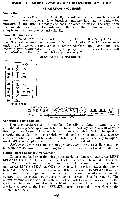
USING THE MODEL A-250 AS A STEREOPHONIC AMPLIFIER INSTALLATION PROCEDURE Ventilation: The unit is well ventilated in itself, but sufficient space must be allowed around it to permit proper air flow. Install the amplifier in a manner to allow for unrestricted circulation. Do not place books or other objects on the cage or in the immediate vicinity of the instrument. Reducing the air flow will result in sharply reduced component arid tube life. Power Requirements: Plug the AC cord into any outlet furnishing 117 volts 50 or 60 cycle AC cur- rent. The voltage may vary between 105 and 125 volts. Two AC convenience outlets are located on the rear of the instrument. Auxiliary equipment (tape deck, record player, additional amplifier) may be plugged into these outlets and will be controlled by the on/off switch located on the A-250. REAR PANEL CONNECTIONS LEFT PREAMP O OUT TAPE O O OUT O AUX 1 O O AUX 2 O TUNER O O TAPE HO. O O CER-XTAL. H 0 O MAGNETIC N 0 RIGHT LEFT CHANNEL CHANNEL TOP OF CHASSIS RIGHT SPEAKERS LEFT SPEAKERS A B 4 8 16 32 A B 4 6 16 32 REAR PANEL MODEL A250 Connecting Your Speakers: 4 AMP ■I ■■ 0 4 AMPS TOTAL II7 VAC 6CI1,, 200W Your two speakers should be matched if possible to obtain optimum results and should be placed approximately 8 to 15 feet apart against one wall of your listening room. Corner placement is also quite acceptable. Facing the speakers straight out or slanting them slightly will depend on your room size, acoustic effect and where you will be seated for listening. It may - be necessary to experi- ment with speaker placement until best results are obtained. Use'any type wire to connect your speakers. Lamp cord is excellent and may be easily dressed around the molding for an inconspicuous and neat installation. Normal Stereo Speaker Arrangement: Connect one lead from the left speaker to the 16 ohm terminal-on the LEFT SPEAKER OUTPUT strip and the other lead to the A and B terminal on the same strip. Now connect one of the leads from the right speaker to the 16 ohm terminal on the RICHT SPEAKER OUTPUT strip and the other lead to the A or B terminal on the same strip. NOTE: A and B terminals on both SPEAKER output strips are strapped together at the factory and should be allowed to remain strapped for this method of stereo speaker connection. (See Diagram A) The output terminals used should be those marked with the same impedance as the speakers. The above illustration is for 16 ohm speakers. If you are using 8 ohm speakers connect to the 8 ohm SPEAKER output terminals rather than to the 16 ohm terminals.
-
 1
1 -
 2
2 -
 3
3 -
 4
4 -
 5
5 -
 6
6 -
 7
7 -
 8
8 -
 9
9 -
10
-
11
-
12
-
13
-
14
-
15
-
16
 |
 |
