Harman Kardon DVD 50 Owners Manual - Page 6
Front Panel Controls - remote
 |
View all Harman Kardon DVD 50 manuals
Add to My Manuals
Save this manual to your list of manuals |
Page 6 highlights
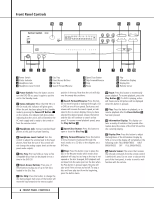
Front Panel Controls ^% $ #@! 1 2 34 5 6 7 8 9) 1 Power Switch 2 Status Indicator 3 Headphone Jack 4 Headphone Level Control 5 Disc Tray 6 Direct Access Buttons 7 Disc Skip 8 Search Forward/Reverse 9 Open/Close Button ) Skip Forward/Reverse ! Stop @ Pause # Play $ Information Display % Display Dim ^ Remote Sensor 1 Power Switch: Press the button once to turn the DVD 50 on; press it again to put the unit in the Standby mode. 2 Status Indicator: When the DVD 50 is in the On mode, this indicator will glow green. When the unit has been placed in the Standby mode by pressing the Power-Off Button 29 on the remote, the indicator will glow amber, indicating that the unit is still connected to the AC main supply and is ready to be turned on from the remote control. 3 Headphone Jack: Connect standard headphones to this jack for private listening. 4 Headphone Level Control: Turn this control to adjust the volume level to the headphones. Note that the use of this control will not change the analog output levels at the rear panel audio outputs. 5 Disc Tray: This tray holds as many as five compatible discs that can be played one at a time in the DVD 50. 6 Direct Access Buttons: Press one of these buttons to play any of up to five discs loaded in the Disc Tray. 7 Disc Skip: Press this button to change the disc being played. Each press of the button will move the tray forward to the next occupied position in the tray. Note that the unit will skip over the empty disc positions. 8 Search Forward/Reverse: Press this button to move forward or backward through a CD or DVD at one of four speeds. Each press and release will increase the search speed, as indicated in the on-screen display. Once you have selected the desired speed, release the button and the disc will continue to search at fast speed. To resume normal playback speed, press the Play Button #. 9 Open/Close Button: Press this button to open or close the Disc Tray 5. ) Skip Forward/Reverse: Press this button to move forward or backward through the music tracks on a CD disc or the chapters on a DVD disc. ! Stop: Press this button once to place the disc in the Resume mode, which means that playback will stop, but as long as the tray is not opened or the disc changed, DVD playback will continue from the same point on the disc when the Play button is pressed again. Resume will also work if the unit was turned off. To stop a disc and have play start from the beginning, press the button twice. @ Pause: Press this button to momentarily pause playback. To resume playback, press the Play Button #. If a DVD is playing, action will freeze and a still picture will be displayed when this button is pressed. # Play: Press the button to playback, or to resume playback after the Pause Button @ has been pressed. $ Information Display: This display contains a variety of indicators that provide information about the status of the DVD 50 and the disc currently playing. % Display Dim: Press this button to adjust the brightness of the Information Display by 50% or to turn the display off completely in the following order: FULL BRIGHTNESS ➔ HALF BRIGHTNESS ➔ OFF ➔ FULL BRIGHTNESS. ^ Remote Sensor: The sensor that receives the infrared commands from the remote control is behind this area. Do not cover or obscure this part of the front panel, in order to avoid a malfunction with the remote. 6 FRONT PANEL CONTROLS
-
 1
1 -
 2
2 -
 3
3 -
 4
4 -
 5
5 -
 6
6 -
 7
7 -
 8
8 -
 9
9 -
 10
10 -
 11
11 -
 12
12 -
13
-
14
-
15
-
16
-
17
-
18
-
19
-
20
-
21
-
22
-
23
-
24
-
25
-
26
-
27
-
28
-
29
-
30
-
31
-
32
-
33
-
34
-
35
-
36
-
37
-
38
-
39
-
40
 |
 |
