Harman Kardon DVD 50 Owners Manual - Page 9
Rear Panel Connections - harman kardon
 |
View all Harman Kardon DVD 50 manuals
Add to My Manuals
Save this manual to your list of manuals |
Page 9 highlights
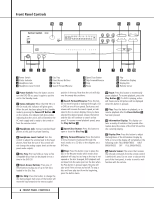
Rear Panel Connections ª • ¶ § AC INPUT 100-240VAC 50/60Hz 18W Manufactured under license from Dolby Laboratories. "Dolby" ,"Pro Logic", and the double-D symbol are trademarks of Dolby Laboratories. Confidential unpublished works. Copyright 1992-1997 Dolby Laboratories. All rights reserved. "DTS" and "DTS Digital Out" are trademarks of Digital Theater Systems, Inc. Appartus Claims of U.S. Patent Nos. 4,631,603, 4,577,216, 4,819,098, and 4,907,093 licensed for limited viewing uses only. WARNING : SHOCK HAZARD-DO NOT OPEN! AVERTISSEMENT : RISQUE DE CHOC ELECTRIQUE-NE PAS OUVRIR! CAUTION RISK OF ELECTRIC SHOCK. DO NOT OPEN. DIGITAL OUT OPTICAL COAXIAL VIDEO OUT PROGRESSIVE/COMPONENT SCAN VIDEO S-VIDEO Pr CLASS 1 LASER PRODUCT KLASSE 1 LASER PRODUKT LUOKAN 1 LASER LAITE KLASS 1 LASER APPARAT CLASSE 1 PRODUIT LASER REMOTE AUDIO OUT CONTROL IN L OUT R Pb COMPOSITE Y MODEL NO. DVD 50 harman / kardon NORTHRIDGE CALIFORNIA 91329, USA MADE IN KOREA CAUTION VISIBLE AND INVISIBLE LASER RADIATION WHEN OPEN. DO NOT STARE INTO BEAM OR VIEW DIRECTLY WITH OPTICAL INSTRUMENTS. Manufactured/Date De Fab.: Serial No./No. De Series THIS PRODUCT COMPLIES WITH APPLICABLE REQUIREMENT OF THE DHHS PERFORMANCE STANDARD FOR LASER PRODUCTS, 21 CFR SUBCHAPTER J. DHHS CODE : GV ¡ Remote Control Input ™ Remote Control Output £ Analog Audio Outputs ¢ Component Video Outputs ∞ Composite Video Output § S-Video Output ¶ Coaxial Digital Output • Optical Digital Output ª AC Power Cord ¡ Remote Control Input: Connect the output of a remote infrared sensor, or the remote control output of another compatible Harman Kardon product, to this jack. This will enable the remote control to operate even when the front panel Remote Sensor ^ is blocked. This jack may also be used with compatible IR remote control-based automation systems. ™ Remote Control Output: Connect this jack to the infrared (IR) input jack of another compatible Harman Kardon remote-controlled product to have the built-in Remote Sensor ^ on the DVD 50 provide IR signals to other compatible products. £ Analog Audio Outputs: Connect these jacks to an audio input on an A/V receiver or surround processor for analog audio playback. ¢ Component Video Outputs: These outputs carry the component video signals for connection to analog or digital display monitors with component video inputs. For standard analog TVs or projectors with inputs marked Y/Pr/Pb or Y/Cr/Cb, connect these outputs to the matching inputs. If you have a digital television that is compatible with high scan rate video, connect these jacks to the "HD Component" inputs. note that a change must be made to the setup menus in order to take advantage of the progressive scan circuitry. See page 22 for more information on progressive scan video. Note that these jacks should NOT be connected to standard composite video inputs. ∞ Composite Video Output: Connect this jack to the video input on a television or video projector, or to a video input on an A/V receiver or processor if you are using that type of device for video input switching. § S-Video Output: Connect this jack to the S-Video input on a television or video projector, or to an S-Video input on an A/V receiver or processor if you are using that type of device for S-Video input switching. ¶ Coaxial Digital Output: Connect this jack to the coaxial digital input of an A/V receiver or surround processor for Dolby Digital, DTS or PCM audio playback. NOTE: The coaxial digital output should only be connected to a digital input. Even though it is the same RCA-type connector as standard analog audio connections, DO NOT connect it to a conventional analog input jack. • Optical Digital Output: Connect this jack to the optical digital input of an A/V receiver or surround processor for Dolby Digital, DTS or PCM audio playback. ª AC Power Cord: Connect this plug to an AC outlet. If the outlet is controlled by a switch, make certain that it is in the ON position. 9 REAR PANEL CONNECTIONS
-
 1
1 -
2
-
3
-
 4
4 -
 5
5 -
 6
6 -
 7
7 -
 8
8 -
 9
9 -
 10
10 -
 11
11 -
 12
12 -
 13
13 -
 14
14 -
15
-
16
-
17
-
18
-
19
-
20
-
21
-
22
-
23
-
24
-
25
-
26
-
27
-
28
-
29
-
30
-
31
-
32
-
33
-
34
-
35
-
36
-
37
-
38
-
39
-
40
 |
 |
