Harman Kardon HD100-Z Owners Manual - Page 5
Connections
 |
View all Harman Kardon HD100-Z manuals
Add to My Manuals
Save this manual to your list of manuals |
Page 5 highlights
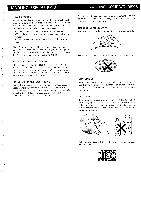
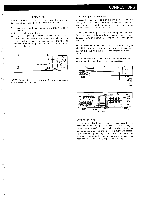
IMPORTANT Before plugging the unit in, be sure to remove the transportation screws and holders on the bottom of the unit. 1. Place a cloth under the unit in order to prevent it from being scratched. 2. Turn the unit upside down. 3. Remove the three transportation screws with a screw driver. Then, turn each of the three holders clockwise or counterclockwise, match the catch portion of the holder to the hole of the bottom plate and extract it, as shown in the illustration below. 0 0 CONNECTIONS Connecting to a Receiver Conncet the "OUTPUT" jacks of this unit to the CD or AUX input jacks of the receiver by using the enclosed connection wire. Do not connect the output of the CD player to the PHONO input jacks of the receiver. Carefully connect the plugs to the left and right channel jacks. Push the plugs in all the way. Poor seating of the plugs tends to cause hum or intermittent sound and may damage the speakers. NOTE: While you are connecting this unit to the rest of your high fidelity system, please unplug the power cord, disconnecting not only this unit but all the components from the AC outlet. Do not interwind the connection wires with the power cord. If interwound, the sound quality may be degraded. 0 NOTE: Be sure to tighten screws by the reverse procedure before transporting the unit. To AC Outlet O O a e J AI ooeo lnil 000® Receiver Volume Setting The digital recording format of compact discs enable them to accurately reproduce all peaks contained in the music signals without noise. Therefore, if attempting to adjust the volume setting as you would for analog record players and cassette tape recorders, by listening to the noise level, the sudden unexpected surge in the receiver power may harm your speakers. Avoid excessively high volume setting. 4
-
 1
1 -
 2
2 -
 3
3 -
 4
4 -
 5
5 -
 6
6 -
 7
7 -
 8
8 -
 9
9
 |
 |
