Harman Kardon T65C Owners Manual - Page 4
Assembling, Turntable
 |
View all Harman Kardon T65C manuals
Add to My Manuals
Save this manual to your list of manuals |
Page 4 highlights
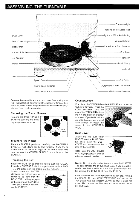
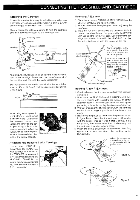
ASSEMBLING THE TURNTABLE Dust Cover Dust Cover Hinge Platter Mat Center Spindle 45 Adaptor '. . Platter Foot . ...... . . Speed Control Quartz Lock Indicator I Quartz Lock Button Counterweight Tracking Force Scale Ring -Weight and Wire Anti-skating Armrest/Clamp Capacitance Trim Selector Cue Lever Tonearm Headshell Clamp Headshell Cut Button \ Auto/Manual Arm Lift Button 33/45 Speed Selector Remove the turntable and the dust cover from their packing. The headshell, counterweight, dust cover hinges, disc stabilizer, and 45 RPM adaptor will be found within the polystyrene foam cushion packing. Removing the Transit Screws Remove the three TRANSIT SCREWS securing the floating suspension as shown. `' transit Screws Mounting the Platter Place the PLATTER gently and carefully over the CENTER SPINDLE. Push down gently and vertically. If you try to mount the PLATTER at an angle or use undue force, this can damage the CENTER SPINDLE or the hole in the PLATTER. Threading the Belt Rotate the PLATTER so that the hole is over the PULLEY. Extend the DRIVE BELT which is in position around the PLAT- TER, and place it in the groove on the PULLEY. Slowly rotate the PLATTER clockwise two or three turns to check to be sure that the Pulley DRIVE BELT positively engages in the groove on the PULLEY. Then, place the PLATTER MAT on the PLATTER. Drive Belt 3 Counterweight First clamp the TONEARM on the ARMREST and move the CUE lever forward. Thread the COUNTERWEIGHT onto the rear of the TONEARM by turning it in the direction of arrow as shown. if you find it will not go onto the arm, use a small alien wrench to loosen the screw in the COUNTERWEIGHT. Dust Cover Attach the two dust cover HINGES into the DUST COV- ER. Then, insert the DUST COVER into the sockets at the rear of the turntable. °•74.:,;„„ Note: Close the DUST COVER while playing records in order to minimize acoustic feedback. Note: Do not apply undue force to rotate the PLATTER. This can damage the DRIVE BELT. Also, if you do not intend to use the turntable for some time, particularly in winter, remove the DRIVE BELT from the PULLEY. If the turntable has to be transported by car, etc., remove the HEADSHELL and COUNTERWEIGHT and secure the TONEARM with the tonearm CLAMP so that it does not move. Also remove the PLATTER and reinstall the TRANSIT SCREWS.
-
 1
1 -
 2
2 -
 3
3 -
 4
4 -
 5
5 -
 6
6 -
 7
7 -
 8
8 -
 9
9 -
 10
10 -
11
-
12
 |
 |
