Harman Kardon T65C Owners Manual - Page 7
Adjusting, Level
 |
View all Harman Kardon T65C manuals
Add to My Manuals
Save this manual to your list of manuals |
Page 7 highlights
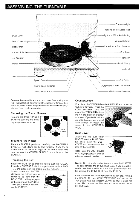
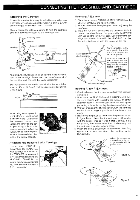
ADJUSTING THE LEVEL 6. Adjust the anti-skating by placing the ANTI-SKATING WIRE into the groove that corresponds to the specified stylus track- ing force. The anti- skating should be ad- 5g justed to the same Anti-skating_ Setting as the stylus wire tracking force. ANTI- SK/TING CONTROL NEEDLE is provided with calibration grooves. The first groove provides zero skating force. Each following groove adds 0.5 grams. Anti-skating Control Needle 7. Adjust the ANTI-SKATING WIRE HOLDER again so that the wire meets the TONEARM at a right angle. Adjust wire holder with the same procedure described in step 1. 90° With the DUST COVER closed, adjust the level of the turntable by turning the four FEET clockwise or counterclockwise. •C3t The turntable employs a Floating Suspension mechanism to which the PLATTER and the TONEARM are mounted. The level of the floating suspension is set by three LEVEL ADJUSTING SCREWS. This level is factory-set and you are not required to adjust it. When you set up the turntable, adjust the level of the turntable itself with the FEET as indicated. If floating suspension level is must be readjusted, adjust it with the DISC STABILIZER and the PLATTER MAT placed on the PLATTER: turn the LEVEL ADJUSTING / tevei / Adjusting Scie\,vs SCREWS so that the distance between the turntable surface and the bottom of the PLATTER is 4mm (5/32 inch). 6
-
 1
1 -
 2
2 -
 3
3 -
 4
4 -
 5
5 -
 6
6 -
 7
7 -
 8
8 -
 9
9 -
 10
10 -
 11
11 -
 12
12
 |
 |
