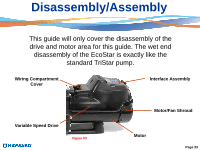
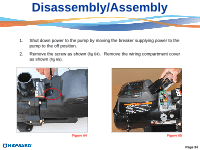
Hayward EcoStar Technical Guide - Page 40
Remove the fan Shroud as shown - parts
 |
View all Hayward EcoStar manuals
Add to My Manuals
Save this manual to your list of manuals |
Page 40 highlights
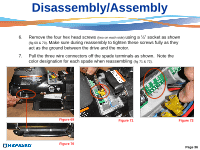
Disassembly/Assembly 11. Remove the two screws on each side of the fan shroud as shown (fig 75). 12. Remove the fan Shroud as shown (fig 76). Note: The fan shown (fig 73) comes as part of the motor assembly. It should also be noted that the fan shroud can be installed upside down. Square top section of shroud should always be on the top section of motor. Figure 75 Figure 76 Page 38
-
 1
1 -
2
-
3
-
4
-
5
-
6
-
7
-
8
-
9
-
10
-
11
-
12
-
13
-
14
-
15
-
16
-
17
-
18
-
19
-
20
-
21
-
22
-
23
-
24
-
25
-
26
-
27
-
28
-
29
-
30
-
31
-
32
-
33
-
34
-
 35
35 -
 36
36 -
 37
37 -
 38
38 -
 39
39 -
 40
40 -
 41
41 -
 42
42 -
 43
43 -
 44
44 -
 45
45 -
46
-
47
-
48
-
49
-
50
 |
 |

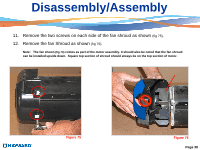
Disassembly/Assembly
11.
Remove the two screws on each side of the fan shroud as shown
(fig 75).
12.
Remove the fan Shroud as shown
(fig 76).
Note:
The fan shown
(fig 73)
comes as part of the motor assembly. It should also be noted that the fan shroud
can be installed upside down.
Square top section of shroud should always be on the top section of motor.
Figure 75
Figure 76
Page 38