Hayward HP21404TC HeatPro_Square_Manual_Rev_G_5148 - Page 11
Installation
 |
View all Hayward HP21404TC manuals
Add to My Manuals
Save this manual to your list of manuals |
Page 11 highlights
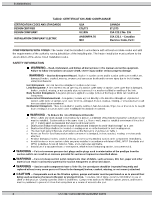
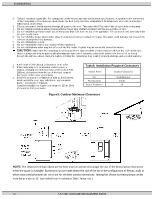
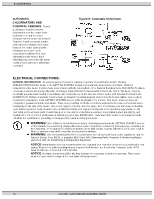
51300003301G INSTALLATION This manual contains instructions for installation, operation, maintenance, troubleshooting, and parts lists for the proper operation of the swimming pool heaters. Manufacturer strongly recommends that the installer read the manual before installing the swimming pool heater. If after reviewing the manual any questions remain unanswered, contact the factory or local representative. Following heater installation, the installer should leave all manuals with the consumer for future reference. NOTICE: The installation instructions are intended for the use of a qualified technician, specifically trained and experienced in the installation of this type of heating equipment. Some states or provinces require that installer be licensed. If this is the case in the state or province where heater is located, the contractor must be properly certified. SPRINKLER HEADS: The heater is designed to handle the wettest weather conditions that are typical of rain and high humidity. Sprinkler heads force high-pressure water into the unit from the side at an odd angle. Make sure there are no sprinkler heads near the heater that will spray on or into the unit. Many sprinkler systems are connected to a well system, whose water is high in minerals, Sulphur, salt and other aggressive contaminates, that will leave a buildup on the unit and electronics causing corrosion and shortens life. NOTICE: Damage from sprinkler interaction is not covered under the warranty agreement. Make sure that sprinklers are placed at a sufficient distance away so that normal wind will not carry the mist to the heat pump. NOTICE: If located in an oceanfront area, the heat pump should be placed out of direct spray of sand and salt. This will clog, damage, and corrode the unit. You may also consider protecting the unit by creating a physical barrier outside of the minimum clearances between the unit and the prevailing beachfront wind. Damage caused by sand or salt spray is not covered by the warranty. THE USE OF A POOL COVER IS RECOMMENDED. A pool cover reduces heat loss, conserves chemicals, lowers the load on filter systems and may provide a valuable safety feature EQUIPMENT INSPECTION: On receipt of the heater, inspect the heater carton(s) for damage. If any carton(s) is damaged, note it when signing for it. Remove the heater from the carton(s) inspect it and advise the carrier of any damages at once. NOTICE: Do not drop the heater from a pickup truck tailgate to the ground. This may damage the heater. NOTICE: The heat pump must not be tipped or transported on its side as evaporator "oil logging" may occur. MATERIALS NEEDED FOR INSTALLATION Installer is responsible for providing all external to unit electrical supplies. Extra hardware items may also be required for anchoring. Additional plumbing items needed: 2 inch PVC pipe Schedule 40 and 2 inch fittings and components as follows: 2 inch Isolation Valves qty(3) 2 inch Check Valve qty(1) 2 x 2 x 2 PVC Tee's qty(2) NOTICE: Pipe fittings such as reducers, tees, and elbows cause pressure to drop as water flows through them. Plan the plumbing layout carefully, using as few fittings as possible to connect your heat pump. See pad plumbing layout in the WATER PIPING section for further direction. LOCATING THE HEATER: The installation location of the heat pump is very important for its efficient operation. The heat pump will perform more efficiently when placed in direct sunlight with ample air intake and the avoidance of air re-circulation. Locate the pool heater in an area where its condensation will not result in damage to the area adjacent to the heater or a nearby structure. NOTICE: DO NOT install the heat pump in a fully enclosed space (i.e. garage, shed etc.). Such an installation will void its warranty All criteria given in the following sections reflect minimum clearances. However, each installation must also be evaluated on prevailing local conditions such as proximity and height of walls and public access areas. OUTDOOR INSTALLATION AND SERVICE CLEARANCES The heater must be installed outdoors such that the installation and service clearances shown in Table3 and Figure3 are maintained. Additional installation requirements are as listed; 1. Level surface for proper draining. USE ONLY GENUINE REPLACEMENT PARTS 11
-
 1
1 -
2
-
3
-
4
-
5
-
 6
6 -
 7
7 -
 8
8 -
 9
9 -
 10
10 -
 11
11 -
 12
12 -
 13
13 -
 14
14 -
 15
15 -
 16
16 -
17
-
18
-
19
-
20
-
21
-
22
-
23
-
24
-
25
-
26
-
27
-
28
-
29
-
30
-
31
 |
 |
