Hayward Salt & Swim Salt & Swim Owner's Manual - Page 7
the Cell Vessel.
 |
View all Hayward Salt & Swim manuals
Add to My Manuals
Save this manual to your list of manuals |
Page 7 highlights
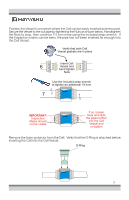
Position the Vessel in a manner where the Cell can be easily inserted and removed. Secure the Vessel to the cut pipe by tightening the Nuts as shown below. Handtighten the Nuts to stop, then continue 1/4 turn more using the included strap wrench. If the Inspection marks can be seen, the pipe has not been inserted far enough into the Cell Vessel. Verify that both Cell Vessel gaskets are in place Insert Cell 6 Vessel and hand tighten Nuts Use the included strap wrench to tighten an additional 1/4 turn 7 IMPORTANT: Inspection Marks should not be visible If so, loosen Nuts and slide the pipes further into the Cell Vessel and re-tighten Remove the foam protector from the Cell. Verify that the O-Ring is attached before inserting the Cell into the Cell Vessel. O-Ring 5
-
 1
1 -
 2
2 -
 3
3 -
 4
4 -
 5
5 -
 6
6 -
 7
7 -
 8
8 -
 9
9 -
 10
10 -
 11
11 -
 12
12 -
13
-
14
-
15
-
16
-
17
-
18
-
19
-
20
-
21
-
22
-
23
-
24
 |
 |
