HP 0x2x16 KVM Server Console Switch Maintenance and Service Guide - Page 27
Removal and replacement procedures, Safety considerations, Required tools
 |
View all HP 0x2x16 manuals
Add to My Manuals
Save this manual to your list of manuals |
Page 27 highlights
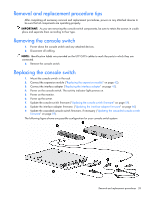
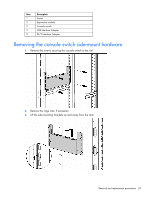
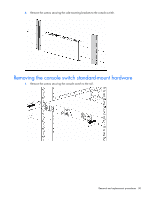
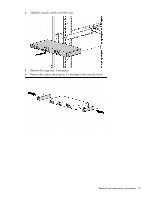
Removal and replacement procedures In this section Safety considerations...27 Required tools...27 Removal and replacement procedure tips 28 Removing the console switch ...28 Replacing the console switch ...28 Removing the console switch side-mount hardware 29 Removing the console switch standard-mount hardware 30 Removing the console switch cantilever-mount hardware 32 Replacing the console switch side-mount hardware 32 Replacing the console switch standard-mount hardware 35 Replacing the console switch cantilever-mount hardware 37 Removing the expansion module ...40 Replacing the expansion module...42 Removing and replacing the expansion module hardware 43 Removing the interface adapter...43 Replacing the interface adapter ...43 Safety considerations Important Safety Information Before servicing this product, read the Important Safety Information document provided with the console switch. To access some components and perform certain service procedures, you must perform one or both of the following procedures: • Power down the console switch and any attached devices. • Remove the console switch. If the rack environment, cabling configuration, or the console switch location in the rack creates awkward conditions, remove the console switch from the rack. Required tools The following tools are required for some procedures: • Phillips screwdriver • Cage nut insertion tool (included with your original rack hardware kit) Removal and replacement procedures 27
-
 1
1 -
2
-
3
-
4
-
5
-
6
-
7
-
8
-
9
-
10
-
11
-
12
-
13
-
14
-
15
-
16
-
17
-
18
-
19
-
20
-
21
-
 22
22 -
 23
23 -
 24
24 -
 25
25 -
 26
26 -
 27
27 -
 28
28 -
 29
29 -
 30
30 -
 31
31 -
 32
32 -
33
-
34
-
35
-
36
-
37
-
38
-
39
-
40
-
41
-
42
-
43
-
44
-
45
-
46
-
47
-
48
-
49
-
50
-
51
-
52
-
53
-
54
-
55
-
56
-
57
-
58
-
59
-
60
-
61
-
62
-
63
-
64
-
65
-
66
-
67
-
68
-
69
-
70
-
71
-
72
-
73
-
74
-
75
-
76
-
77
-
78
 |
 |
