HP 0x2x16 KVM Server Console Switch Maintenance and Service Guide - Page 63
HP IP Console Switch
 |
View all HP 0x2x16 manuals
Add to My Manuals
Save this manual to your list of manuals |
Page 63 highlights
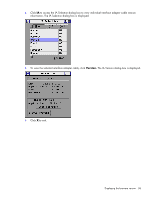
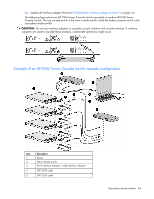
HP IP Console Switch CAUTION: Do not use interface adapters to cascade HP IP Console Switches with console switches. If interface adapters are used to cascade these products, undesirable operations might occur. CAUTION: While cascading console switches, be sure that the console switch is cascaded below the HP IP Console Switch. Undesirable operations might occur if these specific cascading sequences are not followed. The following HP IP Console Switches can be integrated into the console switch system. Compatible HP IP Console Switch models include: • 1 x 1 x 16 [PN: 262585 (B-21)] • 3 x 1 x 16 [PN: 262586 (B-21)] All HP IP Console Switches must be upgraded with SoftPaq firmware, version 2.1.1 or later, when cascaded with this product. Cascading an HP KVM Server Console Switch with another HP KVM Server Console Switch NOTE: To perform a firmware upgrade for a cascaded console switch and all attached interface adapters, you must locally connect the keyboard, monitor, and mouse to the cascaded console switch to access the local OSD. 1. Mount the console switches in the rack. 2. Locate a UTP CAT5 cable and connect one end to the server connection port ("Components" on page 71) on the cascaded console switch. 3. Connect the other end of that same UTP CAT5 cable to the RJ-45 port on the interface adapter. 4. Connect the interface adapter to the appropriate ports on the server. 5. Repeat steps 1 through 3 for any other servers to be added to this system. 6. Connect the local port KVM cable to the cascaded console switch. 7. Power on the cascaded console switch. 8. Power on the monitor. 9. Power up the server. 10. Update the cascaded console switch firmware. 11. Update all interface adapter firmware ("Updating the interface adapter firmware" on page 60). 12. Power off the cascaded console switch. 13. Power off the monitor. 14. Disconnect the local KVM cables from the cascaded console switch. 15. Connect the local port KVM cable to the main console switch. 16. Connect a UTP CAT5 cable to the server connection port ("Components" on page 71) on the main console switch. 17. Connect the other end of that same UTP CAT5 cable to the RJ-45 interface port ("Components" on page 71) on the cascaded console switch. 18. Repeat steps 15 and 16 for any other console switches to be added to this system. 19. Power on the console switches. 20. Power on the monitor. 21. Update the main console switch firmware. Cascading console switches 63
-
 1
1 -
2
-
3
-
4
-
5
-
6
-
7
-
8
-
9
-
10
-
11
-
12
-
13
-
14
-
15
-
16
-
17
-
18
-
19
-
20
-
21
-
22
-
23
-
24
-
25
-
26
-
27
-
28
-
29
-
30
-
31
-
32
-
33
-
34
-
35
-
36
-
37
-
38
-
39
-
40
-
41
-
42
-
43
-
44
-
45
-
46
-
47
-
48
-
49
-
50
-
51
-
52
-
53
-
54
-
55
-
56
-
57
-
 58
58 -
 59
59 -
 60
60 -
 61
61 -
 62
62 -
 63
63 -
 64
64 -
 65
65 -
 66
66 -
 67
67 -
 68
68 -
69
-
70
-
71
-
72
-
73
-
74
-
75
-
76
-
77
-
78
 |
 |
